By using the formula for the magnetic field of a wire that I derived in my preliminary data,
(1)
I was able to model systems composed of current-carrying wires.
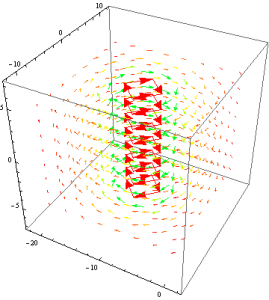
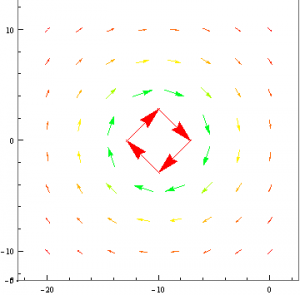
First I used the above equation and converted from Cylindrical to Cartesian coordinates. This was done because Mathematica will only plot vector fields in this form. I then plotted the resulting vector field due to a positive current.
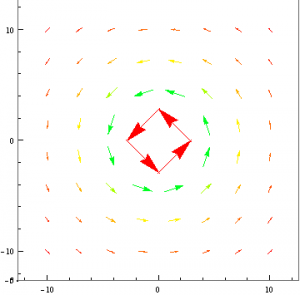
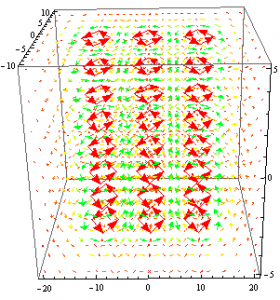
This is exactly what we would expect to see for the magnetic field of current carrying wire as illustrated by the well known “Right-Hand-Rule”. The field lines are more intense towards the center of the of the wire while they decrease exponentially as they move further away. They are also oriented counter-clockwise since a positive current was used. Suppose now that we were to switch the current to a negative value.
As expected, the field lines behave in the same way as before expect they oriented in a clockwise fashion.
Below I changed the viewpoint of the magnetic field such that only the x,y plane is shown. This helps to visualize the field because the field does not change along the z-axis.
Now that I successfully found the Magnetic Field for a current-carrying-wire, I could make the system more complicated by adding additional wires.
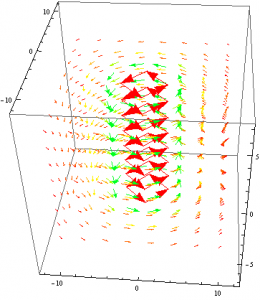
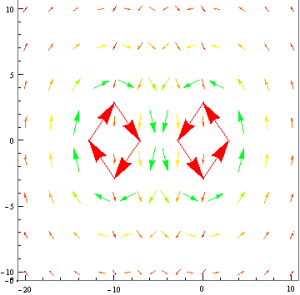
Suppose that some identical wires were placed parallel to each other at some distance.
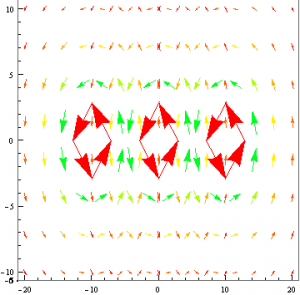
Again I changed the viewpoint such that only the x,y plane is seen.
As you can see in the above plots, the fields in between the wires have a certain type of symmetry. The field lines point in opposite directions and as they get closer to the midpoint between the to wires, they are of the same magnitude and cancel. It is safe to assume that as the distance between the wires approaches 0, the magnetic field between the wires will no longer exist.
Above and below the set of wires, the direction of the field lines due to each wire is the same: +x below the wire and -x above the wire. Coincidentally, this shares similar traits to the magnetic field due to a plane of current; the field lines above and below the plane will point either in the positive or negative x direction while there is no magnetic field anywhere along the plane itself. This shows that a plane of current can be viewed as a collection of parallel wires with no distance between them.
Suppose now that I had two wires parallel to each other but rather than having both wires having the same current, they are opposite to each other.
If Mathematica were able to superimpose the magnetic fields from the different wires, I suspect that the resulting field would resemble that of a magnetic dipole. However, I have not been able to find a function that will do this given two different vector fields and am limited by time to model a magnetic dipole using an alternative method. Nevertheless, the field that I was able to model does share some similarities to that of a dipole. The symmetry of the field lines are the same as those of a dipole. This is a result of two equal and opposite currents.
My final data builds significantly from the preliminary data sets. In that set, I derived the equations for the electric field of a sphere, cylinder and the approximation of an electric dipole. Those were:
Where the dipole was approximated as two point charges of opposite charge (i.e. two spheres of opposite charge).
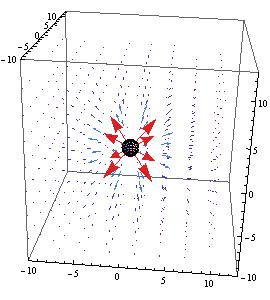
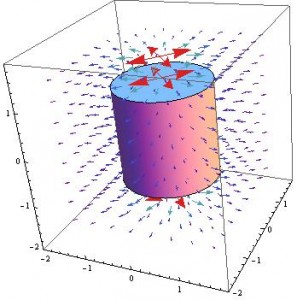
I went back to mathematica and overlaid a 3-D model of a small sphere on the previously plotted vector field of the electric field of a sphere, pictured below.
The same was done for a cylinder, both cases allowed for it to be seen how the geometries affected the electric fields.
For the electric dipole, an additional approach was taken to find the electric field. The equation for the electric potential of an “ideal” dipole is given as
For the purposes of simplification in Mathematica, the equation was re-written to absorb all the constants into one term:
Now to find an expression for the electric field, use the formula:
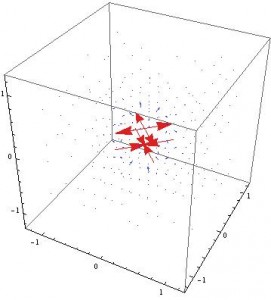
Which Mathematica can interpret and plot accordingly as:
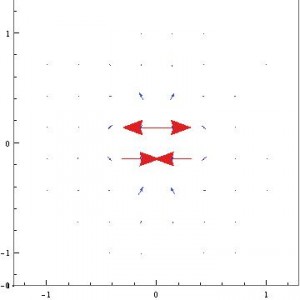
For a better view of how the vectors are interacting, look at this 2-D plot of the same field:
The code for the following models can be found here: Final Data
After talking with Professor Magnes after my preliminary results, I decided to first look at an RLC circuit with no voltage source, which is much simpler to model. Doing this allowed me to better understand the mechanism behind the circuitry and gain more experience with Mathematica as well.
After doing so, I returned to my progress with an RLC circuit with a voltage source and determined that the odd structural variations with the long-term structure were due to computational limitations of Mathematica (again, thanks to Professor Magnes for the suggestion). Since I had only developed the approximate solution, I went on to graphically solve for the full solution and see what the damping terms did to the solution.
Note: I included the findings from my preliminary data in this final data post (so it may seem redundant for a portion in the middle) since it was used in my final results as well. I figured it helps to have everything in one place for the reader.
RLC Circuit with no voltage source
Circuit Diagram and Mathematics
The first circuit we will examine is an RLC circuit with no voltage source. The initial potential difference is stored on the capacitor, but can not be recharged due to the lack of a voltage source. The three main components of this circuit are a resistor (R), an inductor (L), and a capacitor (C).
[Figure 1]
The differential equation that governs this circuit is
[1]
where L is the inductance, R is the resistance, C is the capacitance, I is the current through the circuit (which is the same at all places at one time since this is a series circuit), and t is the time.
Solving the Differential Equation
We can set arbitrary values for R, L, and C since they depend on the specific pieces of equipment themselves:
Inductance= 1 Henry
Resistance= 10 ohms
Capacitance= .1 farads
In Mathematica, the command to solve [1] looks like
[2]
which when solved, yields:
[3]
Completing the Full Solution via Graphical Solving
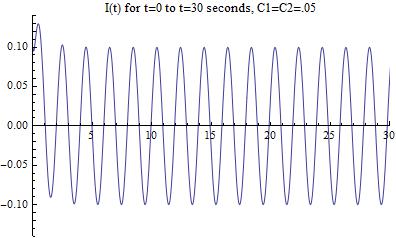
The two constants depend on the initial conditions of the circuit, which must satisfy Ohm’s Law of . So, the initial current in the circuit must be 0.1 amps. Using a graphical guess-and-check method in Mathematica, I determined the value of the two constants to be approximately 0.05 each, resulting in a solution that is given by
[4]
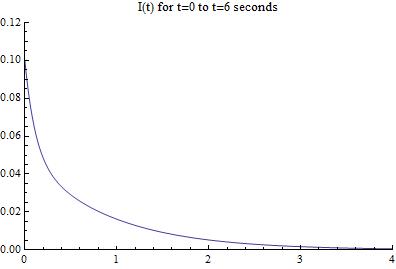
The plot of this equation gives us the current as a function of time, and looks like
[Figure 2]
This graph tells us that although the RLC circuit starts out with a current of 0.1 amps, it quickly dies down due to the lack of a voltage source and is not very interesting after a few seconds. Refer to the upcoming conclusion blog post for a bit more analysis.
Now, lets examine the RLC circuit with a voltage source (much more interesting!)
RLC Circuit with AC voltage source
Circuit Diagram and Mathematics
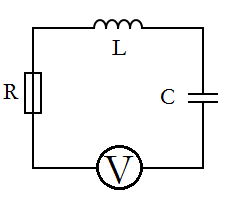
Now we can model an RLC circuit that consists of a capacitor, voltage source, resistor, and an inductor. To easily visualize this, I have constructed a basic circuit diagram (Figure 3).
(Figure 3)
The differential equation that governs this RLC circuit is given by
[5]
where L is the inductance, R is the resistance, C is the capacitance, I is the current, is the resonant angular frequency, is an initial value dependent on the voltage source, and t is the time. The inductance (L), resistance (R), and capacitance (C)are all determined by their respective circuit components, which are easily changed out for different ones. depends on the inductance and capacitance, and its value is given by
[6]
What we have left in terms of variables are current (I) and time (t). For our purposes, time is the independent variable, which leaves the current in the circuit at any time to be the dependent variable. Now that we have established this, we can solve our differential equation [5] for current as a function of time ().
Solving the Differential Equation
In order to solve [5], I will use the equation solving powers of Mathematica. In particular, the DSolve function is used. When plugged into Mathematica, the input line looks like:
[7]
We must set values for resistance, inductance, capacitance, and . For this solution, I chose the same values as the first circuit :
Inductance= 1 Henry
Resistance= 10 ohms
Capacitance= .1 farads
= 1 Volt
When the command is run with the above values set, Mathematica generates the general solution, which is:
[8]
First, lets make sure that this solution is reasonable. The known form of the solution to the equation for such a circuit is given by:
[9]
The form of our equation [8] seems to match up pretty nicely with this known solution [9]. Now, lets examine [8] in more detail.
Our solution [8] looks a little daunting, but we can break it down into its components. The first two terms have constants that depend on the initial current running through the system, i.e. when . However, we can approximate the equation by only looking at the last term, which is a superposition of sin and cosine functions along with a couple exponential terms thrown in. The reason that we can apply this approximation is that the first two terms “damp out” quickly, and thus have exponentially less of an effect as time progresses. The reader may still be curious to see how much of an effect these terms have on the current flowing through the system: to that I say don’t worry! After my initial approximation, I will solve for these constants and compare the two cases.
Approximate Solution and Graphs
For now, we will deal with the approximate solution, which is:
[10]
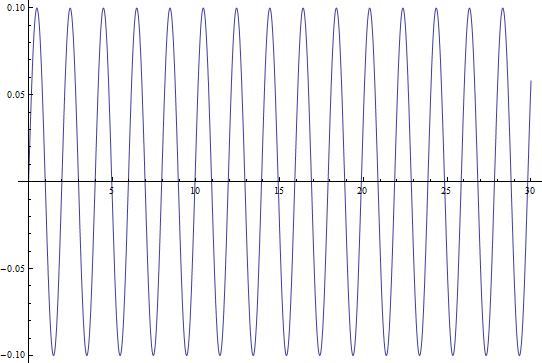
Now that we have this equation, we can use Mathematica to give us an idea of what the changing current looks like over a longer period of time. Figure 2 shows the current in the circuit as a function of time () plotted over a 30-second interval.
(Figure 4)
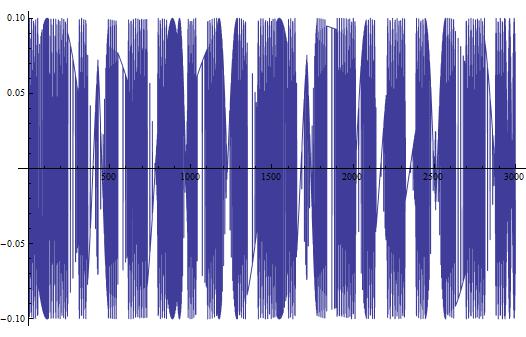
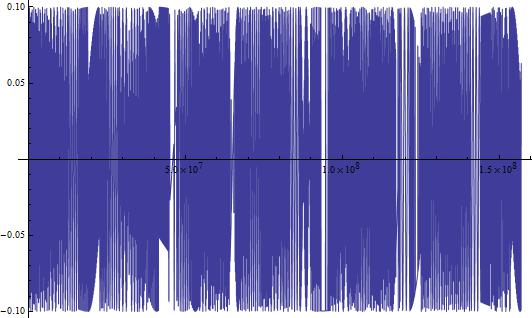
This looks like something we would expect! A sinusoidal wave that describes the changing current over time, just like our equations dictate. But, this is a short time-scale. What happens when we look at the changing current over a longer period of time? In Figure 3, I show the changing current over a longer time period (3000 seconds/50 minutes). In Figure 4, I repeat the process, but with the timescale being 5 years.
(Figure 5)
(Figure 6)
In both Figures 5 and 6, we see some very interesting long-term variations in the current. Why does this occur?
Computational Limits
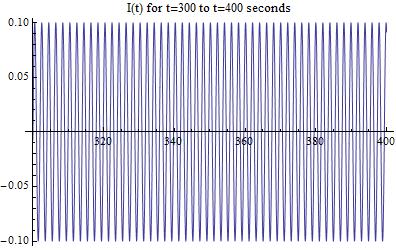
It is clear that Mathematica is displaying some odd variations that do not seem to have a set pattern. To investigate this and determine its cause, lets look closer at a range of time where the current seems to be irregular in the previous two figures. Specifically, lets look at the time scale between 300 and 400 seconds because it seems to have very strange behavior.
[Figure 7]
Looking at the graph above, we see that it looks completely normal! There are no strange variations and the current continues the predicted sinusoidal trend. This leads me to the conclusion that Mathematica has limitations that caused the irregular variations that we saw before, and that they do not actually exist in the data/circuit.
Completing the Full Solution via Graphical Solving
The next and final step in completing our model is accounting for the two initial terms that we left out. Lets take another look at the full equation.
[11]
We can see that they are exponential functions with a separate constant for each term. Solving for these constants quantitatively can prove to be difficult, so I will attempt to solve for them via a guess-and-check method using plots in Mathematica. I need to match the initial condition so that Ohm’s law is satisfied. So, must hold in the initial state. This means that the initial current must be 0.1 amps. Lets try a few values for and and figure out graphically what they should be.
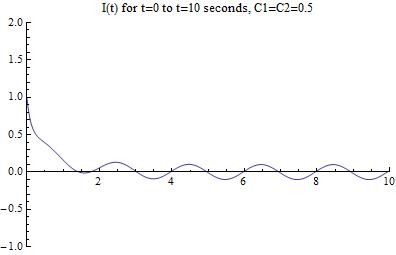
First, lets try values of 0.5 for each, resulting in the following equation:
[12]
The graph resulting from this equation is:
[Figure 8]
We can see that the initial current that this combination of constants is too high! It gives 1.0 amps, when we are looking for 0.1 amps.
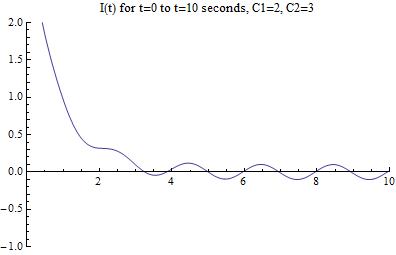
Lets try slightly higher values for each, as well as having different values for the two. The equation that results is:
[13]
Which produces the following graph:
[Figure 9]
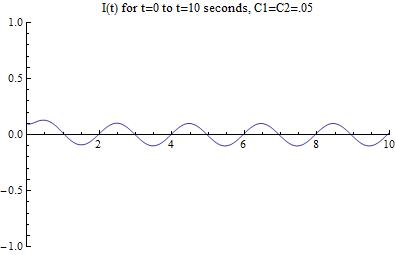
Looks like we have gone the wrong way with our guess! Lets try lowering both the constants to arrive at the correct graphical solution (in reality, this took me many more iterations of guessing and checking):
[14]
Which results in the following graph:
[Figure 10]
The Graphical Solution
Now that we have arrived at the correct graphical solution, lets change the scaling of the graph to better match that of [Figure 2], which was the initial approximation that did not take into account the two damping exponential terms.
[Figure 11]
My conclusion from this final data will follow in my next blog post.
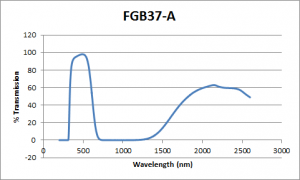
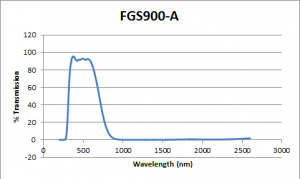
Now that we have the theory down, let’s apply convolution to actual data. The model here is two optical filters placed on top of each other. The light beam will go through both filters, and come out the other side somewhat convoluted. I have chosen two optical filters from thorlabs:
The plots of their transmission percentage as a function of wavelength are shown below:
Notice the first plot down does not tend to zero as the wavelength increases. My hypothetical light beam will have a wavelength of around 500 nm, so I cropped out the two peaks from each plot from 200 nm to 1000 nm. I also added 200 zeroes to each end extending my plots from 0 to 1200 nm. I did this so that the transformations would have as little noise as possible.
Convoluting the two functions requires using the exact same method described earlier, but instead using discrete Fourier transformation. My first attempt at convoluting these two plots failed. The convolution gave me complex solutions, and I need my solutions to be real. I tested the method on two Gaussian functions by extracting artificial data points through the function ‘Table’. The list of data presented was not in the same format as the imported optical filter data. Mathematica does not like Excel, and the data imported was in the format of a list of 1×1 matrices of each point [The data also needed to be one dimensional, so the x-axis represents data point number. Fortunately the amount of data points is equivalent to the range of wavelengths, so for all intents and purposes the x-axis represents wavelength]. To bypass this confusion I saved my data as a text file and imported the list as a list. For example:
a = Import[“C:\\Users\\Zeeve\\Desktop\\EM Project\\FGB37-A test.txt”, “List”]
The data is now real. It should also be noted that the default setting for the Fourier transform is not the convention for data analysis. This requires using the tool FourierParameter to change the range from {0,1} to {-1,1}.
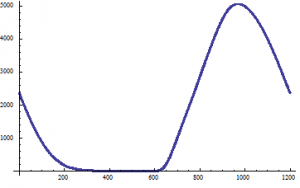
This is what my data looks like:
The y-axis is the transmission percentage, and the x-axis is the wavelength.
Notice the peak is around 1000 nm. It turns out that the inverse discrete Fourier transform of the product of two Fourier transforms of data is not the convolution of the data. It is actually the cyclic convolution of the two data sets. If you go back to the original definition, one of the functions in the integral of the convolution is shifted by some value x’.
Notice also the y-axis and how it extends to beyond 5000. This is because my normalization constant was wrong. The square root of 2 Pi in the convolution algorithm is a normalization constant for Gaussian functions. Correcting this was simple. I used the ‘Normalize’ function to normalize my Fourier transforms, and used the product of those results:
v = Normalize[m]*Normalize[n] instead of c=Sqrt[2 Pi] m*n
Correcting the former issue is trickier. I need to cycle the function back to peak at around the 500 mark. I admit I am not familiar with the mathematically correct method of correcting this error, so I ball-parked it. The peak needs to be around 500 nm since the original data peaked at around 500 nm. Cycling the curve backwards required outside help. I used the method described in the first answer here: http://mathematica.stackexchange.com/questions/33574/whats-the-correct-way-to-shift-zero-frequency-to-the-center-of-a-fourier-transf .
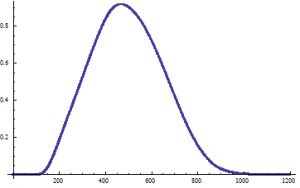
The method uses the function ‘RotateRight’ to cycle a range of data a certain amount of points. My range of points extends from 0 to 1200, and I cycled 400 points. Now I have a plot where the x-axis is pretty much the correct wavelength for its corresponding value (although the values are off by a factor of 100, which is fine since it is simply a normalization correction), which is the convolution of the two optical filters:
Again here the y-axis is the transmission percentage, and the x-axis is the wavelength. The y-axis is off by a scaling factor.
For a complete transcript of the convolution, please check out the Mathematica script:
For my conclusion I will discuss about deconvolution and some expansions on convolution.
Note: If the files do not work for you, I have uploaded all of my files to Google Drive which can be accessed in the conclusion. The concerning files are the Mathematica script ‘Optical Filters’, and the two text files ‘FGS900-A test’ and ‘FGB37-A test’.
NOTE: some of the equations are too long to render fully. To see them in their entirety, either open the image in a new window or see the mathematica file
Force on the slug
In the preliminary data, an equation for the force in a railgun was calculated assuming a constant current in the system. This was:
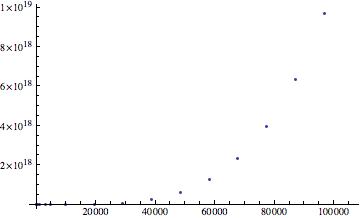
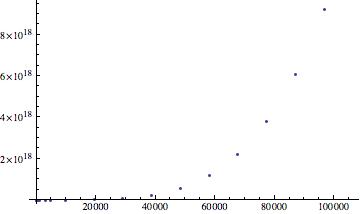
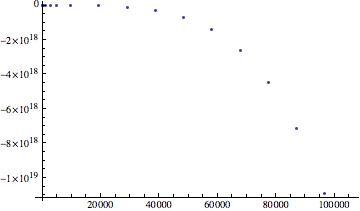
Where J is substituted for the I, because mathematica will not accept I for some strange reason. However, this is entirely inaccurate and essentially useless, as the current is almost never constant in time for a railgun. The graph does show, however, that for very small values of L, the force is small. This means that the slug must move into the loop far enough to experience a force before the current dissipates. Happily however, from the equation for the force calculated earlier, we can now find the total force on the system as a function of time using the equation of total current as calculated by Elias Kim.
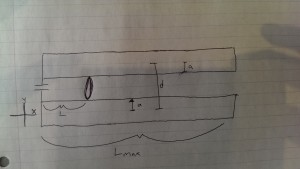
Where L is the instantaneous length of the loop along the rails, W is the rail separation (center to center), a is the radius of the rails, A is the cross sectional area of the rails, Qo is the initial charge in the capacitor, rho is the resistivity of the rails, v is the velocity, and C is the capacitance of the capacitor. We will then use this derived equation to solve for the force in two theoretical examples and provide simulations of the force as functions of time for each. For a small railgun, where a=.009, W=.03, C=450*10^-5 and Subscript[Q, 0]=1.8 we get
However, although this is still more accurate than before, it is still not a completely accurate measure, as t and L are still expressed independently from one another. however, this issue may not be resolved as the equations of motion are too complicated to attain precise equations of motion.
For the military railgun, however, the force is significantly greater, with a C=1.5 farads, Qo=10000, W=.8, and A=.01 additionally, the logarithmic terms were solved for to be inside of a range of values, which were then plotted as the variable k. Additionally, it should be noted that the values of the capacitance and charge are derived assuming a 100% conversion between energy stored in a capacitor and kinetic energy. The resistivity was plotted to be at a minimum that of Aluminum.
These measures of force are significantly more accurate than the theoretical version shown earlier in the data. The reason for this is that aside from the previous issue of L and t still being unrelated, this graph demonstrates the correct behavior for this system. We can manipulate the values of L however, and can see a clear trend in the force as a function of time in the above manipulation. Upon firing, the force quickly reaches a maximum as both the loop becomes large enough and the current still is present in sufficient quantity to provide efficient acceleration, however, as time goes and the loop size becomes larger, this term then collapses to be insignificant. That being said, it is clear that even a small system can accelerate objects to incredible velocity. Additionally, the resistance in the circuit must be accounted for as it has a tremendous impact on the graph of the force.
By combining and altering our manipulations of the equations given above, a clear trend in the force appears. Most likely, the force will resemble an overdamped wave, as seen in classical oscillations and EM waves. This means the force will reach a maximum, then exponentially decrease until the slug leaves the rails.
Finally, by analyzing these examples and the general equations of force it is clear that there is an ideal set of dimensions for a given system to maximize the force upon the slug. If each value falls outside the ideal range, the force will quickly decline by several magnitudes from the maximum possible force.
The Inductance Gradient
Remember the force can also be given as
The other way to measure the force experienced by the slug in a railgun is using the inductance gradient, L’, for the railgun, by which you can find the optimal measures for a given system. The inductance gradient is measured in microhenries per meter, accounting for the Mu term of the force. For most cases, this value is calculated experimentally, however, for a miniscale railgun, the method of Lagrangian optimization. The object of this method is to minimize the value of the goal function,
The minimum of G is also proven to be the point of inflection in the P function. found using the second, series term of the P function. Eventually, this will form a regression, which can be evaluated using a system of equations to find the most efficient rail dimensions for a given system.
Where Jmax] is the maximum tolerable current density in the rails, and Lambda is an aribitrary constant. The Jmateral value is derived from the maximum tolerable current density of a copper cable (it comes from the material used in the system). The h, z and w, values are the dimensions of the rails. Jmax] is different from Jmaterial] because the current, attempting to take the shortest path through the system, will cluster in the corners between the rails and the slug.
Energy in a railgun
The most effective means to approximate the energy in the railgun is to use the capacitance and charge in the capacitor bank. Although this is extremely inaccurate while measuring the actual velocity and energy of the slug following firing of the system, it is an effective means to calculate the various constants going into the force. The muzzle energy can be calculated by measuring the kinetic energy of the slug following its expulsion from the loop, from this, it is possible to calculate the fraction of energy lost thermodynamically and frictionally in the system as discussed in the preliminary data. The energy in a capacitor is defined as:
The kinetic energy of any object is defined classically as:
Using this we can theoretically calculate the efficiency of both our large and small railgun systems. For the small system, where 10 400V, 450 microfarad capacitors are wired in parallel, C=4500 microfarads, V=4000 V, the mass is 3.6 grams and the muzzle velocity was around 700 m/s. This gives the following values:
For the small scale design, the system achieved a 25% efficiency in the transfer of energy. Although this appears to be a low efficiency, a standard firearm usually has an efficiency between 20-40%, and this is an extremely inefficient design for a railgun. The military, in their system tested in 2013, for which we modeled the forces earlier, the kinetic energy was given to be 33MJ however, due to the fact that the precise specifications of the capacitors are classified, we cannot effectively measure the efficiency of the system. Their efficiency is most likely higher, probably around 60%. The reason for this is that for high efficiency designs, the slug design and rail geometry changes significantly. We have modeled the military design as a square barreled launch system, with rails on either horizontal side. However, it is likely that the real geometry is different, to increase the efficiency of the discharge, as well as reduce the inevitable wear caused by heat. Additionally, rather than routing the current through the slug, through a gap all the while dealing with high resistances and thermodynamic loss, the millitary system insulates the main body of the slug, while adding a material at the rear which when subjected to the initial current shock will become a plasma. This is a much more efficient design, and that, along with the ability to make the slug more aerodynamically efficient will increase the total efficiency of the system. Although we do not have the tools to fully explain the resistivity of the plasma (plasma physics is a graduate level study), the Spitzer resitivity of a plasma is given as:
*from http://silas.psfc.mit.edu/introplasma/ and Wikipedia, common knowledge to people who have taken plasma physics
Where Eta is the Spitzer resistivity, Z is ionization of nuclei, m is the electron mass, Curly Epsilon is the resistivity of free space, ln (Capital Lambda) is the Coulomb logarithm, k is Boltzmann’s constant and T is the temperature in kelvins. This value is presumed to significantly increase the efficiency. Additionally, the use of a plasma allows the system to be launched from rest, which as shown in the force approximations, significantly increases the efficiency of the system.
Acceleration on the slug
Using the derived equations of force found earlier, it is fairly simple to calculate the accelerations as functions of time in a railgun. Prior to showing, it ought to be noted that although the accelerations for even a small scale model are enormous, predicting in the hundreds of thousands, even tens of millions of metres per second squared, the slug only remains in the rails for periods best measured by microseconds, and the force dissipates even faster.
Given this understanding, the general form of the acceleration can be written as:
For our two examples, the smaller scale measure using a projectile weighing 3.6 grams and our large scale millitary model used a projectile mass of 3.2 kg. Subbing those in and generating manipulations, we arrive at:
for the small scale model, and:
For the military model. A is also the second time derivative of L as a function of T. So to find L(t), we can set up a differential using the acceleration to see if we can solve for theoretical values of velocity and position in the loop.
where Mu, m, W, A, Rho, a, A, C, and Qo are constant with regards to t, while L and t are time dependent. This information, however does not help us solve this differential, which is impossible to be solved for. The real plots of position and time are almost always calculated experimentally, as are the inductance gradients. This is the most effective means to solve the system practically, as to arrive at our data, several simplifying assumptions had to be made.
Conclusions
The basic principles surrounding railgun physics are an excellent teaching tool to model much of the classical mechanisms of Electromagnetism. However, beyond the conceptual standpoint, the mathematics to calculate the specific quantities in the system are extremely complex. Since most of the variables are dependent upon one another, the resultant mathematics quickly expands into a long equations which cannot be computed. However, using the equations we have modeled, several understandings can be reached. First, the materials used in the railgun must be highly efficient conductors. Second, the geometry of the rails in question is crucial, helping determine the current densities, magnetic fields, forces and inductance gradient. Third, the force and resultant acceleration, when derived experimentally, should resemble an overdamped oscillator, where the system starts at 0, reaches a peak, then experiences an exponential decay. Finally, it is clear that for any railgun, regardless of setup, it can be assumed that there will be an enormous discharge of energy in an extremely small timescale, with forces anywhere from the hundreds of thousands to millions of newtons in the first few nanoseconds/ microseconds, depending on the size of the system. This last conclusion actually is the basis of the sub-field of engineering called pulsed power, which has a variety of applications.
Railguns, and by extension pulsed power, have a wide variety of uses. There is the obvious military benefit, being able to shoot kilogram sized objects with enough kinetic energy to annihilate most naval vessels at ranges previously limited to missiles. However, this technology is not only useful for that application. In a more optimistic setting, these systems can be used to quickly and cheaply accelerate objects into space (non-living, as the forces experienced to accelerate organic matter to escape velocity would most likely result in immediate death), Finally, and perhaps most interestingly, railguns have been proposed as starter mechanisms for fusion reactors, specifically inertial confinement systems. Using a railgun, the idea is to collide plasmas at high velocity into a single locus, hopefully triggering a self sustaining fusion reaction. Fusion is, of course the holy grail of energy research, and the invention of a self sustaining reactor would be a significant leap in technological progress.
Finally, although we had planned to regroup and construct a railgun, we simply ran out of time as well as material issues. We sent a request for materials into the associated offices on campus, and they responded on May 2nd. As such, we were under enormous stress to undertake that portion of the project. Although we gathered most of the necessary materials, there were several issues with assembly. First, we had to use a flash circuit as the basis for our railgun, unfortunately, in order to expose all the necessary terminals, the circuit had to be exposed. Additionally, the specific camera we used always had charge within the capacitor. As such, I shocked myself, a lot. Following this issue, we discovered that although the base components were available on campus, wiring that was appropriate for the circuit was being used both in the electronics lab, and the physics department. We then had to cut most of the circuit. Finally, we managed to make a semi-functional railgun; however, the slug possessed too high of a resistivity, and was too massive. So there was no launch, this limited our project’s scope, as most of the values for the railgun’s dimensions must be determined experimentally, as there are simply too many variables to cope with.
However, it is still possible to understand most of the railgun system using theoretical derivations. It became clear that when trying to design a system to deliver huge quantities of energy in a short time railguns are the ideal system, assuming there has been careful consideration given to the systems dimensions.
The goal of my project was to explore a relatively well understood model for light scattered off spherical particles in the interstellar medium (ISM): Mie theory. Over the course of my investigations I switched my inquiry from attempting to derive and plot the asymmetry parameter, g, to plotting the extinction efficiency $Q_{ext}$. Note: I have included portions from my preliminary data post in order to maintain clarity and continuity. Portions from the preliminary post are still relevant and will remain likewise.
Final Reflections
An important question emerges in the study of scattered light in the interstellar medium (ISM). Why use the Mie solutions to Maxwell’s equations as opposed to the Rayleigh or Debye methods for modeling this scattering? As with many other methodological decisions, the answer lies in the physical parameters and observational requirements of the system that I’m trying to model. Optical observational data of extinction due to dust grains as a function of wavelength is denoted by: $A_\lambda$ and this observed data necessitates that the extinction be inversely proportional to wavelength:
$A_\lambda\propto\lambda{^-1}$
i.e. the wavelength must be approximately the size of the grains in question. Only with that dependency will the the model fit the data. Wavelength dependencies for Rayleigh and Debye scattering do not provide the necessary proportion.
Asymmetry parameter,g
As indicated in my preliminary data, modeling the Mie solutions to Maxwell’s equations for scattered light by spherical particles has proven tricky. Ultimately my attempt to plot the asymmetry parameter, g, was unsuccessful, but I was able to plot another grain property instead, the extinction coefficient $Q_{ext}$, versus dimensionless size parameter x (which I will explain in a later subsection of this post). My Mathematica code for the asymmetry work is attached at the bottom of this post as it was in the preliminary data post, but I updated the notebook since I commented on those results and have concluded that work with a derivation of the scattering coefficients $a_n$ and $b_n$.
Below I detail my journey through the asymmetry parameter, g, within of through Mathematica 9 and the processes that comprised those investigations. I find that detailing where I made it up through is important in the process of fixing my work in the future, in addition to being a pedagogically useful process (learning through mistakes!).
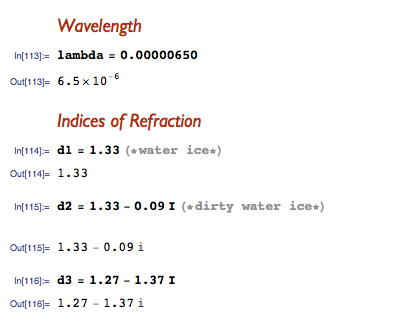
I made some simplifying (and yet physically relevant) assumptions. The spherical grains will be water ice with an index of refraction of n=1.33. The vacuum will have an index of refraction of n=1. Items [k, 1] and [k, 2] are coefficients for the imaginary portion of the indices of refraction. I have assumed a wavelength within the optical spectrum. [K, 1] – [K, 3] are the wave numbers for the different indices and included are the wavelengths necessary to derive those wave numbers. Lastly I have provided an arbitrary, placeholder grain radius.
I have also defined grain size parameters, necessary for the calculation of the coefficients $a_n$ and $b_n$, shown below.
Helpfully, Mathematica has Bessel functions built in. I used them in my exploration into modeling the asymmetry parameter. Dependent on interstellar grains properties, i.e. if it’s dielectric and thus has a real index of refraction or it has a complex index of refraction (impure water ice grain), the Bessel or Ricati-Bessel function will change.
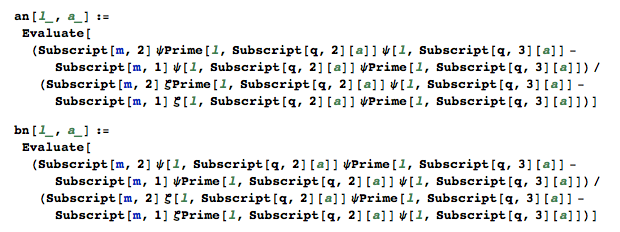
Lastly, here’s my code for the coefficients, $a_n$ and $b_n$. $\alpha$ and $\beta$ have been replaced with q, but those values are still the size parameters.
$Q_{ext}$ v. Size Parameter
In exploring scattering within the interstellar medium (ISM), it is possible to define an extinction efficiency $Q_{ext}$. This efficiency is dependent on index of refraction, m, and can be approximated by
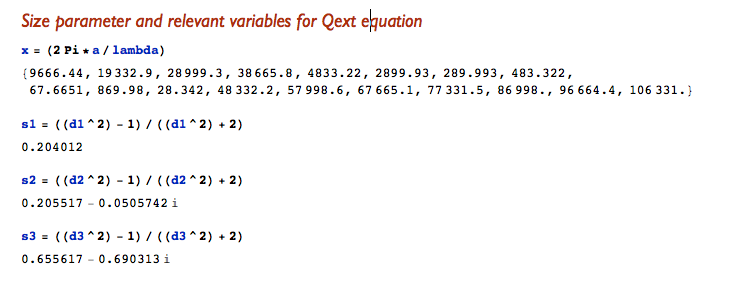
where $x=2\pia/\lambda$ and is the dimensionless size parameter, depending on grain radius, a.
In Mathematica I began by defining a wavelength (red light in microns) and the indices of refraction. Note that indices $m_2$ and $m_3$ (denoted by d2, d3) involve complex components. These components are necessary because of the nature of the grains, which in this case I assumed to be made of different ices.
Next I defined the size parameter, $x=2\pia/\lambda$ as well as interior terms for the $Q_{ext}\approxeq(8/3)x^4|{\frac{m^2-1}{m^2+2}}|^2$ equation; specifically, I define ${\frac{m^2-1}{m^2+2}}^2$.
Next I combined the previous bits of Mathematica code to get the actual values for $Q_{ext}$
and then applied a transpose on my data points (where x-values need to be the size parameter, x, and y-values need to be $Q_{ext}$) to be able to ListPlot the three $Q_{ext}$ v. size parameter plots. Transposes shown below!
Now I could create my plots! Note that the scales are arbitrary, what I am interested in is the behavior of the plots. This behavior dictates differences in ice grain extinction efficiencies dependent on size and index of refraction. Below are my three plots:
Qext v size parameter x (m = 1.33)
Qext v size parameter x (m = 1.33-0.09i)
Qext v size parameter x (m = 1.27-1.37i)
Conclusion
While the plots for Qext v size parameter x for m=1.33 and m=1.33-0.09i show a positive exponential trend, the final plot shows quite the opposite behavior. For grains with indices of refraction that have complex components, extinction efficiency versus size parameter plots should indicate a damping in the plot. So I do have some confusion with my plots. The third plot clearly indicates a variation in behavior when compared to the first two, but the second plot (of an extinction efficiency involving a complex index of refraction) should behave similarly to plot 3, not plot 1. This is a good transitioning point into where this work could go in the future – examining whether or not the extinction efficiency versus size parameter plots were indeed done correctly. Mathematica is lenient neither in syntax nor its learning curve! In the future it would also be useful to try and continue my work on the asymmetry parameter, but that might take a greater commitment than just fixing what may be incorrect with the extinction efficiency plots.
I have learned a great deal over the past few weeks about research and computational modeling. I have truly grown in respect to my appreciation for modeling and all the hiccups and hurdles that come with learning how to effectively and efficiently use Mathematica. While my explorations into the asymmetry parameter, g, were unsuccessful at producing a plot, I am very proud at being able to produce plots of extinction efficiency $Q_{ext}$ versus size parameter, x. The results, while not ideal, still reflect trends in the physical behavior of the system – in this case the light scattered by spherical particles in the interstellar medium (ISM).
Resources
Introduction to Electrodynamics, 4th ed. by David J. Griffiths
Physics of the Galaxy and Interstellar Matter by H. Scheffler and H. Elsässer
Interstellar Grains by N.C. Wickramasinghe
Physical Processes in the Interstellar Medium by Lyman Spitzer, Jr.
The scattering of light, and other electromagnetic radiation by Milton Kerker
Mathematica 9 Help Documentation Center (the most valuable resource!)
As my part of the project, I have successfully modeled how a railgun acts as a circuit. These results are interesting on their own, but throughout this post I will try to put them in context and show the various aspects of my results. In my preliminary data, I had derived the most general versions of the magnetic field of the rails, missing a good amount of necessary information. I modeled resistance, showing how it changes as the factors that compose it change. I will present the rest of my results by first introducing each necessary concept, and then showing how it is applied in one of two scenarios: a small-scale railgun and a military-scale railgun.
Current from the Capacitor Setup:
As noted before, the original current in the circuit comes from a bank of capacitors of varying degrees of strength. The capacitor has an initial charge:
(1)
This charge will decrease over time, where
(2)
As we can see, the charge in the capacitor decays at an exponential rate proportional to the resistance of the circuit and capacitance of the bank. The higher these values, the longer it will take to discharge.
Now we can see that the current is time derivative of Q,
(3)
The result of this derivative is:
(4)
We will use this term “o” to refer to the current from the capacitor. We will model two specific scenarios, a small scale rail gun that we found online, and more massive versions of the rail gun that the military might use. Below is the model for current due to power supply of a small scale version with rails of .2m spaced .03m apart, and cross sectional area .0009m^2 with 10 450 microfared capacitors connected in parallel to store maximum charge.
Here you can see that the current from the capacitor is massive at first. It then drops very immediately over a very short period of time. The majority of the current is gone after a little over a nano second. As you can see, adjusting the length of the rails also causes the current to drop, meaning that as the projectile moves and the length of the rails in the circuit lengthen, the current drops tremendously. The same is true with the resistivity; rails made of aluminum draw a great deal more current than do the rails made from steel, the opposite end of the resistivity spectrum.
Now we will model the most prototypical version of the rail gun proposed and worked on by the navy. According to our research, the rails of this gun will be up to 10m long, spaced .8 meters apart, a cross sectional area of .01m^2, and be supplied by capacitors storing 33 megajoules of energy. Energy Stored in a capacitor is defined as:
(5)
Which, knowing that 33 megajoules of energy is necessary, yields
(6)
Now we know that these values constrain each other. For example, let’s say we are working with 10,000 coulombs of charge. The corresponding value of C would then be 1.5 Farads. We will go forward with these parameters from here on out. We will also let the minimum value of resistivity correspond to that of iron, 9.71*10^-8, because it is extremely unrealistic to use aluminum.
Here we see a very similar result to the current from the capacitors of the smaller scale version, albeit on a much larger scale. Here, it is important to see that the current does not decay quite as quickly. This is remedied in the model by making the timescale larger, something that can be done in mathematica.
Induced Current
As we know, the magnetic field in the loop and the area of the loop change as current flows and as the projectile moves. This changes the magnetic flux phi through the loop and induces a potential difference (aka EMF) epsilon and hence an induced current, which we will refer to as u. We must first find the EMF of the system.
(7)
We must first define:
(8)
Now I will take the time derivative of \[Phi]. B is changing over time so:
(9)
B doesn’t expressly depend on t, so we will use the chain rule:
(10)
Here is where the math begins to get a little dicey, and the readers will have to trust what I am doing. I have posted the link to my mathematica documentation at the bottom of this page; if anybody would like a more detailed look at the derivations I have done, then they can look there. In the meantime, I have solved for the EMF of the loop following the procedure listed above:
(11)
We can see here that EMF is actually dependent on the NET current through the wire, which is problematic at first. However, as we discovered later on, we can account for this with relatively simple algebra. This logarithmic function, which increases as L decreases, is very important. However, its current form is far from elegant and from here on out we will refer to it as k. Dividing this result by R will give us the induced current (which we will refer to as U) and yields the following expression:
(12)
The total current (which we shall refer to as J) in this scenario is the original current coming from the capacitor minus the induced current caused by the changing magnetic flux and thus emf. We know this to be true from Lenz’s law, which shows us that the induced current lessens the overall current and thus the overall magnetic field and eventually force. Once again, the algebra for the derivation of J is in my documentation. If you would like to see it, it is attached at the bottom of the page. For now, the final result for J will suffice:
(13)
Once again, I would like to model this situation for two different scenarios, the first being a rail gun with a=.0009, d-.03, C=450*10^-5, and Subscript[Q, 0]=1.8.
As we can see from the model, an increase in velocity drastically decreases the current in the loop. This makes a lot of sense, because a higher velocity means a higher change in flux with respect to time, and thus a much greater inducted current in the opposite direction. This velocity term is something I would like to be able to solve for as a function of time in the future, but for now I will allow it to be a manipulated quantity.
As before, I will now model the total current for a military grade railgun.
Once again, we see a very similar result. I have set the range of velocities much higher for the military grade railgun. The military hopes to speed velocities as high as 2400 m/s, and I have obliged them in my model.
EMF Revisited
Now that we have come up with an expression for current, we can plug it back into the expression for EMF. Which we will then attempt to plot as a model of time and length. Plugging our expression for current yields:
(14)
Using the above equation, I plotted the EMF of the small railgun over time:
The maximum emf is about 200 volts, which makes sense in the context of this study. It is a sizeable, but not intrusive chunk of the Rail’s original potential difference.
As has been the trend, a plot of EMF vs. Time regarding the military railgun:
Back to the Magnetic Field:
Now, the final step in my part of the project is to model the magnetic field that is on the projectile. From here, John will be able to take a closer look at the forces and energy of the projectile. Plugging the total current into my derivation of magnetic field on the projectile:
(15)
Here, I have defined “b” as yet another logarithmic function, one that appears when integrating the magnetic field over the width of the loop/length of projectile. To see the specific derivations at work, refer to my Mathematica page.
Magnetic field of a small rail gun:
I once again plugged the parameters of the small rail gun into the above equation and created the following model:
Magnetic field of a military rail gun:
Doing the same for the military rail gun I created:
Though I will conclude my project much more thoroughly in my next post, I would like to make a few comments about my final results here. The currents of both railguns was incredibly high, at most many million amps. However, they only exist as such for extremely small periods of time, giving way to the idea of a “pulse” of power, firing the projectile. The analogous magnetic fields reveal similar information. For a very brief period of time, these railguns create magnetic fields stronger than the strongest continuous magnet in the world. However, this magnitude once again disappears almost instantaneously. Numerous factors go into creating extreme power and even more go into deciding when and how it is dispersed. My data provides a glimpse into one of the most fascinating parts of physics. The models are the most interesting part; I implore you to look at the mathematica documentation and play with them, as well as look at my derivations.
I have developed expressions for B, H, and M for the JET tokamak, and have plotted these fields. I began by deriving the expression for the magnetic field of such a system, approximating it as a toroidal solenoid. I followed Griffith’s example 5.10 to arrive at my expression. As mentioned previously, the expression for the magnetic field of this system is:
$\textbf{B(r)} = \frac{\mu_{0} N I}{2 \pi s} \hat{\phi}$.
As mentioned previously, I use the parameter values from the JET project, and will assume that $N = \alpha q(r)$. My first instinct (and the first value of alpha that I tried) was to set $\alpha$ at the circumference of the torus (17.9 m). As will be discussed below, this did not give reasonable results, and I revised the value of alpha accordingly.
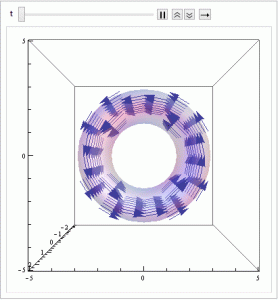
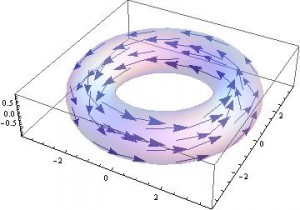
I defined a field (bfield) based on the expression I derived. This was in spherical coordinates since that was easiest to use with the Mathematica command TransformedField. I then transformed this to Cartesian coordinates, and used VectorPlot3D to plot the Cartesian vector field. This produced the circumferential field that I expected. It varies only with distance from the center of the torus ring, and curves around the torus.
The magnetic field, as expected, is purely circumferential and its direction alternates as the current changes. The torus has been superimposed on the field to indicate the region where the field is nonzero.
The torus from a different perspective.
I then repeated the same procedure for the Auxiliary field and magnetization, and both produced the fields I expected (both were the same shape but different magnitudes than the magnetic field and the magnetization was in the opposite direction). Magnetization was in the opposite direction of the magnetic field (as expected) because I used the magnetic susceptibility value of hydrogen (since JET used an H or DT plasma) and hydrogen is diamagnetic (as per Griffiths Table 6.1). A tacit assumption here is that this value does not change significantly when the gas is ionized into a plasma. I do not know what effect this would have on my results, but my results should be viewed with this fact in mind.
The Auxiliary field looks very similar to the magnetic field, and, in fact, differs only in that the vectors have different magnitudes.
Note that all of these fields are identically zero for all regions outside of the the volume of the torus. The values described by the vector field only hold for locations where $(R – r/2) \leq s \leq (R + r/2)$. Unfortunately, I was unable to find a way to force Mathematica to either make the vector field zero in this region or two suppress the vectors so that they did not display. Despite this, the field is correct, just over an incorrect range.
The magnetization in the torus, again, has the same shape as the other fields, but opposite sign.
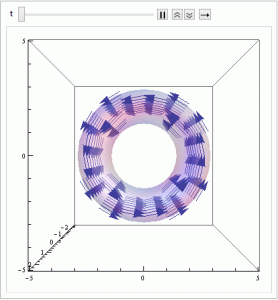
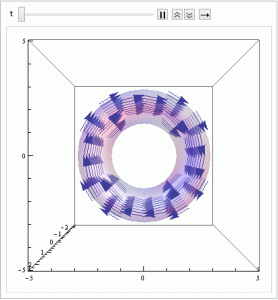
Now, realistically, the current in my expression for these quantities would not be constant, but would vary with time (as tokamaks operate as pulsed, AC devices). This means that $I = I_{0}\cos(\omega t)$. This assumes that that at time zero, the current amplitude is maximum (which is reasonable since the zero point is arbitrary as long as we look at the system sufficiently long after the tokamak operation has begun).
To account for this time dependence, I let $I = I_{0}$ and multiplied in the cosine term. I did this in the VectorPlot3D argument instead of in the definition of my field because the transform would not work with 4 variables. This should not affect the results. I did this for all three fields. As expected, the fields retain their shapes and the vectors alternate direction with current. An example follows, and the rest can be found in the Mathematica notebook:
After developing these models, I wanted to use my expression to find the magnetic field at the center of the torus volume. I would then compare this to the established value for JET’s magnetic field, and the difference would speak to the legitimacy of my model and the assumptions I made, specifically the proportionality constant, $\alpha$. The magnitude of the magnetic field as a function is radius was plotted, to emphasize the fact that it varies only with radius and is not constant throughout the torus (since it spans a range of radii).
The magnetic field strength as a function of radius, to illustrate the fact that the field does vary with radius, which is not necessarily clear from the vector fields. . The surface of the torus is included to illustrate the region with nonzero field.
For $\alpha = 17.9$, $B = 22.6$T. The established value is $B = 3.6$T. This is a percent error of over 500%. Since this value of alpha was simply a first guess to see how the model worked, this extremely high percent error should not be alarming. We can easily find a better alpha. Knowing what B should be, and the other constants, we can solve for alpha and get that it should take a value of $\alpha = 2.85$. This is very interesting because this means that $\alpha = R$ and that $N = \alpha q = R q = (2.85)(3) = 8.55$. A value of 8.55 for N means that there are only about 9 windings of the current around the solenoid. In Griffiths’ example, he specifies that we assume the windings to be “uniform and tight enough so that each turn can be considered a closed loop.” 8.55 turns around a circumference of 17.9 meters is probably not sufficiently tight. As such, this model has shown that is model is insufficient to describe the behavior of a tokamak (which is not surprising). As it is, this results indicate our model is imprecise. It also indicates that, perhaps, the current should be modeled as a set of smaller currents with tighter windings superimposed on each other. The next logical step in this research would be to examine what exactly the effects of this fallacious assumption are, and how best to address them.
I would also like to note that, while my original plan was to also model the electric field of this system. In my research I have not found any mention of the electric field of a tokamak reactor, only ever the magnetic field. I assume that this is because the magnetic field is the source of confinement, and thus more interesting. Since the electric field seems to be uninteresting to tokamak research, and since I have nothing against which to compare my model, I will not be modelling this field.
With this model (assuming that the windings were closed loops) changing q had a relatively small effect. According to the expression for magnetic field, changing q changer the magnitude of the field vectors (they are directly proportional). In my Mathematica animations of this, though, the change in vector magnitude was never actually noticeable. As such I conclude that, while the safety factor plays a significant role in tokamak design, due to the simplifications made in my model, it has very little effect.
While my results (that N is small and that q has a negligible effect) both indicate that my model is not sufficiently precise to model a tokamak, this does not indicate failure. The main thing that can be learned from this is that a tokamak’s magnetic field is much more complicated than that of a toroidal solenoid, as the current is at a large angle compared to the plane in which the torus lies as it travels around the torus. While my model is imprecise and does not take this into account, it can produce the appropriate values for magnetic field, but with a compromise.
The assumption that went into my model (Griffiths’) that the current loops were essentially closed meant that we assumed the current had only z an s components (and no phi component). The fact that N is so small relative to the circumference means that the current loops will be more slanted and will have a component in all three directions. Obviously, this means that the expression for magnetic field will be different. In the derivation, the fact that the current had no phi component meant that terms cancelled out, leaving us with a purely circumferential field. Clearly, in an actual tokamak, this is not the case. While it is unfortunate that my results showed my model to be insufficient for a robust model of a tokamak, it has been very valuable in that it has confirmed and emphasized the complexity of a tokamak magnetic system. It also puts the current state of fusion research in a very clear context – research has been going on since the middle of the last century, and yet no viable commercial fusion reactor has been developed. This seems to make sense considering the complexity of the systems.
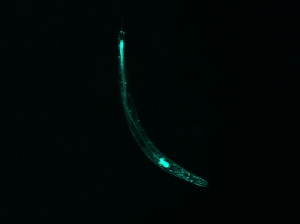
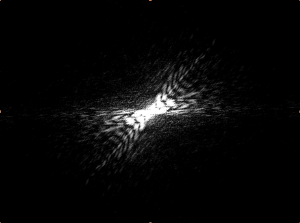
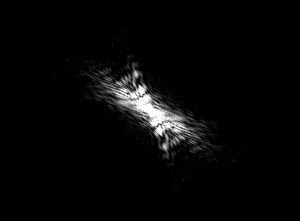
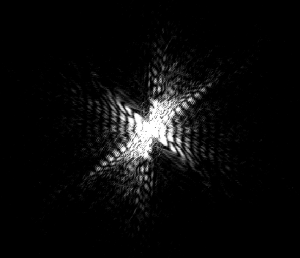
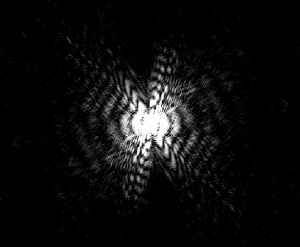
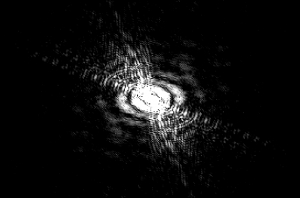
Listed below are five sets of data (3-7), two images each. On the left is the photograph of the fluorescing worm. To the right is its corresponding diffraction pattern, produced with Mathematica.
First, a few comments:
Notice that each worm shape contains a different symmetry (or lack of symmetry). However, every diffraction pattern is symmetrical. The two images tend to share some symmetrical qualities, as noted below each image.
These diffraction patterns are due to the fluorescing parts of the worm (GFP, or green fluorescing protein). I believe that because of my image manipulation (converting to grayscale and brightening the image significantly), the diffraction pattern is approximately due to the entire worm and not just the fluorescing parts.
On that note, I’d like to discuss the parameters I used for image manipulation and Fourier Transforming.
The Fourier Parameters I chose were {0, 1} . These are the default parameters when using the FT command on Mathematica. I chose them among the three most common by ruling out the other two: {-1, 1} is used for data analysis (which I was not doing), and {1, -1} is used for signal processing (also irrelevant to my project). My choice of parameters specified the conventions I wanted the program to use when applying the transform.
The command ImageAdjust [image, {a, b}] adjusts the contrast of the image by a and the brightness by b. For most of my images, I adjusted the contrast by the same amount, but changed the brightness differently for each photo depending on my judgement.
I divided the images by hand and reassembled them according to the image dimensions, rectangles of dimension {col/2, row/2} (where col = the number of pixels in each column of the image, and row = the same for each row). I could have use the command RotateRight, but I did not figure that out until after I developed this equally effective algorithm.
IMAGE 3
This image has axial symmetry perpendicular to the axial symmetry of the worm. The worm is mostly linear, and so is the diffraction.
Although this does not have an “inversion center” (the worm does not complete a loop), it is significantly less straight than the first few examples. Correspondingly, the diffraction pattern has an axial symmetry perpendicular to the “axis” of the worm. However, it splays out to a higher degree, indicating that the area of the pattern corresponds with the curvature of the worm.
This further backs up my hypothesis from image 5. The curvature of the worm is great and the area of the pattern is also large. However, this worm does have a sort of “inversion center.” The diffraction image has an eye in the center, which is different than all of the preceding images. The curvature of the worm greatly effects the produced image, which is not surprising, but the overall shape of the image changes dramatically. With more circular worms, an “eye” is formed in the center of the diffraction pattern, and the pattern here has both some rotational symmetry and axial symmetry. With straighter worms, the diffraction is much more linear, containing only axial symmetry.
The purpose of this project is to demonstrate the difference between theoretical descriptions/relationships of basic LC circuits and experimental values. This is also an exercise in developing a deeper understanding of the theoretical equations governing these relationships. I will record the voltage drop across various components in each circuit and plot them in comparison to the theoretically predicted values. In addition, I will try to answer questions such as “What are the probable causes for deviation from predicted values?”
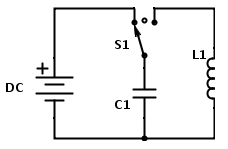
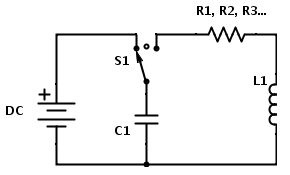
The first and most simple circuit I will work with is a basic LC circuit:
The DC power source charges the capacitor until it is discharged (via switch) into the right hand circuit. In theory the current should oscillate back and forth between the capacitor and inductor indefinitely if there was no resistance in the circuit. Actual experimental measurements should reveal some resistance due to the wires and components themselves. Below is the start of my derivations for the voltage across each components:
Kirchoff’s Loop Law states that the total voltage drop across the right hand circuit loop should be zero:
(1)
We know that the voltage drop across an inductor is equal to L(dI/dt) and across a capacitor is Q/C:
(2)
Which can be rewritten as
(3)
Leaving us with the general solution to this second order differential equation
(4)
The derivation of the above equations will be more thorough in future posts.
RLC circuit
This circuit is dampened with a resistor, and thus no longer resembles simple harmonic motion, but rather a damped harmonic oscillator.
Kirchoff’s Loop Law now reads
(5)
(6)
Which leaves us with a new second order differential equation
(7)
(8)
(9)
(10)
(11)
Eq. (11) is the second order differential equation governing the charge on the capacitor as a function of time and thus describing the voltage drop and current through the other components of the circuit.
Predictions
Theoretically I should expect the voltage across the components in an LC circuit to oscillate indefinitely according to simple harmonic motion. I expect that with a real circuit this would not be the case. A physical LC circuit would actually behave as if a resistor was in series with the two components, causing the amplitude of the oscillations to decrease over time. This is because the circuit parts, such as the wires connecting each component, are not ideal and have resistance.
I predict that a graph of the voltage difference over time for a given component will appear as a decaying sinusoidal wave. In other words it should resemble an dampled oscillation.
Methods
I will use a PicoScope digital oscilloscope to measure the voltage difference across the capacitor in the LC circuit. In this way I will both be able to see the voltage the capacitor is initially charged to as well as record the transition from a steady voltage to an oscillating voltage.
Sources, Resources, and Parts Needed
Equipment Needed:
DC power source, AC frequency generator, Oscilloscope, Computer, Multimeter
Parts Needed:
Breadboard; various values of resistors, capacitors, and inductors; switch; wires/alligator clips
Helpful Texts:
Physics for Scientists and Engineers: A Strategic Approach with Modern Physics (2nd ed.) by Randall D. Knight
Introduction to Electrodynamics (4th ed.) by David Griffiths
Data Reduction and Error Analysis for the Physical Sciences by Philip R. Bevington, D. Keith Robinson
Experimentation : an introduction to measurement theory and experiment design by D.C. Baird
Ordinary Differential Equations by Morris Tenenbaum and Harry Pollard
Class notes – Classical Mechanics (PHYS 210), Zosia Krusberg.
Week 1 – April 20th-26th. Acquire all equipment and parts needed for experiment: Talk to Larry Doe for parts and possibly a power source. Talk to David Rishell about an AC signal generator. Setup experiment in Mudd 216 with Prof. Magnes’ oscilloscope, DC power source, and multimeter.
Week 2 – April 27th-May 3rd. Derive equations to predict voltage drop across components to plot on top of collected data. Those equations being ΔV for LC, dampened LC (RLC), and AC driven RLC in series circuit. Collect data on voltage drops across LC and dampened LC circuit components. Plot data in mathematica.
Week 3 – May 4th-10th. Collect data on voltage drops over AC driven circuit. Predict resonance frequency. Define equations governing resonance frequency and find actual resonance frequency of circuit. Plot findings in mathematica. Consider sources of error or causes of deviation from predicted values on all three circuit configurations.
Week 4 – May 11th-17th. Finish data collection and additional exploration/inquiry. Create time dependent plots in mathematica to demonstrate projected vs experimental values.
Place/Logistics
Experimentation and data collection will occur in Professor Magnes’ lab in Mudd 216. Brian and Tewa generally work MWF and can be contacted for access to the lab.