Publishing a Google Presentation in Moodle

by Amy Laughlin

Upload a PowerPoint or Keynote slideshow to Google drive and embed it in your Moodle site, and any changes you make to your presentation will be immediately reflected on your Moodle site. Your students will be able to view the presentation directly from within Moodle.

Click the upload arrow in your Google Drive and then choose Files

Upload-Files

Make sure conversion is turned on:

Upload-Settings-Convert

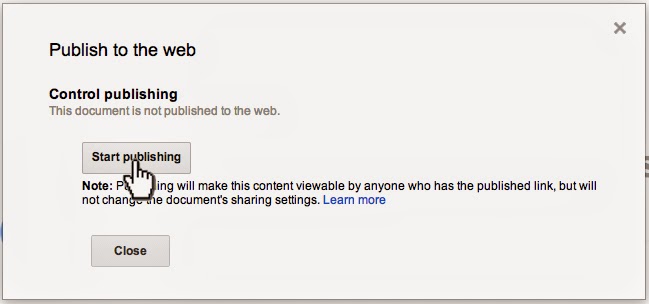
Once your presentation is uploaded, open it in your Google drive and click File > Publish to the Web.

File-Publish-to-the-Web

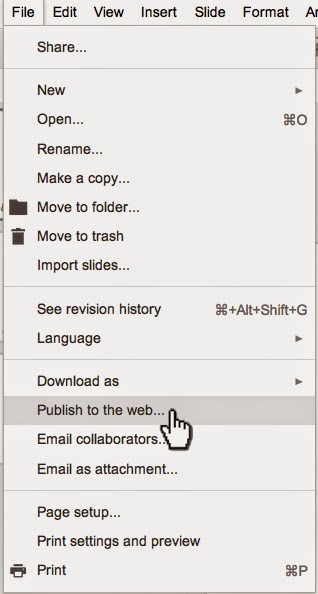
Then choose > Start publishing

Publish-to-the-Web

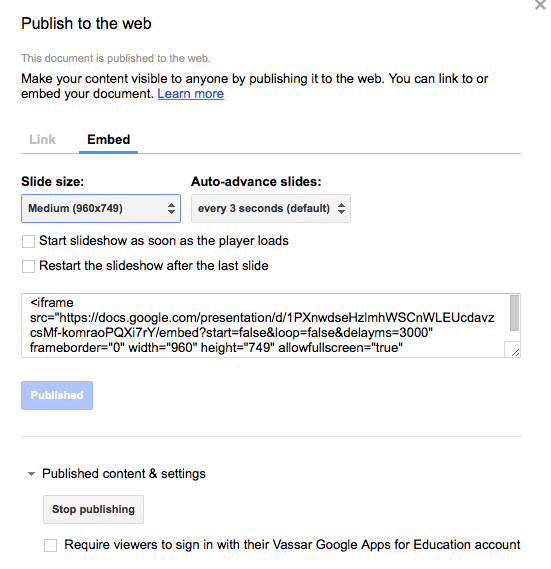
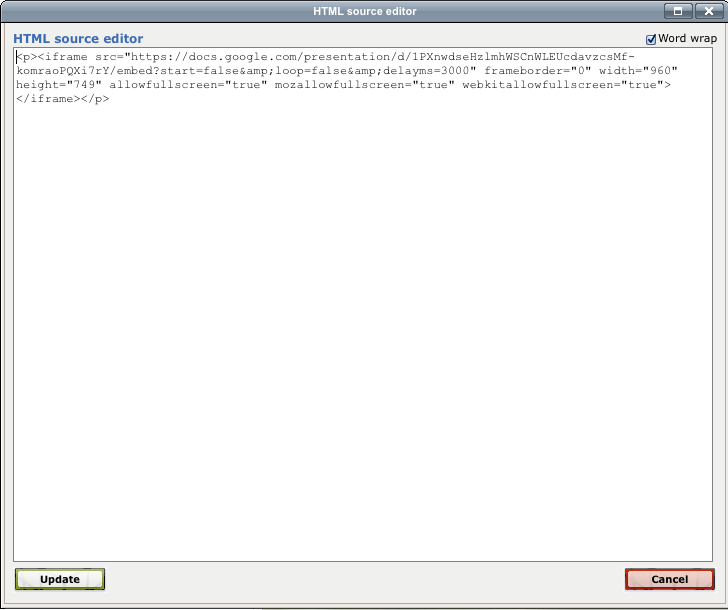
You will then see a dialog box that allows you to choose the size of your presentation and whether to Link or Embed. Choose the Embed tab, and copy the iframe source code.

Screen Shot 2014-10-20 at 2.33.16 PM

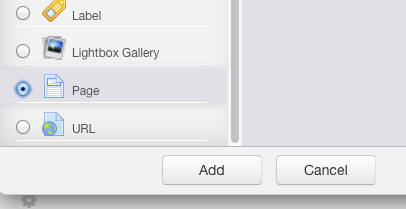
Now return to your Moodle site, turn editing on, and click on > Add an activity or resource.

Screen Shot 2014-10-20 at 2.41.48 PM

Choose > Add Page

Screen Shot 2014-10-20 at 2.42.28 PM

Add the name and description of your presentation. Make sure the toolbar toggle is turned on to reveal all the toolbar options. The toolbar toggle button is the first button in the upper left corner of the toolbar.

Screen Shot 2014-10-20 at 2.44.03 PM

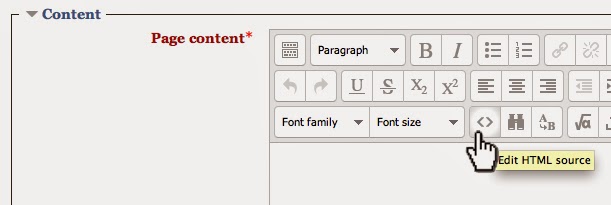
Scroll down to the Content section (below the page description).

Screen Shot 2014-10-20 at 2.56.52 PM

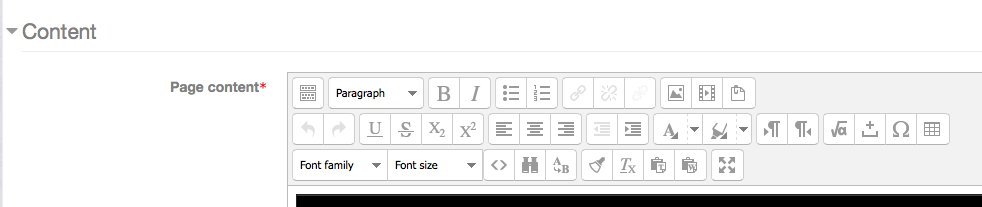
Click on the edit HTML source button (<>).

Screen Shot 2014-10-20 at 2.44.15 PM

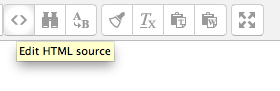
Paste in the Embed code that you copied from the Google Presentation Publishing page, then choose Update, to save.

Screen Shot 2014-10-20 at 3.04.04 PM

Click either the “Save and Return to Course” or “Save and Display” button at the bottom of the screen.

Your Google Presentation is now live and published to your Moodle site. You can edit and update your slideshow from your Google Drive and your changes will automatically be reflected in your Moodle site. Note that you may need to refresh your browser page in order to see the slideshow.

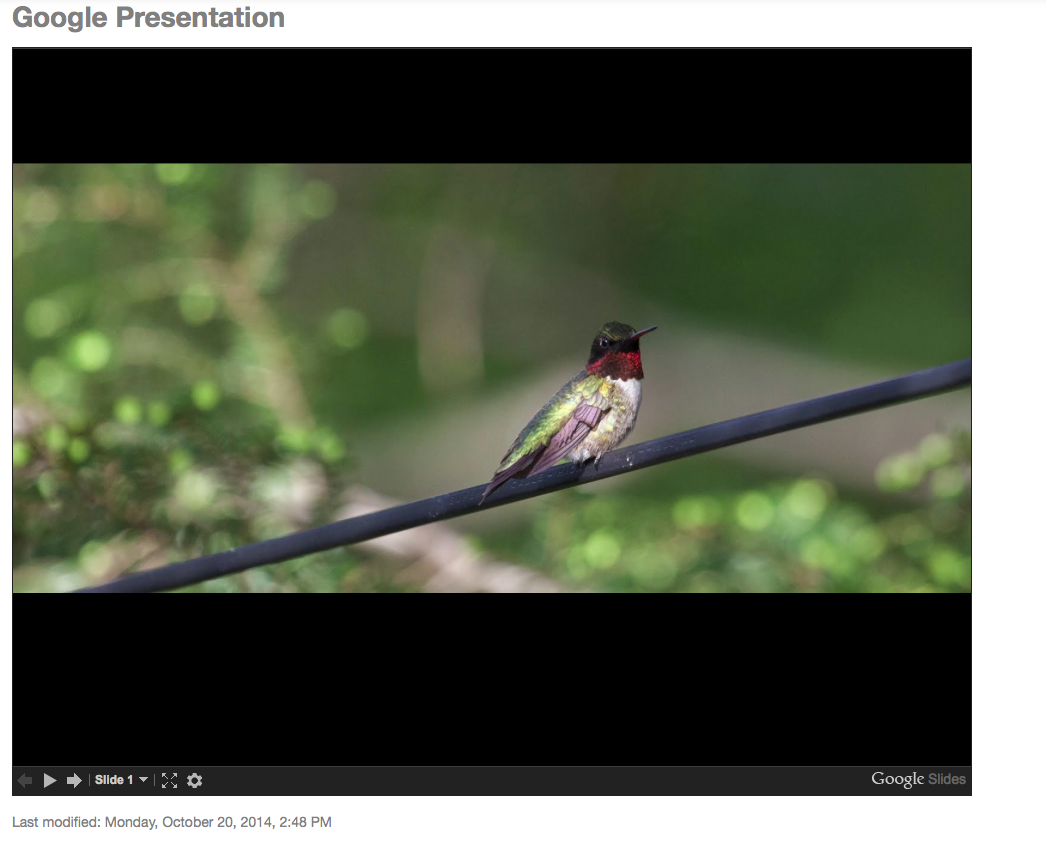
From your course page in Moodle, your presentation will appear like this:

Screen Shot 2014-10-20 at 3.12.14 PM

When your students click on the presentation file, a new Moodle screen will open displaying the slideshow:

Screen Shot 2014-10-20 at 3.12.35 PM

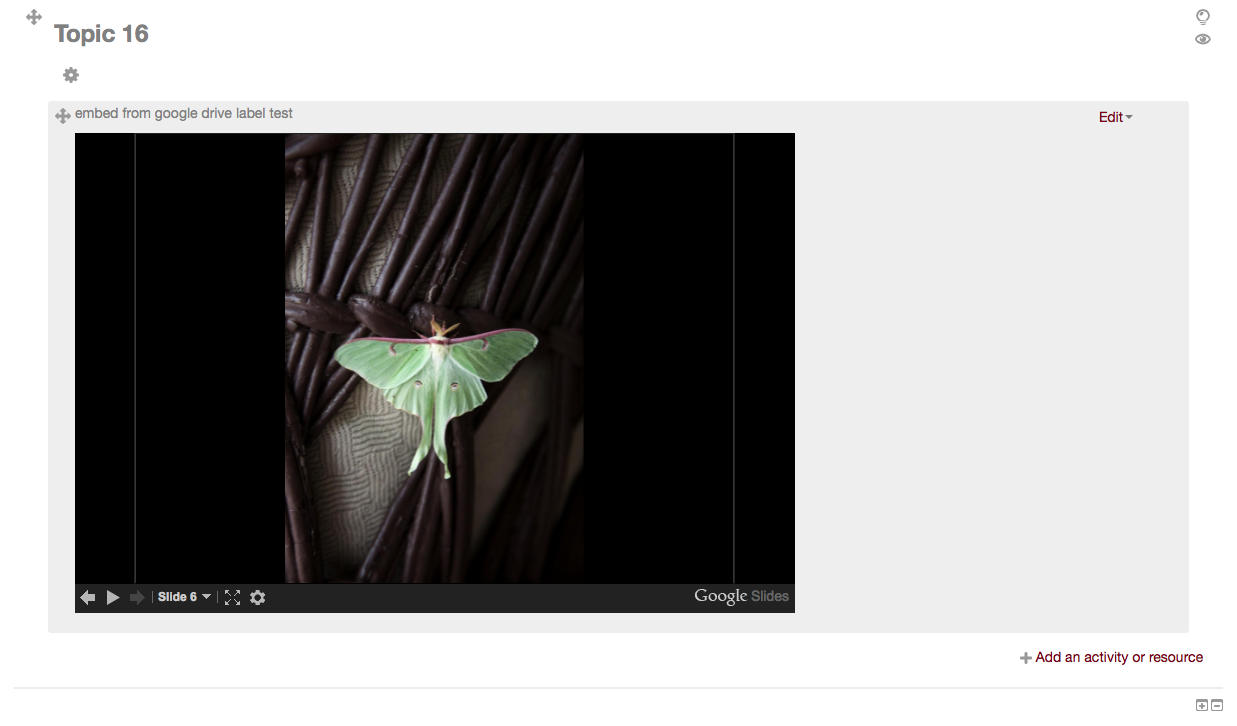
You may also embed your presentation as a Label instead of a Page in Moodle. When adding and Activity or Resource, choose Label instead of Page (all other steps remain the same), and your slideshow will be immediately visible from a section on your course page.

Screen Shot 2014-10-20 at 3.13.15 PM

 Works with video too.

If you want to embed video that is stored on your Google Drive you can copy the iframe code from the Google Drive Viewer. This is a great option if your video is not posted on YouTube or Vimeo.

Screen Shot 2014-10-21 at 12.42.30 PM

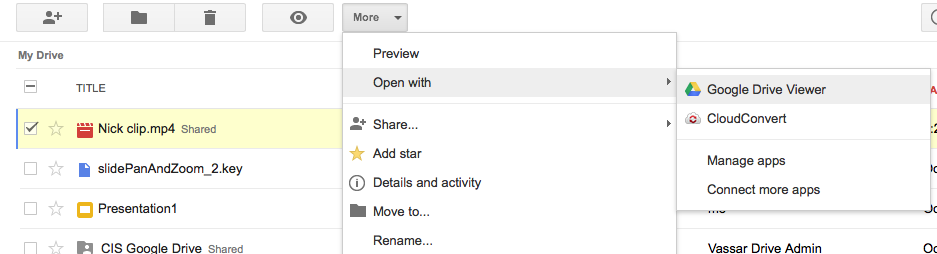
After uploading your video to Google Drive, select it and choose Open with > Google Drive Viewer, from the More drop-down menu. Once the video is open in Google Drive Viewer, click on the three vertical dots on the top menu, then choose Embed item.

Screen Shot 2014-10-21 at 12.33.09 PM


This screen will appear:

Screen Shot 2014-10-21 at 12.33.43 PM

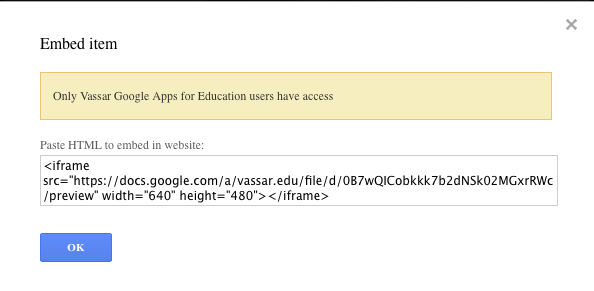
Copy the embed code into a page or label using the HTML editor button in your Moodle site, following the same procedure as described above, to embed a slideshow presentation.

The resulting video will look like this in you Moodle site:

Screen Shot 2014-10-21 at 12.31.48 PM

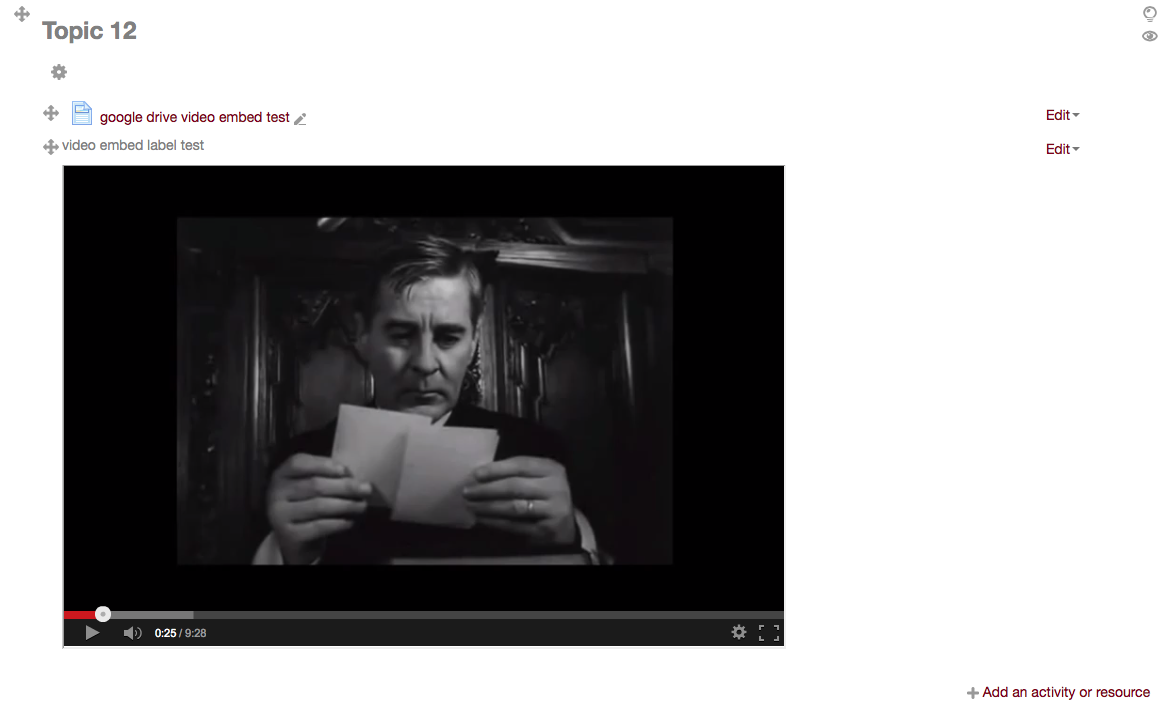
If you embed the video into a Moodle page then you will see the page icon. When clicked, it will open a separate window for viewing the video. If you embed the iframe code into a Moodle label you will see the video embedded in your course front page.


Share

Remote Learning at a Residential College

by Steve Taylor

Since shortly after the web was developed, colleges and universities have used it for conducting distance education programs. Leaders in the practice included public institutions, whose mission included serving a wide geographical area of non-traditional students; large universities, who were challenged to provide alternatives to courses taught in huge lecture halls; and professional schools and trade schools, whose focus was on procedural skills. The emergence of MOOCs in 2012 brought more attention to the practice. It has not been obvious, however, how distance learning technologies could benefit small, private, residential, liberal arts colleges like Vassar. Many have doubted— reasonably so—  that an online course could offer a better learning experience than a face-to-face course with a small student/faculty ratio. At Vassar this summer, we identified a use for distance learning technologies that borders on the ironic: a residential college connecting with its students when they’re not in residence; an institution known for small class sizes interacting with a student cohort of 700. We used Moodle to enhance our summer common reading program for incoming students.

Vassar College has administered a common reading program for first-year students every summer since 2006. The Dean of Freshmen’s office mails a copy of the chosen book (this year’s was Alison Bechdel’s graphic memoire, Fun Home), along with other orientation materials, to each admitted student’s home address. The students are instructed to read the book, but there have been no other requirements. For the summer of 2014, Dean Susan Zlotnick wanted to enhance the common reading experience with some online interaction, using Moodle. Over the course of several weeks, ACS produced three short videos, each with a different faculty member speaking about an aspect of the book, and inviting students to respond to one of several discussion prompts. Student participation was high, for an activity that had no penalty for non-participation. 427 of the 670 students (64%) posted responses, most of them substantial in length.

The goals of the common reading program are to give incoming students a preview of what classes at Vassar might be like, and to give them an opportunity to have a common intellectual experience with each other before courses begin. By all accounts, that was successful. This experience raises an interesting question: what other aspects of Vassar life might be enhanced by having an online space for shared information and social interaction?

Share

Recording Video or Audio Directly Into Moodle

Vassar’s Moodle system has a new tool, with the possibly too cutesy name of “PoodLL.” PoodLL provides a bridge between Moodle and the camera and/or microphone on a person’s computer. There are two main ways it can be used:

1. An instructor can record a video or audio message directly onto the main page of a Moodle course, or into the instructions of a discussion forum, or even into the description field associated with a file. Previously you would have to use some other software to make the recording, then upload it into Moodle; now no other software is necessary.

Are there things that come across better when seen or heard than when read? A poem or a foreign language passage? A view of a physical object or action? Here’s how to use PoodLL to make the recording:

2. You can create an assignment (or a quiz) in which students reply by recording themselves. Many instructors use Moodle’s Assignment activity to collect files (like research papers or homework exercises) from students. Now the Assignment activity can also be used to collect video or audio recordings from students.

One of the most obvious uses of this is to ask foreign language students to record themselves speaking in the target language, but be creative! A lab instructor could ask students to make a brief video showing the results of their procedure. Drama students could record a dramatic reading. Here’s how to create an assignment that lets students record their responses:

If you’re not yet feeling muddled by Moodle’s PoodLL, you might try noodling with an audio or fiddling with a video. There’s also a whiteboard function, so you could doodle in Moodle’s PoodLL. More on that in a separate post.

Share

New Moodle Feature: Annotating Student Papers

Screen Shot 2014-01-14 at 12.44.32 PMWith the recent upgrade to Moodle 2.6, instructors have a new function available: If a student uploads an assignment in the form of a PDF file, the instructor can make various types of annotations to the file directly within Moodle. Previously, they would have to download the file, use some program that provided annotation functions, then upload that revised version to Moodle, for the student to download. Now that can be done within Moodle.

Annotation functions include highlighting, circling, drawing, stamping an available graphic (like a checkmark or an X), and writing Post-It-type notes.

Here’s a quick demo:

Share

Vassar Moves up to Moodle 2.0*

by Steve Taylor
Most software programs are in continuous development, as we all know from the “Upgrade to the latest version” alerts that pop up on our screens all too often. When the program runs on a server, as Moodle does, those upgrades usually happen without our notice, because the changes are either small or they happen to a part of the program that’s not so visible to us.

But then there are the big upgrades, the ones where the version number changes on the left side of the decimal point. Moodle has made that change (from 1.9 to 2.0) and we will be implementing the new version at Vassar this summer (2012.)

The most important reason for us to do this is simply to keep up with all the development that happens in and around Moodle. Since Moodle 2.0 was released in late 2010, third-party programmers have abandoned creating and enhancing the products that work with version 1.9 and have devoted themselves exclusively to writing for the new version.

Beyond that compelling-but-unsexy reason for us to upgrade, there are some great improvements to Moodle 2.0:

Better Editor. The editing tool that Moodle presents whenever you write a description, label, blog post, forum post, email message, etc. has been replaced with one that works properly with the Safari and Chrome browsers and is more resistant to the bugs introduced by pasting in text from Microsoft Word. (Text copied from Word includes LOTS and LOTS of invisible tags that can potentially “break” your Moodle page, to an extent that is very difficult to fix.)

External Repositories. When you add a file to your course site, the source doesn’t have to be your desktop computer– now you can directly add a link to a file from an external repository, like YouTube, Flickr, Dropbox, etc.

Better Looking. The new Moodle has more attractive themes to choose from, to set the visual tone for your site; it will also automatically format pages to look good on mobile devices such as smart phones and tablets.

Re-engineered activities. The gradebook, wiki, and quiz activities have been completely overhauled for easier use and better performance.

However…

The new version introduces some challenges, of course. A strength of Moodle is that it’s an open-source product, which  means that third-party developers can create add-on functions. Some of the add-ons that we’ve used at Vassar won’t work with the new version. These include the FLV Player (for streaming video), Scheduler (for office hours), and the Page format (for multiple tabbed pages within a course site.)

Also, there will no longer be a “Files” area, hidden from students, where instructors can upload files for later linking. Hidden folders of files will now reside on the “front page” of a course site.

The switch-over will take place in mid-June. ACS will be working with instructors to make sure that their migrated sites still work properly and that instructors know how to work in the new Moodle.


* (Actually, 2.3)

Share

Moodle Site Revamp in Three Easy Stages: Part 3 of 3

by Baynard Bailey

Elegant Moodle Site Design Part III

In Part I, we set the stage for redesigning our Moodle site by backing up our site and then clearing out unnecessary files. We also chose a design style for our course. In Part II, we employed Moodle “Web Pages” as a way to keep our instructional design elegant and efficient. Now, for Part III, we are going to complete our Moodle site revamp by fleshing out our course site, and building easy to use and understand links to activities and readings.

Order! Order!

A Messy Files Area Increases Cognitive Load for Faculty and Students

Building Simple and Effective Course Links

Before we build the links, it is important to remind ourselves of one of the peculiarities of Moodle. I’m not sure if this applies to all Moodle users, but it applies to Vassar’s current version – Moodle 1.9.16. If you have a file in the files area and there is a live link to the file from your course site, Moodle won’t let you delete the file. However, if you move the file, Moodle won’t automatically update the link with the file’s new location, so the link won’t work for students any more. There is no notification to the instructor that the link is broken. The best way to avoid this problem is to organize your files well before building the course links.

Instructors may choose to build links to every file, or they may choose to provide links to directories containing .pdfs and other course files. The choice depends mostly on the number of readings students access via Moodle. If you have a large number of .pdfs for the students to download, building a link to every file is tedious. It can also promote “Moodle Sprawl”, as every file linked to the front page increases the size of the page. Most professors would benefit from providing a link to a directory or directories containing readings and other files. This is a great strategy IF the professor has a consistent naming system for the files, as the file names will be the students only way of locating the readings.

Many computer systems alphabetize things differently than humans. For example,  in Moodle’s File Area, all capital letters come before all lower case letters. Hence, the letter ‘Z’ comes before the letter ‘a’. All numbers come before letters. Spaces and some symbols come before numbers and letters, other symbols follow letters and numbers. If you have ever looked at your Moodle files and been bewildered by how things are arranged, the  rules of alphabetization are probably to blame. To leverage computer alphabetization, employ a consistent file naming scheme, such as “lastname_of_author-article_title”. If you are capitalizing, make sure that you capitalize the first letter of each file. That way, when students go to find files in a directory with many articles, they will easily be able to find the readings by searching for the author’s name.

Links

Consistent File Naming in Action

Reduce Moodle Clutter: Prioritize Major Assignments and Activities

Major assignments should be highly visible at the beginning of the semester. Having fewer “clutter” items at the top level lends significance to activities and assignments that are displayed on the front page.

Forums are one of the most popular Moodle activities, but be careful to choose a forum / discussion board that suits your course. The “standard forum” in Moodle has the capacity a nigh-infinite number of questions, topics and responses. If you envision a lot of forum activity and a large number of topics during the semester, then the “standard forum” is the right choice (hint: you most likely need just one). However, if you are planning just a few activities that require  forum posts, consider the other forum types:

  • A “single simple discussion” keeps the class focused and responding to a single prompt.
  • “Each person posts one discussion” enables every student to post one topic, like a paper proposal, and everyone else can reply.
  • The “Q &A forum” is the an interesting pedagogical forum: each student must post their opinion or viewpoint before they are allowed to view their fellow students’ posts. If you are trying to prevent groupthink, this might the choice for you.

Finishing Touches

mountain range

A good banner image for a course will be panoramic in its aspect ratio (image courtesy of philflieger in Flickr).

If you haven’t already, be sure to add your contact information and office hours at the top. If you feel so inspired, create a banner (hint: something wide and not too tall, around 100 kb; large pictures punish users accessing via laptops, tablets and smartphones). When uploading the syllabus, apply a naming convention to help keep track of versions. (Hint: use numbers or letters, as having a syllabus titled “final-final-final version” is confusing.) Once you have your readings, major assignments, and activities in place, your Moodle site is ready to go. Hopefully these posts will help you revamp your site. An elegantly designed Moodle site, one that increases functionality and is easy to use, will benefit students and faculty alike.

As a postlude to my Moodle Design series, I’ll be adding an article highlighting some really great but oft-overlooked features in Moodle.

Share

Moodle Site Revamp in Three Easy Stages: Part 2 of 3 – Elegant Design Architecture

Building Elegant Instructional Design Architecture with Moodle Web Pages

by Baynard Bailey

In Part I of this series, I focused on the preliminary stages of revamping a Moodle site. The major steps included backing up your materials, culling unnecessary files, and choosing a course design that fits your teaching style (for most that means choosing a ‘topical’ or ‘weekly’ format). In this post, I hope to provide some tips to empower your Moodle site to enhance student understanding of the overall  arc and flow of the course.

Many of the Moodle sites I see suffer from ‘sprawl’ or ‘bloat’. The site starts out fine, but by the end of the semester, especially for courses that meet more than once a week, the length of the front page stretches on for screen after screen. Scrolling to the bottom of the page (the current week) can take a minute or more, and sifting through past weeks’ materials and activities is tedious. Why put up with this, when you can have an elegantly designed Moodle site that better reflects the structure and scope of your curriculum? Consider putting topics, class meetings or weeks into their own “web pages” within Moodle. The resulting front page of your Moodle site will be an elegant summary of the major topics of your course, easily navigable, and an aid to learning.

Compose a Web Page Screen Shot

Creating web pages makes elegant Moodle site design easy.

It is easy to overlook  the “Compose a web page” resource tool, especially when one is first using Moodle. But if you are revamping a course, this resource choice is worth serious consideration. Composing Moodle web pages provides instructors ample room to provide detailed directions for class activities without adding unnecessary sprawl to the front page of your course site. I will use some examples from a recent consult I had with Molly Shanley.

Molly wanted to meet because she had taught a course Poli Sci 278 before, using Blackboard. She was now getting ready to build her site in Moodle and wanted tips for building sites for Moodle courses that met biweekly. She had a syllabus that was 90% complete. I decided I would try and sell her on the idea of using Moodle web pages to help structure her course.

We built a few of the first class meetings with a web page for each meeting. This really reduced front page sprawl, especially in regards to the some of the early class meetings, which contained comprehensive directions and details. We discussed how this approach allowed the main topics of the course to stay afloat at the top level of the site, becoming a sort of topical outline for the semester. Students would be able to easily discern the arc of the course, and to place the topic for each class within that arc. At the same time, the full details for readings and assignments could be accessed quickly and easily. We were happy with the results so we copied and pasted the syllabus outline and fleshed out the bulk of the course.

Outline for Part of the Course

Each Class Becomes a "Branch" of the Course Outline (Draft Syllabus)

Here’s a sample “Moodle Web Page”, found by clicking on the corresponding link from the outline above:

Sample course meeting

Copying and Pasting Yielded Excellent Results

Since Molly had a well developed syllabus, it was a straightforward mechanical process to paste the details into a corresponding structure in her Moodle site. The front page of her Moodle site became an outline of the entire course. Each class meetings’ corresponding web page will contain detailed information about readings, activities and assignments. Building the design of your course into a corresponding visual and textual pattern in Moodle is excellent instructional design, facilitating the learning and teaching process.

Look forward to Part III where we’ll complete the Moodle site revamping process.

Share

Moodle Site Revamp in Three Easy Stages: Part 1 of 3

by Baynard Bailey

Moodle sites are living breathing documents that evolve as the semester progresses. When push comes to shove during the semester’s crunch, one thing shoved is often an effective course site design. Thankfully, the semester ends and the mess goes away. But when it comes time to teach that course again, it is a good opportunity to revamp that course site. What to do first? Where to start? I hope to walk readers through some of the major steps and processes that will facilitate an effective instructional re-design of a course site.

Currently at Vassar, we are working with Moodle version 1.9.7 so my instructions are tailored to that, but I hope that some of the broader strategies could be applied to any Learning Management System.

In order to provide the best advice possible, I decided I would actually help revamp a site. I reached out to my friend and colleague Karen Robertson and offered to assist her in redesigning her Moodle site for Women’s Studies 240: Constructing Gender. The site was a good candidate for revamping. Prior to last year, it had been team-taught, so Karen had inherited the site and had yet to really “move in”. Last spring’s site contained a wealth of great materials, but the organization could be altered to improve the presentation. Karen warmly received my idea and so we met last week.

Mini Zen Garden

Good Instructional Design Reduces Cognitive Load

I had the goal to design a neat site with a clean and uncluttered look and feel (and then to share the strategies employed in our ACS blog). Karen and I discussed why it was important to keep an uncluttered appearance to the front page of the Moodle site. She reminded me that our goal was to develop a clear and easy to use site in order to reduce labor and cognitive load.

Step 1: Back up your old materials.

Before we began, we backed up the old site. Additionally, we printed out a copy of the main page so we could have a visual map of the old site. We also printed out lists of readings in the file areas so Karen could go through them on her own.

Step 2: Take stock of your current materials. Delete duplicates and unnecessary items (first pass).

We went through the site week by week, deleting unused assignments and various items that had been used in the past but were unnecessary now. Bear in mind, we didn’t go through all of her readings, we just deleted the “low hanging fruit”.

Step 3: Choose a style of course design that fits your teaching style

This is a big step. Karen and I discussed the pros and cons of topics versus weeks (these are the two most commonly used settings in Moodle). Topics are great in that users can choose to have as many or as few topics as fit their curriculum. Weeks are useful in that the dates are auto-created and visually correspond right away to the semester’s calendar.  Karen pointed out that some topics are much longer than others, and that weeks often bridge topics. She emphasized the importance of making it absolutely clear to students what was expected each class.

On my end, I wanted to avoid Moodle “sprawl”. Every time you add a topic or a week, it adds a space to a course site. Sometimes faculty use the “Topics” setting, and then create a topic for each time the class meets or just about any other reason. To make matters worse, faculty often include extensive directions in labels right there on the front page of the site. The end result is a Moodle site that is about ten feet long, difficult to navigate, and a hindrance for faculty and students alike. To avoid “sprawl”, I showed Karen how we could put in extensive and precise directions as a “web page” resource for each topic. Since the directions were web pages, we could even include links to readings, assignments, activities, or anything else we had in Moodle.

Generally, faculty have an excellent sense of the arc of a course and a strong understanding of the intended learning goals for the semester. How well those concepts are communicated in Moodle is a mixture of teaching style and sometimes fluency with Moodle. I wanted to provide Karen a tool that would allow her to describe the arc of the course in a glance, but also allow flexibility and specificity in terms of readings and class activities as the semester evolved. The end result was a compromise between “topics” and “weeks”; we would use the “topics” setting, but provide specific directions and links for each class meeting.

I thought we were done there, as determining the arc of the course would require some deep thinking, but luckily, Karen had already done the deep thinking and quickly summed up the major topics of the course:

  • Feminism and Pop Culture
  • Secret Life of Commodities
  • Visual Pleasure: Hollywood and the Gaze
  • The Romantic Industrial Complex
  • Postermaking

Our next steps would include organizing the files area to best fit the instructional design. As part of our conversation, we had made a prototype topic for the first few classes.

Topic Prototype

Our Topic "Prototype" Keeps the Main Page Simple

I offered to continue to make placeholders for the rest of course. Karen would review the reading list in preparation for our next meeting. It had been a really productive consult with good feelings on both sides. I looked forward to our next meeting.

To be continued…

Share