Using Discord for Teaching, Learning, and Community

In the scramble to get classes and work online this spring, there wasn’t a lot of time for careful evaluation of online collaboration tools. We had to move our curricula and other work online as quickly as possible, so we used the tools that were quick, easy, and familiar. Our campus Zoom license gave us an easy excuse to use it as a replacement for face-to-face classes, meetings, and social events.

As the semester winds down, we have more time to consider what tools and techniques we might employ for the fall semester. Uncertainty looms over what forms our teaching, learning, and other work will take, but now is the time to explore alternatives. All of us, myself included, have experienced “Zoom fatigue” and wondered what other options exist.

Discord is a free online chat application that was originally designed with gamers in mind, but the more questions we see from faculty who are looking for Zoom alternatives, the more promising Discord seems for a variety of purposes. This article will merely scratch the surface of Discord’s capabilities, but there’s much more to this easy-to-use tool. I’ll share some resources for installing and setting up Discord and then touch on a few possible applications.

To get started with Discord, I recommend following their guide to using Discord for your classroom. Discord gives you the ability to create as many free servers as you like, with each server hosting up to 500 voice, chat, or video channels. You can organize these channels under categories, and there’s a full permissions suite to control access to these channels.

You and your students can chat via video and voice, just like Zoom, and text chat channels give you realtime or asynchronous ways to share files, thoughts, announcements, syllabi, or whatever else you can think of. You can make custom channels for breakout rooms or group work. You can share your screen, stream video to your students at high resolution, and give your class a place to connect whenever and from wherever. Your servers are always open, and only you and people you give access to can join. As the server administrator, you have full control over all your channels and server membership, so in the unlikely event someone joins your server uninvited, you’ll be able to remove them quickly and securely.

Using Discord is the best way to see the possibilities it offers, so if you’d like to know more, please contact your ACS liaison and we’ll arrange a demonstration for you.

Share

Voice-Over Slideshows

powerpointNarrated recordings of slides can be useful for providing supplementary information to students, or to help prepare for upcoming class activities.  They can serve as a component of a flipped, or partially-flipped, classroom, or simply provide complementary material for a traditionally-structured classroom.  Microsoft PowerPoint and Macintosh’s Keynote are two of the most popular software options for producing slideshows.  In Keynote, narration of a slideshow results in a single audio file, whereas a PowerPoint slideshow narration produces individual audio clips for each slide.  The single audio file model of Keynote introduces some difficulties when one wants to insert a slide, or rearrange slides, after the full presentation has been recorded.  While one can generate individual audio clips in an external program, such as QuickTime Player, and drag them into Keynote, it is not a simple process and, in the end, PowerPoint wins out for the flexibility and simplicity offered by its model of an individual audio clip for each slide.

usb-headset-ac850_hi

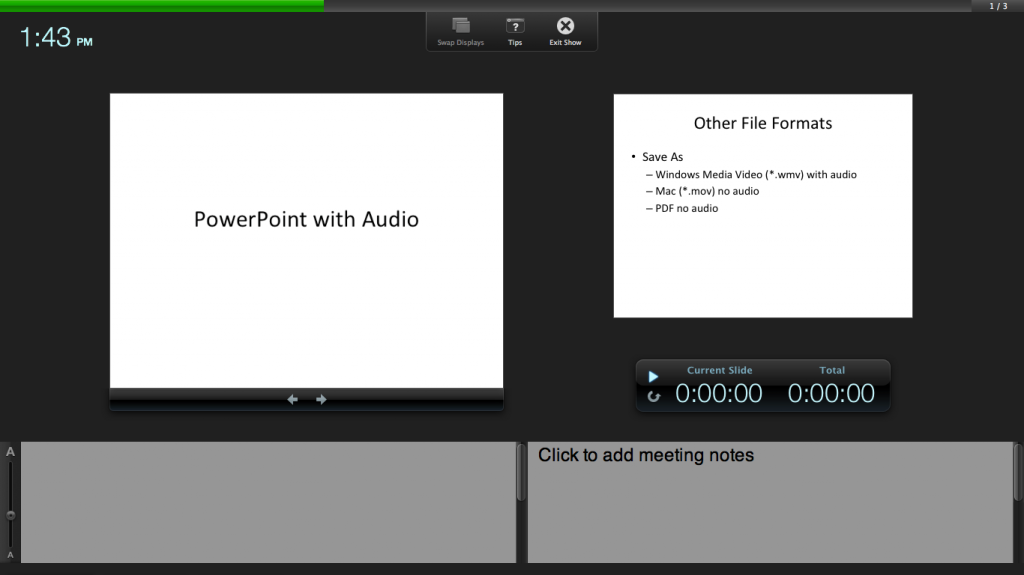
Using your computer’s built-in microphone or a USB microphone, you can create your own narrated slideshow.  The following instructions are specific to a Mac, however the procedure is very similar when using a PC.  After connecting the mic, if necessary, be sure to select the appropriate audio input/output source in system preferences.  Open your PowerPoint file and select the first slide.  Click the tab labeled  Slide Show.  Then, under Presenter Tools, select Record Slide Show.  After selecting Record Slide Show, the audio recording screen opens and recording starts immediately.  You can pause ( ll ), restart ( ↺ ) & continue ( ▷ ) as needed.  Click on the forward arrow at the bottom of the current slide (or use arrow keys) to advance.  Press the esc button or Exit Show at top-center to finish recording.  Select yes when asked if you want to save your slide timings (this includes audio).  As you can see, the procedure for creating a narrated slideshow in PowerPoint is quite simple.

mac_ppt_record_screenshot

Screenshot of audio recording in PowerPoint on a Mac.

Any subsequent editing is also straightforward.  For example, to re-record audio for a single slide, simply select the slide, then select Slide Show Record Slide Show. Make your recording for the individual slide and esc, or Exit Show, when finished.  You may also insert a new slide anywhere in the lineup and add audio to that single slide without causing the audio to fall out of sync on the original slides.  Another layer of multi-media that one may take advantage of is that of adding video/movie clips to slides.  It is not a difficult task and may be worth exploring as an additional enhancement to your presentation.

It is important to save your presentation as PowerPoint Presentation with the filename extension *.pptx.  The format designed to be compatible with earlier versions of PowerPoint (PowerPoint 97-2003 Presentation), which uses the extension *.ppt, has a number of features disabled.  As a result, students watching the slideshow on a Windows machine will not be able to take advantage of the “s” shortcut for pausing and restarting the presentation.  Finally, when you are ready to share your presentation with students by posting it on your Moodle site, for example, you may wish to save it as a PowerPoint Show (*.ppsx).  When students double-click on the file icon, it will automatically launch into the show mode, and they won’t be able to edit your slides.

If you have any questions or would like additional information, please contact Shelly Johnson, ACS liaison for the Sciences, at x7866 or mijohnson@vassar.edu.

Share

Prezi

by Steve Taylor

Prezi is a tool for creating presentations, just as Powerpoint and Keynote are, but with some interesting differences. Since its creation in 2009, it’s been seen more and more in conferences.

Metaphors
One way in which Prezi differs from earlier presentation tools is its metaphor. Both Powerpoint and Keynote use the metaphor of a series of individual slides that can be shown in a predetermined sequence, just as 35mm slides would be shown with a carousel projector.

In Prezi’s metaphor, the creator arranges materials on an infinitely large canvas and— as I think of it— uses a video camera to pan and zoom through those materials. That can be done on the fly or the creator can pre-record a series of pans and zooms. The resulting presentation maintains the spatial relationships among the various materials.

It’s On the Web
Although they can be downloaded, “Prezis” are assembled on the web, through your browser, and can be presented via your browser as well. They can be shared with the general public or with a select group of colleagues (or members of a class.) You can even collaborate with others on the creation of your Prezi, which makes it a great vehicle for group projects.

Good and Bad Uses
I’ve seen great uses of Prezi and uses that make no sense at all— unfortunately, quite a few of the latter. If your presentation materials consist of a series of bullet-point lists, quotations, graphics, etc. that have no particular spatial relationship to each other, then there’s no particular reason to lay them out side by side and pan from one to another. But if there are spatial relationships— such as in a complex chart, diagram or map— then Prezi may be the perfect tool.

Here are a few examples of great uses for Prezi. You can pan and zoom on your own, or click the Play button to step through a pre-recorded tour.

“Classification of Organisms,” created by Robert Kappus, will lead you systematically through a complex chart. The chart is circular, and the zoomed-in labels and graphics are aligned along radii of the circle, but that poses no problem, as the pre-recorded tour can not only pan and zoom, but rotate the view as well.
The “Physical Features of Africa Quiz” Prezi, created by Emily Thompson, will give you a tour through the major mountain ranges of Africa. Maps tend to be difficult things to project in a classroom, because the amount of detail means that labels often are too small to see from a distance. Prezi is a great vehicle for showing detailed maps, because of the extreme levels of zooming it can support.
One of my favorite uses of Prezi is to explore different details of a complex work of art. Here’s one that I created, providing a tour through some of the details of the painting Garden of Earthly Delights, by Hieronymus Bosch. An instructor can present a series of details from a work like this, without losing the context of each detail.
A number of people have realized that Prezi can be a good tool for creating a concept map— a diagram that shows relationships among various concepts. Here’s an example of a Globalization concept map, created by Dennis Carnduff.

Go to the Prezi website to explore other materials that various people have made public, to get more ideas on how it can be used.

Licensing
Prezi offers three levels of licensing:

  • Public, which is free, provides you with 100 MB of storage, but requires you to make your creations public.
  • Enjoy, which costs $59/year, provides 500 MB storage and allows you to make your creations private.
  • Pro, which costs $159/year, provides 2GB storage.

However, students and teachers— anyone with an “edu” email address— can get the Enjoy level of license for free.

Prezi U
The website also provides a gateway to “Prezi U,” a community of educators who share ideas about using Prezi in their teaching.


Share

Google Plus for Educators

by Steve Taylor

Google has “semi-released” a new service that many people consider to be a direct competitor to Facebook: “Google +”. Like Facebook– or Twitter, for that matter– it’s a social network, meaning that you identify other people that you’re interested in and you share information with them.

Nearly every college or university student uses Facebook, so it was natural for faculty and administrators to start exploring how they might take advantage of that to improve communications with students. But many found the idea of an instructor friending a student to be at best a little awkward and at worst, creepy. Part of the problem is that, in Facebook, a “friend” relationship is bi-directional: in order for a student to see her teacher’s postings, the teacher has to see hers. (That problem can be addressed with Groups and restriction settings, but creating those takes more effort than most people want to make.)

Circles

Google+ takes a somewhat different approach: relationships can be one-directional, more like following someone in Twitter. You create “circles” of acquaintances of different types: current friends, high school friends, family members,  co-workers, etc. and include different people in one or more of them. They’ll be notified that you added them to a circle, but they won’t know the name of that circle and they won’t be obligated to add you to any of theirs.

As an example, an instructor could create a circle that includes all of the students in English 101. He can share websites or comments with that circle, so that they appear in those students’ news feeds. But he doesn’t have to share his comments or pictures from last night’s barbecue with that circle. And if none of them add the instructor to any of their circles, he’ll never see anything they post. Of course, if they also make “English 101” circles with the same members, they can share things that are appropriate for that group.

Students could also create temporary circles for chatting and sharing materials among a project group. (As could faculty researchers.)

Hangouts

“Hangout” is the Google+ name for a video chat. At the moment, this is probably the slickest way for a group of people to do video chatting. It’s very easy to do, can accommodate up to ten people at a time, and it’s free. Though you can schedule hangouts, Google thinks of them as being spontaneous– like if you’re hanging out in the college center and friends bump into you and hang out for a while. But an instructor could use the hangout feature for online office hours or for holding study sessions. Or for collaborating with research colleagues. Or for interviews.
There are other features too, but circles and hangouts seem to be the most intriguing ones for educational use. As of this writing, Google+ is in pre-release, which is to say that it’s available to people who know someone who knows someone, but it should be generally available soon.

Share

Back Channels in the Classroom

By Matthew Slaats

There has been an ongoing conversation taking place here at Vassar College, about the role of the computer in the classroom. At a time when technology seems ubiquitous, there are still very strong opinions on the pros and cons of students using laptops in class. These range from those focused on the “chalk and talk” method to having highly digital classrooms. To me this is not a discussion of right or wrong, but a question of appropriateness, especially when trying to create an atmosphere of engaged learning.

One place where I feel that digital technology can make a major impact is the large lecture hall. Typically, these spaces are about the transmission of information from faculty to student. The relationship is directional, emanating from the lectern or chalkboard to the eyes and ears of students. At an early stage in a college career, this is a vital transaction, providing a foundation for the years to come. The lecture hall is a standard on every campus and will continue to be for many years. Concerns arise, however, as the computer begins to invade this space, allowing students’ minds to wander to their ever-growing social network. So, what can be done to maintain focus and build on the possibilities of the information being provided?

One idea that I’ve been thinking about for several years is the “back channel.” No, I’m not going to talk about some grimy alleyway to place misbehaving students in. What I would like to consider is a virtual space, organized and developed by students, that allows them to engage in conversation, ask questions, and bring their own perspective to what had been a one-sided conversation. This online space would allow for the class presentation to be viewed alongside other modes of communication. After a cursory review, an instructor might then bring some of these topics into the conversation when meeting with smaller groups. There are also significant possibilities for those students who are just a bit too shy to raise their hands.

With Powerpoint and Adobe Connect developing webcasting capabilities, this idea is already a possibility. A recent New York Times article discussed options and identified initiatives at several universities to create just such a space.

No matter which side of the conversation you fall on, may it be chalkboard or webboard, the important thing is to find modes of teaching that allow students to engage. It is about making the information meaningful, not just for meaning’s sake, but in such a way that the student can make it a part of their own personal experience. Providing modes of response accomplishes this objective.

Share

Videoconferencing

by Steve Taylor

Not long ago, the idea of live two-way video communication seemed futuristic. For years, phone companies dabbled with video-enabled telephones, but the bandwidth of a telephone connection just isn’t up to the job. With the nearly ubiquitous high-bandwidth Internet connections of the present day, however, one-to-one video conversations  via computer have become commonplace.

By far the most common system for this at the moment is Skype. Skype began as an Internet-based phone system (“voice over Internet protocol” or VoIP), but in 2006, added video capability. You can use Skype to connect to someone’s standard telephone (without video, of course), but there is a charge for that. When communicating Skype-to-Skype, voice-only or with video, there is no charge. That’s true for international calling, too, which is especially compelling, given the cost of traditional long-distance phone calls.

Apple’s iChat program also supports videoconferencing, including multi-party conferences, but only operates on Macintosh computers.

In education, one powerful use of videoconferencing is for a class to be able to converse— in real-time— with a highly regarded author, artist, or scientist, for whom it would not be practical to arrange a site visit. Children in elementary schools use videoconferencing to chat with authors of their favorite books.

Vassar students in Prof. Jeremy Davis’ Experimental Animal Behavior class used Skype to interview authors of articles they were reading. Students would read several articles by a single scientist, then prepare some questions. They would discuss the papers in class, then call the author, to ask their questions. Both students and scientists enjoyed the experience.

Since most recent-model computers have built-in cameras and microphones, Skype is easy to use for one-to-one videoconferencing. Using it for one-to-many conferencing is more difficult. Although it’s easy for a class to see and hear the remote person via a classroom’s projection system, the classroom computer’s built-in camera and microphone don’t work well for a room full of people. With funding from the Fergusson technology fund, Prof. Davis purchased a conference microphone, which made it easier for the class to speak to their remote scientists.

Another way to use videoconferencing in education is “many-to-many,” in which one class interacts with a remote class, often in another country. This technique has been used by Prof. Silke von der Emde’s German classes and Prof. Hiromi Dollase’s Japanese classes, to share knowledge with students in other cultures.

This type of videoconferencing calls for a more sophisticated system. There is a special communications protocol (H.264) that enables high-quality, real-time video and audio communication, but must be done using a specially designated device, rather than a standard computer. Many colleges and universities, as well as hotels and conference centers, have rooms with these devices. Vassar has such a system in College Center Room 204. A centrally located microphone picks up voice from anywhere in the room. The videoconferencing device— located above a 50-inch LCD display— includes a video camera that can be pre-programmed to pan and zoom to a dozen different locations in the room, so that the remote viewers can see the individual who is speaking.

In order to make use of Vassar’s videoconferencing facility, you’ll have to reserve the meeting room via Campus Activities and arrange for an operator via Media Resources. It’s advisable to arrange for a test-run previous to the conference day, to make sure that everything works on both ends.

Vassar’s newest player in this field is Adobe Connect Pro. Connect Pro is essential a web conferencing system, which is to say, a system for sharing computer screens and text chatting, which has for many years been used as a way to provide training or product demos to groups. But Connect Pro also includes voice and video channels and the ability to record sessions for later playback.

Please contact your ACS liaison to get started on any of these systems.

Share