Make Better Videos with Your Phone or Computer (Free!) – Vimeo Video School

Impressed by Vimeo’s Video School

by Baynard Bailey

I am a long time fan of Vimeo and I’ve used it to share video for a bunch of Vassar projects over the years. (FTR those who don’t know, Vimeo is “a video-sharing community for original creative work and the people who create it”.) I was excited to see that Vimeo has launched a series of videos under the heading of “Vimeo Video School“. The series is really well done, practical, and even entertaining. I have watched and sent out links to a lot of instructional videos over the years and I have to say, this series is as good or better than anything I’ve ever seen (in the genre). Here’s an example from the series “Mastering Mobile Video“:

In addition to the Mobile Video Series (which by the way totally vindicates my ire when I see people shooting their video in portrait mode) they also have these series of lessons:

Video School Lessons

Introducing Windows Movie Maker
For PC people who are new to video editing, this free series is a friendly introduction to Windows Video Maker.

iMovie for Mac
Mac-friendly folk: edit videos without the stress. Easily master iMovie essentials in this free Video School series

Final Cut Pro X
Kick your video editing up a notch (or three) with our premium series focusing on the ins and outs of Final Cut Pro X for Mac. BAM.

Adobe Premier
Brush up on the basics and learn the finer points of Adobe Premiere in this free Video School series.

This is a fun series and makes good use of technology we have in hand or on campus.

Share

ACS Collaborates with ART 386 students and faculty on “first-of-its-kind exhibition.”

Amitabha Buddha, Central Tibet, 19th century; pigment on cloth; 38 1/2 x 25 1/2 in.; The Rubin Museum of Art, New York, F1997.6.3.

Amitabha Buddha, Central Tibet, 19th century; pigment on cloth; 38 1/2 x 25 1/2 in.; The Rubin Museum of Art, New York, F1997.6.3.

ART 386,  Embodying Compassion in Buddhist Art: A Curatorial Training Seminar was taught by Karen Lucic during Fall semester, 2014. The purpose of the class was to give students the opportunity to research and curate an exhibition at the Frances Lehman Loeb Art Center. During the summer of 2014, Professor Lucic contacted me to discuss creating a website for her students to use as a repository for their research and eventually this site would become a companion site to the final exhibition in April, 2015. Over the course of the Fall semester, students wrote and compiled content for the site and they worked closely with ACS to design and populate the site.

From ART 386 Syllabus:

Each student will be responsible for the digital content and interpretation of 2-3 works in the exhibition. The instructor will assign the objects to each student, based on her/his experience and preparation. These student contributions will be posted on the exhibition application and/or website. (60% of grade.)

Students will work in teams to produce additional resources for the exhibition: gallery guide, interactive maps, guide to web resources, etc. Students in the team will also give feedback on other team members’ work before submission (20% of grade.)

From ART 386 Assignment Sheet:

The purpose of this assignment is to create digital educational content for the exhibition. Always remember who your audience is: visitors to the exhibition, or online users, who might not know much—or anything—about the topic. What you write, and your choice of materials should be based on your assessment of what will enhance their experience and understanding of the exhibition. Texts should be concise and to the point. Other materials should be short but engaging.

For each work you have been assigned:

1) Write an interpretative text (no more than 100 words) for app/website

2) Select one comparative image (must be open access and high resolution); include full caption of comparative image

3) Write a text (no more than 100 words) explaining the comparison

4) Select an audio file, if possible, that enhances the work (no more than two minutes). Examples: chanting, singing, mantra recitation, etc.

5) Select a video file, if possible, that enhances understanding of the work (no more than 2 minutes). Examples: practitioners circumambulating, prostrating, spinning prayer wheels, making sand mandalas, offering incense, etc.

6) If there are no appropriate audio or video files, choose another comparative image.

7) Compile a list of unfamiliar terms from your texts, with definitions

8) Map your work, at least by country. With some works (Putuoshan, Nachi, etc.), it may be possible to be more precise about locations.

9) Record your written contributions.

While students were working to create the content for the site, ACS student employee Bryce Daniel worked on building a wireframe for the WordPress site. Professor Lucic also collaborated with Duke University students to design an App for the exhibition. The App hosted audio files recored and edited by ACS Consultant, Baynard Bailey. These recordings, narrated by both students and Professor Lucic, include short commentaries describing individual pieces in the exhibit, as well as a pronunciation guide for a glossary of terms.

The Embodying Compassion WordPress site is a comprehensive online exhibit reference guide, containing audio, video, images, interactive hotspot maps, and extensive research, curated by ART 386 students. This project proved to be a excellent example of how students, faculty, and ACS consultants collaborate to produce educational materials for the classroom and public audience.


Links:

Embodying Compassion Website

The Frances Lehman Loeb Art  Center: Embodying Compassion is a first-of-its-kind exhibition celebrating one of the most important figures in Buddhist art, April 23-June 28, 2015

Get the App


Share

Downloading Audio and Video from YouTube

If you want to download the audio or the video from a YouTube video, here’s a great resource for you: http://offliberty.com/

It is very straightforward. Paste the YouTube url into the box, and press the power button. After a shortish wait (can be longer if the video is long) you will be given the choice of downloading the audio as .mp3 and/or the video as .mp4.

The demonstrative part of this video begins at 51 seconds in.


I can imagine any number of situations where this utility would be extremely handy. (It is always good to have a backup plan when you are teaching a class.) However, as the website points out, “Sometimes browsing offline content requires permission from its author or owner. Remember to be sure that you have it.”

Share

Remix your Syllabus

I found a good idea for Vassar faculty in my email today and I wanted to share it. One of the ideas mentioned in 10 Things the Best Digital Teachers Do seemed like a simple yet powerful idea that might be useful to some.

If you are rethinking how you are teaching a course and want to invite the students to collaborate on redesigning the course, stick your syllabus in a wiki (like a Google doc or a Moodle wiki) and invite them as collaborators and rewrite it together. I imagine the process could be very invigorating.


Share

EDUC 373: Adolescent Literacy Wrapup

This week we had the final presentations for EDUC 373: Adolescent Literacy. In the class, area middle school students team up with Vassar students to develop digital storytelling projects. The students explore a number of multimedia formats, including but not limited to podcasts, PowerPoint, digital photography, digital stories and video. We had a really great sharing session as family members joined us to celebrate in their work.

You can view their projects here, thought it doesn’t really tell the full story. This was my fourth time helping Erin McCloskey with this class. This semester was a real high water mark for collaboration, attendance and productivity. The Vassar students spoke very articulately about how much they learned while working with their middle school partners. The students evinced great pride as they shared their blogs, videos, photography and stories. During the semester, I spend the workshop time helping different groups with one technical problem or another, so I don’t often get to know the students very well, but the relationships and personalities were on display yesterday afternoon as the students presented their various projects.

One of my favorites was the “Rainbow Food Review” where the participants tried eating unique food combinations simultaneously:

I was impressed with the variety and creativity of the media shared. Mya and Diamond discussed their fashion blogs along with their DIY makeup video. Tori and Simone created a short film based on the concept of an Alien Talk Show. Some students shared with writing, poetry and photography (sometimes all at once). Others presented slideshows summarizing their various projects.

Erin McCloskey discusses the class here, illustrating how the class benefits both the Vassar students and their literacy partners:

In my opinion, the underreported story here is how often Vassar students (Education students) are involved productively in partnerships with diverse community members. Many of the middle school students return year after year to participate in these digital storytelling workshops!

Share

GIS Tools for Teaching and Research

by Baynard Bailey

Anthropology Professor April Beisaw is a very active user of GIS (Geographic Information Systems) and other technologies in her research and in her classroom. ACS recently produced a video featuring Professor Beisaw employing mobile mapping devices in the field (devices she was able to purchase via the Frances D. Fergusson Technology Exploration Fund). Using the GPS mobile mapping device makes it easy to collect data that can then be imported/loaded into GIS to make nice maps. The video features April Beisaw using mobile mapping devices for field research.

Professor Beisaw continues to be a dynamic user and an advocate for using various GIS (Geographic Information Systems) technologies in her classroom. Last year she asked that QGIS be added to the base image for public computers on campus. I didn’t know about QGIS until April pointed it out to me. QGIS is a free and open source tool that empowers users to “create, edit, visualize, analyze and publish geospatial information”. It is also cross-platform, so that means you can use it on your Mac, Windows or Linux machine. (As an educator, I really appreciate it when software is free and cross platform!) Not too long ago, April gave a little demo in her office showing me and a couple Economics professors how to import maps into QGIS and how to get started creating your own customized maps. It seemed like a great tool for teaching and research, although there is a bit of a learning curve.

All of these maps were made with free QGIS:


I should also mention that Vassar has a GIS lab (using ArcGIS) in Ely Hall 114 and that GIS is available on the SciVis Lab machines. Vassar GIS users can also arrange a consultation with Stephanie LaRose, who is a GIS specialist that comes to campus a couple days a week. If faculty or students are interested in pursuing any of these technologies or resources and would like help, please contact Academic Computing Services by emailing acs@vassar.edu.

Share

Digital Storytelling – Autobiographies with Final Cut Pro

computer-eyeNot too long ago I posted about Final Cut Pro X being an awesome tool for students new to video editing. I was in a class yesterday where the students blew me away with their outstanding work, after just one hour’s worth of training. I was so excited, I wanted to share their work with you.

The Context: The past few years I’ve worked with Professor Erin McCloskey and her EDUC 373: Adolescent Literacy classes. During the course of the semester, Vassar students are paired with area middle- and high school students. They work together developing stories, podcasts, videos and multimedia. We’ve used WordPress blogs to host, document and present their work, to share with classmates and parents. For the Vassar students to introduce themselves to their middle-school partners (and to their VC peers), we asked them to produce 1 to 2-minute digital autobiographies.

The Workshop: Last week during class, I trained the students in FCP X, and this week they posted their stupendous digital autobiographies. I asked them during their presentations if they had ever edited videos before. Most had little to no experience with video. I wanted to share these videos as the assignment really played to the strengths of the students. These are highly personal and very charming.


Student Videos: Here are a few representative examples (but all of the stories were great in their own way):

I showed them how to make their autobiographies in FCP X, but a few students did some interesting things on their own. Logan made an animated movie using his laptop’s camera. Stephanie combined her love of photography and used the YouTube Editor and FCP X to make this video.

We had a great class yesterday (2nd in the semester) sharing these videos with each other. Next week the VC students will use their videos to introduce themselves to their middle- or high- school partners. Professor McCloskey led a dynamic follow-up discussion where she asked her students to reflect upon the difficulties they encountered creating their videos, and how that experience could possibly provide insight when they begin to work with their adolescent literacy partners.


Share

Reflection: A Semester with FCP X – Video Editing with non-film students

fcpx2013Last summer the decision was made to use Final Cut Pro X as the supported video editing software for Vassar students. CIS deployed FCP X in the Film Department’s editing labs as well as in the Digital Media Zone in the library. To help us adapt to the switch from beloved FCP 7 to FCP X, we organized an on-campus workshop with Roberto Mighty. For two days Film faculty and CIS employees worked shoulder to shoulder, getting valuable hands-on experience with an interface that was new to most of us. There had been quite a controversy about Apple’s changes from FCP 7 to FCP X, and most of us were apprehensive about the switch. But after two days of excellent instruction, our general sense was that the FCP X could generally do anything FCP 7 did, and it did some things better. I was looking forward to using it with students.

Using FCP X for Digital Storytelling

Past years I’ve worked with French Faculty with students who were tasked with creating digital storybooks. (For more on the pedagogical goals of this project, I invite you to read Digital Storytelling in Intermediate French.) Early in the fall, I met with Tom Parker and Mark Andrews to discuss their classes’ projects. In small groups, the students compose and illustrate children’s storybooks in French, which they scan and narrate. Previously we’d uploaded the images to VoiceThread and done the recordings via their online Flash interface. Students were able to upload and record easily enough, but I found other aspects of VoiceThread lacking (editing, layering audio, search, embedding, restrictive licensing, to name a few). FCP might be harder to learn, but once learned, they would have total flexibility on how they created their projects and they would have a skill that might be used for another project or life after college. Tom and Mark were amenable to the idea so we tried it out.

I only had an hour with the students so it was a bit of a challenge to cover the essentials in such a short period. Luckily, their projects only required them to import their scanned storybook pages into FCP X, then record narration. We spent a fair amount of time doing practice narration. We touched briefly on titles, incorporating sounds and music, and exporting. Students that had brought scans of all of their storybook pages were able to get a significant amount of work done during the workshop. One of the classes was able to have a follow-up workshop where I was able to work with each group, advising and troubleshooting. This was extremely valuable and I wish we had been able to schedule this for both classes. Generally speaking, students adapted well to FCP X and were quite successful. I don’t think I would have been confident enough to use FCP 7 in the same way. Here is an example:

I liked how they were able to incorporate both their narration and some sound effects. The use of titles, music and end credits added a bit of polish too. I should add that most of the students I work with have little to no experience with video or sound editing.

America in the World Digital Narratives

Eve Dunbar and Carlos Alamos co-taught AMST 250: America in the World this past fall. For one of their major assignments, students could choose to write a paper, create a podcast, or a a digital narrative. I trained the entire class to edit audio, but a couple students were interested in using video for their digital narratives, so I met with them one-on-one. The students were able to start editing after an hour of training. Here’s an ambitious project that a student put together based on interviews she made using her phone:

FCP X FTW!

So for me and my work, FCP X has been a win. It is an easy to learn and very capable video editing platform. Students are able to get up and running with their video projects in a way that would have been too daunting to attempt in FCP 7. (One hurdle is that special formatting is required for projects on external drives to show up in FCP X.) Students do have the option to download a trial version of FCP X, which is often all they need to get through a project.

I’ve already got one class scheduled to use FCP X this semester: Candice Swift’s ANTH 245: The Ethnographer’s Craft is going to use FCP X to create digital enthnographies; they will use Final Cut to create voice-overs on top of stills and video. I am looking forward to this FCP X project and others like it this spring.

Share

Moodle Site Revamp in Three Easy Stages: Part 3 of 3

by Baynard Bailey

Elegant Moodle Site Design Part III

In Part I, we set the stage for redesigning our Moodle site by backing up our site and then clearing out unnecessary files. We also chose a design style for our course. In Part II, we employed Moodle “Web Pages” as a way to keep our instructional design elegant and efficient. Now, for Part III, we are going to complete our Moodle site revamp by fleshing out our course site, and building easy to use and understand links to activities and readings.

Order! Order!

A Messy Files Area Increases Cognitive Load for Faculty and Students

Building Simple and Effective Course Links

Before we build the links, it is important to remind ourselves of one of the peculiarities of Moodle. I’m not sure if this applies to all Moodle users, but it applies to Vassar’s current version – Moodle 1.9.16. If you have a file in the files area and there is a live link to the file from your course site, Moodle won’t let you delete the file. However, if you move the file, Moodle won’t automatically update the link with the file’s new location, so the link won’t work for students any more. There is no notification to the instructor that the link is broken. The best way to avoid this problem is to organize your files well before building the course links.

Instructors may choose to build links to every file, or they may choose to provide links to directories containing .pdfs and other course files. The choice depends mostly on the number of readings students access via Moodle. If you have a large number of .pdfs for the students to download, building a link to every file is tedious. It can also promote “Moodle Sprawl”, as every file linked to the front page increases the size of the page. Most professors would benefit from providing a link to a directory or directories containing readings and other files. This is a great strategy IF the professor has a consistent naming system for the files, as the file names will be the students only way of locating the readings.

Many computer systems alphabetize things differently than humans. For example,  in Moodle’s File Area, all capital letters come before all lower case letters. Hence, the letter ‘Z’ comes before the letter ‘a’. All numbers come before letters. Spaces and some symbols come before numbers and letters, other symbols follow letters and numbers. If you have ever looked at your Moodle files and been bewildered by how things are arranged, the  rules of alphabetization are probably to blame. To leverage computer alphabetization, employ a consistent file naming scheme, such as “lastname_of_author-article_title”. If you are capitalizing, make sure that you capitalize the first letter of each file. That way, when students go to find files in a directory with many articles, they will easily be able to find the readings by searching for the author’s name.

Links

Consistent File Naming in Action

Reduce Moodle Clutter: Prioritize Major Assignments and Activities

Major assignments should be highly visible at the beginning of the semester. Having fewer “clutter” items at the top level lends significance to activities and assignments that are displayed on the front page.

Forums are one of the most popular Moodle activities, but be careful to choose a forum / discussion board that suits your course. The “standard forum” in Moodle has the capacity a nigh-infinite number of questions, topics and responses. If you envision a lot of forum activity and a large number of topics during the semester, then the “standard forum” is the right choice (hint: you most likely need just one). However, if you are planning just a few activities that require  forum posts, consider the other forum types:

  • A “single simple discussion” keeps the class focused and responding to a single prompt.
  • “Each person posts one discussion” enables every student to post one topic, like a paper proposal, and everyone else can reply.
  • The “Q &A forum” is the an interesting pedagogical forum: each student must post their opinion or viewpoint before they are allowed to view their fellow students’ posts. If you are trying to prevent groupthink, this might the choice for you.

Finishing Touches

mountain range

A good banner image for a course will be panoramic in its aspect ratio (image courtesy of philflieger in Flickr).

If you haven’t already, be sure to add your contact information and office hours at the top. If you feel so inspired, create a banner (hint: something wide and not too tall, around 100 kb; large pictures punish users accessing via laptops, tablets and smartphones). When uploading the syllabus, apply a naming convention to help keep track of versions. (Hint: use numbers or letters, as having a syllabus titled “final-final-final version” is confusing.) Once you have your readings, major assignments, and activities in place, your Moodle site is ready to go. Hopefully these posts will help you revamp your site. An elegantly designed Moodle site, one that increases functionality and is easy to use, will benefit students and faculty alike.

As a postlude to my Moodle Design series, I’ll be adding an article highlighting some really great but oft-overlooked features in Moodle.

Share

Moodle Site Revamp in Three Easy Stages: Part 2 of 3 – Elegant Design Architecture

Building Elegant Instructional Design Architecture with Moodle Web Pages

by Baynard Bailey

In Part I of this series, I focused on the preliminary stages of revamping a Moodle site. The major steps included backing up your materials, culling unnecessary files, and choosing a course design that fits your teaching style (for most that means choosing a ‘topical’ or ‘weekly’ format). In this post, I hope to provide some tips to empower your Moodle site to enhance student understanding of the overall  arc and flow of the course.

Many of the Moodle sites I see suffer from ‘sprawl’ or ‘bloat’. The site starts out fine, but by the end of the semester, especially for courses that meet more than once a week, the length of the front page stretches on for screen after screen. Scrolling to the bottom of the page (the current week) can take a minute or more, and sifting through past weeks’ materials and activities is tedious. Why put up with this, when you can have an elegantly designed Moodle site that better reflects the structure and scope of your curriculum? Consider putting topics, class meetings or weeks into their own “web pages” within Moodle. The resulting front page of your Moodle site will be an elegant summary of the major topics of your course, easily navigable, and an aid to learning.

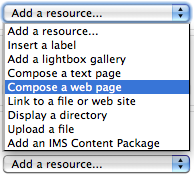
Compose a Web Page Screen Shot

Creating web pages makes elegant Moodle site design easy.

It is easy to overlook  the “Compose a web page” resource tool, especially when one is first using Moodle. But if you are revamping a course, this resource choice is worth serious consideration. Composing Moodle web pages provides instructors ample room to provide detailed directions for class activities without adding unnecessary sprawl to the front page of your course site. I will use some examples from a recent consult I had with Molly Shanley.

Molly wanted to meet because she had taught a course Poli Sci 278 before, using Blackboard. She was now getting ready to build her site in Moodle and wanted tips for building sites for Moodle courses that met biweekly. She had a syllabus that was 90% complete. I decided I would try and sell her on the idea of using Moodle web pages to help structure her course.

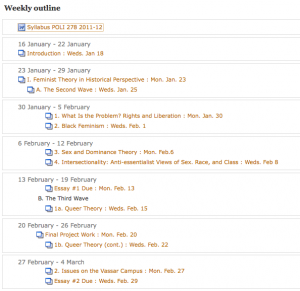
We built a few of the first class meetings with a web page for each meeting. This really reduced front page sprawl, especially in regards to the some of the early class meetings, which contained comprehensive directions and details. We discussed how this approach allowed the main topics of the course to stay afloat at the top level of the site, becoming a sort of topical outline for the semester. Students would be able to easily discern the arc of the course, and to place the topic for each class within that arc. At the same time, the full details for readings and assignments could be accessed quickly and easily. We were happy with the results so we copied and pasted the syllabus outline and fleshed out the bulk of the course.

Outline for Part of the Course

Each Class Becomes a "Branch" of the Course Outline (Draft Syllabus)

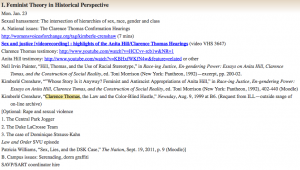
Here’s a sample “Moodle Web Page”, found by clicking on the corresponding link from the outline above:

Sample course meeting

Copying and Pasting Yielded Excellent Results

Since Molly had a well developed syllabus, it was a straightforward mechanical process to paste the details into a corresponding structure in her Moodle site. The front page of her Moodle site became an outline of the entire course. Each class meetings’ corresponding web page will contain detailed information about readings, activities and assignments. Building the design of your course into a corresponding visual and textual pattern in Moodle is excellent instructional design, facilitating the learning and teaching process.

Look forward to Part III where we’ll complete the Moodle site revamping process.

Share