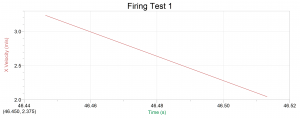
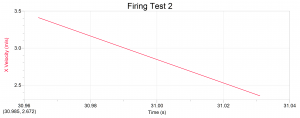
Presented below are the analyzed projectile velocities of several test firing runs of our group’s rail accelerator. The data contains limited data points due to the low fps camera’s inability to accurately capture portions of our projectile’s movement. Another factor limiting both the number of data points and the velocity of the projectile is the tendency of the projectile to vaporize and then ionize into plasma upon the current being connected through it. The electric current transforms the projectile which fades away into nothing as it travels through space.
Figure 1: Graphed data from our first firing test (click to enlarge)
Figure 2: Graphed data from our second firing test (click to enlarge)
These results clearly show the deceleration of our projectile as it fades away and ceases to travel. The initial velocity in the graph represents the velocity as the projectile leaves the rails, no acceleration can be picked up by the camera before then, as the fps is too low to identify the nearly instantaneous acceleration.
The results match our expectations for the projectile’s behavior in that we initially recognized the potential for the projectiles to become plasma. The velocity exhibited seems reasonable given the size of our rail accelerator and projectiles, as well as the relatively low voltage stored in our capacitor bank.
Due to the variable educational backgrounds of our group members, everyone learned something a little different. As an overview we all learned something about the physics involved in the function of a rail accelerator. Specifically we learned through hands-on experimentation about the use of electricity to generate Lorentz force to propel a projectile. A lot of our learning went a little beyond the direct science of the project though, as we all learned something about actually constructing a scientific apparatus for testing.
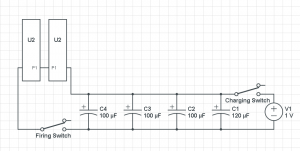
Figure 3: Circuit Diagram for our Rail Accelerator (U2 represents a rail) ((Battery Voltage 1.5V not 1))
If we had to do this project again we would be more attentive to the original construction of our rails and circuit. Small problems in our construction caused major annoyances later in the project. Having constructed a rail accelerator previously would also be largely beneficial. If we were to continue the project, or maybe even in other trials there are several additions we would consider. Testing with different projectiles is the easiest to attempt, if we had suitable materials we might have been able to avoid the problem with the disintegration of our projectiles. If we continued the project it would be interesting to investigate the effects of adding additional capacitors to the charging circuit. Comparing the two charging circuits would clearly show the role the capacitor bank plays in the speed of the projectile fired from the rail accelerator. Another option would be to look into obtaining and using higher quality materials to avoid component failure which adversely affected the entire project.


Impressive that you built your own device and then tested it. Also, you might benefit from a high speed camera. As pointed out during your presentation it is still not entirely clear how the physics for your rail gun works…