Technology on the Squash Court

Interview with Jane Parker
Jane Parker, Head Squash Coach, demonstrates how she uses technology to aid her coaching: by projecting videorecordings model squash playing on the front wall of the court, and by recording athletes’ performances on an iPad, for immediate playback and analysis. (3:56)

Remix your Syllabus

I found a good idea for Vassar faculty in my email today and I wanted to share it. One of the ideas mentioned in 10 Things the Best Digital Teachers Do seemed like a simple yet powerful idea that might be useful to some.

If you are rethinking how you are teaching a course and want to invite the students to collaborate on redesigning the course, stick your syllabus in a wiki (like a Google doc or a Moodle wiki) and invite them as collaborators and rewrite it together. I imagine the process could be very invigorating.


Share

Bring a Scanner on Your Next Research Trip

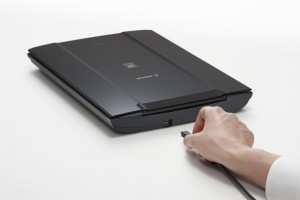
ACS has a portable scanner that’s available for Vassar faculty members to borrow. It’s ideal for bringing to an archive to scan documents (if allowed) for later study. While it’s true that you can save an image of a document page with your phone/camera, a scan will give you a much more consistent and high-quality result.

Most scanners are too bulky and heavy to consider traveling with, but not this one. The Canon Canoscan LiDE 700F is essentially the size of a laptop computer. It’s less than 2 inches high, with a footprint of 11.5 x 16 inches. It weighs only 4.6 pounds. It can scan a letter-size document (8.5″ x 11″) with a resolution of up to 4800×4800 dpi. It fits snugly in a 12″ x 17″ 2.5″ padded carrying case.

71hM38-aSVL._SL1500_


Contact your ACS liaison if you’re interested in borrowing it.

Share

The Bamboo® Graphic Input Tablet

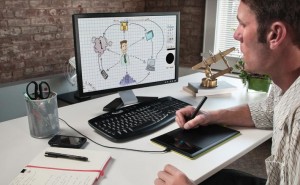
Do you ever need to draw or write free-hand on your computer, but doing it with a mouse is too awkward and you don’t want to buy an iPad or any other tablet computer? You may be happy with a graphic input tablet, like the Bamboo® Connect Pen, which Vassar faculty members can borrow from ACS.

710x440_Connect_01

A graphic input tablet is a device on which you can draw with a stylus— it doesn’t have its own display, but you see the results of your drawing on your computer screen. It’s essentially like using a mouse, but one that you can control as well as you can control a pen.

While using any software that allows you to draw free-hand— Photoshop, Powerpoint, and many others— you can draw diagrams or write equations. The Bamboo Connect tablet is made by Wacom, which is known for its large tablets that are favored by graphic designers. The Bamboo Connect is just 11″ x 7″, with a 5.8″ x 3.6″ drawing area.

Here’s a demonstration and review:

If you’d like to try it out, contact your ACS liaison.

Share

Add Panning Motion to Keynote Presentations, and Annotate Screenshots

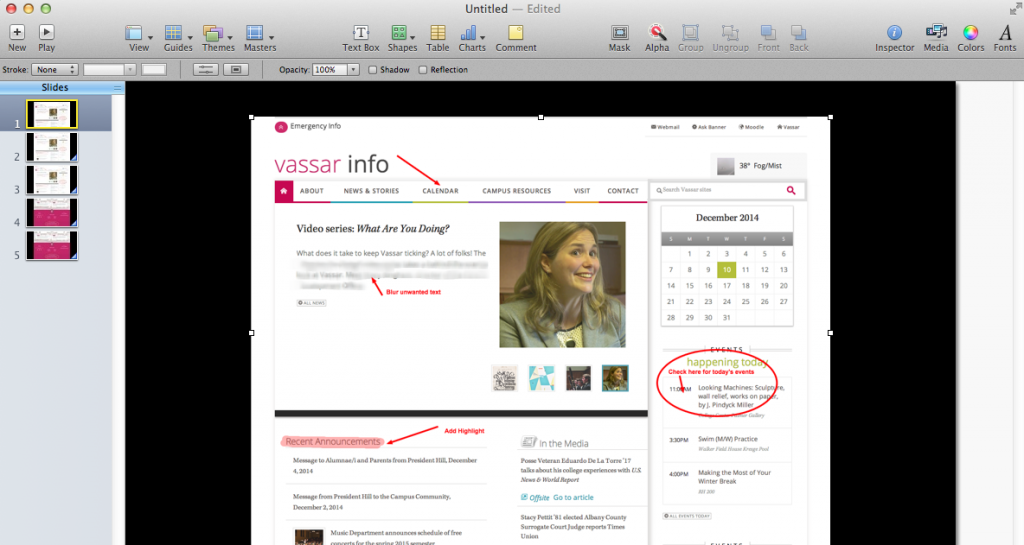
Keynote provides many tools for animating content of your slide presentation. One easy and very useful movement uses the Magic Move transition.  This tool allows a panning movement across a large image. For example, if you wanted to show the entire length of a webpage or a large photograph, you could use the Magic Move transition to move across the page. This will work with any object that is in one position in the first slide and is in a new position in the following slide. For this this example, I captured a screenshot of an entire webpage that would require scrolling down in order to view all the content. In the first slide, the image is positioned on the slide so that the top of the webpage is visible. In the following slide, the image is positioned so that the bottom of the webpage is visible. Using the Magic Move transition, Keynote will create the panning movement between the two slides.

This is what it would look like:


Steps:
Import image into Keynote slide by dragging and dropping it onto a blank slide.
Screen Shot 2014-12-10 at 3.39.56 PM

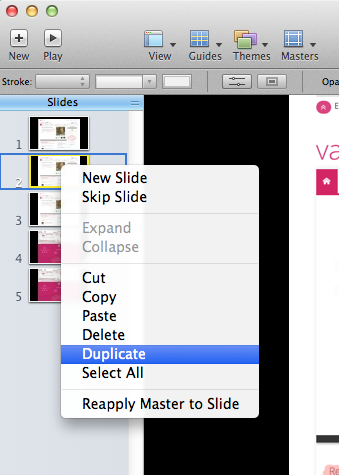
Duplicate the slide. To duplicate a slide in Keynote, right-click on the slide you wish to copy, or select Duplicate Slide from the Edit Menu.

Screen Shot 2014-12-10 at 3.40.41 PM

On the new (duplicate) slide position the image so that the bottom portion is visible.

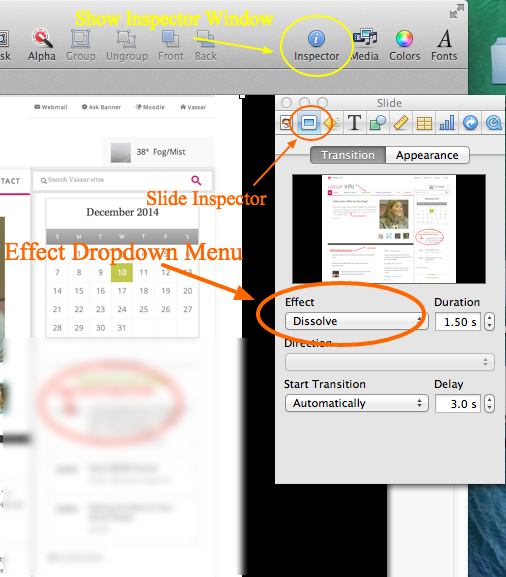
Open the Slide Inspector window.

Click on the slide inspector icon then choose the transition tab.

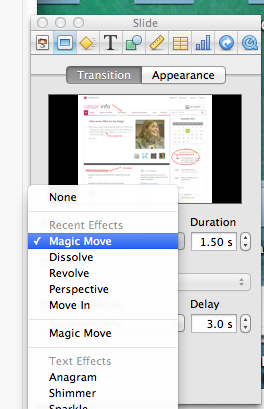
Under the Effect dropdown menu, choose Magic Move.

screen shot edit pm2

Screen Shot 2014-12-10 at 3.54.43 PM

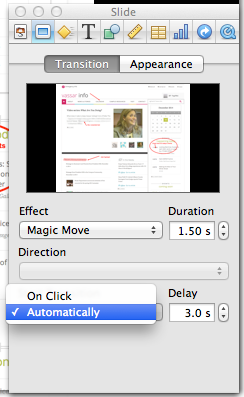
At the bottom of the inspector menu you will have the option for the transition to start automatically or “on click.”

You will also be able to choose the speed of the transition and whether or not to insert a delay before the start of the effect.

Screen Shot 2014-12-10 at 5.06.08 PM

Tip for Annotating Screenshots:
For this example, I used a free application called Awesome Screenshot.”
It is available for Chrome and Firefox browsers, and it allows you to capture an entire webpage, or any portion of a page. It also provides tools for annotating screenshots.

http://awesomescreenshot.com

Here’s a quick tutorial:


Share

EDUC 373: Adolescent Literacy Wrapup

This week we had the final presentations for EDUC 373: Adolescent Literacy. In the class, area middle school students team up with Vassar students to develop digital storytelling projects. The students explore a number of multimedia formats, including but not limited to podcasts, PowerPoint, digital photography, digital stories and video. We had a really great sharing session as family members joined us to celebrate in their work.

You can view their projects here, thought it doesn’t really tell the full story. This was my fourth time helping Erin McCloskey with this class. This semester was a real high water mark for collaboration, attendance and productivity. The Vassar students spoke very articulately about how much they learned while working with their middle school partners. The students evinced great pride as they shared their blogs, videos, photography and stories. During the semester, I spend the workshop time helping different groups with one technical problem or another, so I don’t often get to know the students very well, but the relationships and personalities were on display yesterday afternoon as the students presented their various projects.

One of my favorites was the “Rainbow Food Review” where the participants tried eating unique food combinations simultaneously:

I was impressed with the variety and creativity of the media shared. Mya and Diamond discussed their fashion blogs along with their DIY makeup video. Tori and Simone created a short film based on the concept of an Alien Talk Show. Some students shared with writing, poetry and photography (sometimes all at once). Others presented slideshows summarizing their various projects.

Erin McCloskey discusses the class here, illustrating how the class benefits both the Vassar students and their literacy partners:

In my opinion, the underreported story here is how often Vassar students (Education students) are involved productively in partnerships with diverse community members. Many of the middle school students return year after year to participate in these digital storytelling workshops!

Share

Citrix Demystified

Citrix is an application virtualization product that allows users to connect to a suite of applications not installed on your computer from a wide range of computer systems and mobile devices, both on and off campus.  One way to access Vassar’s Citrix applications is to install the Citrix Receiver on your computer or device.  Alternatively, you can use a web browser to access the Citrix applications via VApps (Vassar Virtual Applications), which can be found at http://vapps.vassar.edu.  Academic applications available on Citrix, via either the Citrix Receiver or VApps, include JMP, MATLAB, SAS, and SPSS, among others.  The VApps web interface is shown in Figure 1.
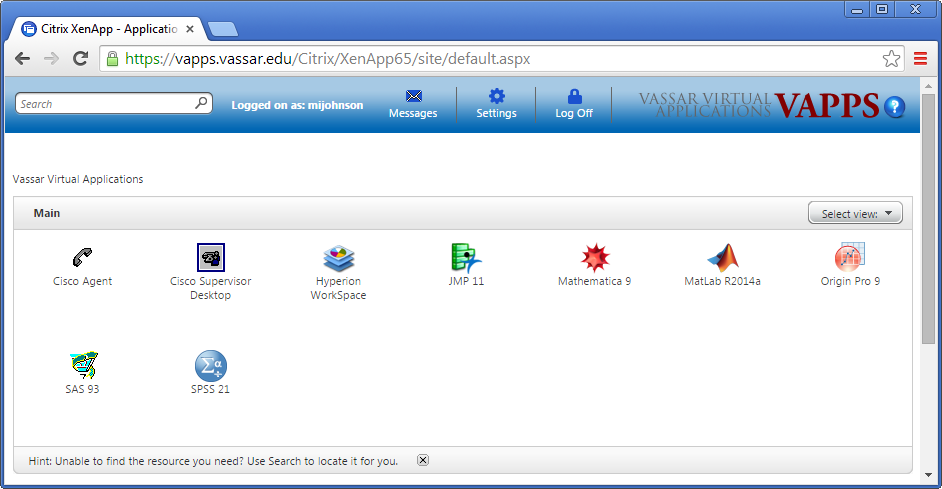
VAPPS_2

Figure 1. View of a typical VApps session.

LOAD BALANCING

While the ability to access software via Citrix is an invaluable resource for faculty and students alike, both factions have historically found the file system to be confusing and frustrating.  Faculty frequently inquire, “Where should I save my files?” or “Where did my files go?”  Much of the confusion results from the fact that all applications on Citrix are configured to be load balanced between two or more servers.

Load balancing is a way to distribute incoming traffic among servers hosting the same application content.  Load balancing aims to optimize resource use, maximize throughput, minimize response time, and avoid overload of any single resource (Wikipedia, 2014).  When one application server becomes unavailable, the load balancer directs new application requests to other available servers in the pool. When you launch an application on Vassar’s Citrix system, you will be directed to a given server based upon a set of rules designed to keep the system load balanced.  There is no way to specify a specific server when you log on.  If you were to save files to the Citrix server during one session (Server A), there is a 50% chance (or more) that you will be directed to a different server (Server B) on a subsequent session.  When this happens, you will not have access to files saved during your previous session.  It will seem like your files have disappeared.  Eventually, you will end up back on Server A, and your files magically reappear.  The load balancing configuration used by Vassar’s Citrix applications is likely the primary reason many Citrix users have had been so baffled by the file system.

SAVING FILES

Where should you save your files when working on Citrix?  There are a few options to choose from.  Select “Save As” and scroll to “Computer” in the drop down menu.  You will see a number of drive options similar to those shown in Figure 2.
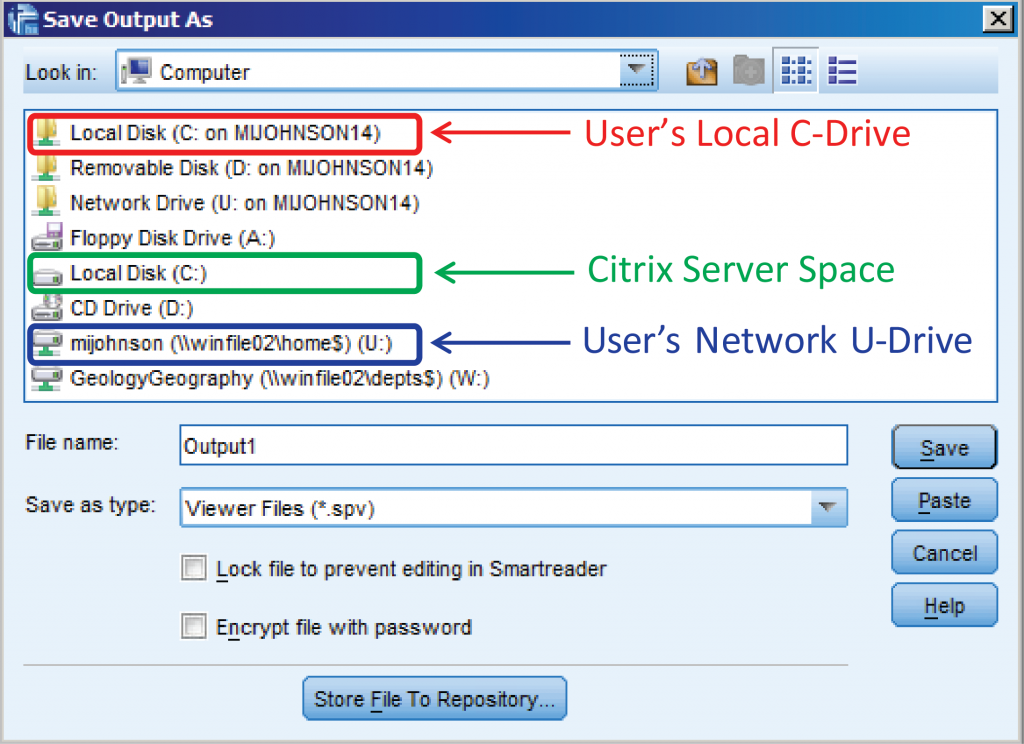
Figure 2. Common options for saving files on Citrix are shown. Do not save files to the Citrix server space, indicated by the green box. Your network U-drive, indicated by the blue box, is the ideal place to store your Citrix files. Alternatively, you may store files on your local drive.

Your U-drive, a network drive that you can access from any Citrix server, is the best place to store your Citrix files.  It is by far the safest environment to store files, because it is backed up 24/7/365, with up to 3 levels of media.  Each user is allotted up to 2 GB of U-drive storage.  Your U-Drive will be identified as: username (\\winfile02\home$) (U:).  Your Vassar user name will replace “username” as shown in Figure 2.  Students’ U-drives will be identified as:  username (\\stufile02\home$) (U:).   If you choose to save to your local machine, you will not, in most cases, be able to access those files when you are working from another location.  For example, files saved to your office desktop computer will not be accessible when you are working from home.

SIMPLIFYING ACCESS TO YOUR FILES

I recommend that you create a separate folder on your U-drive for each VApps application that you use.   Settle on a clear, consistent naming convention (e.g., My SAS Files, My JMP Files, etc.).  You can create these folders the first time you save to your U-drive from a given program.  Depending on the program, “Save As” will offer you the option either via a new folder icon (new_folder_star or new_folder_plus)  or a “New Folder” button near the top of the “Save As” window. Alternatively, you may be able to access your U-drive via your local computer. Most Windows allocations will be set up with your U-drive as a mapped network drive.  In this case, you can simply open Windows Explorer and navigate to Computer → username (\\winfile02\home$) (U:), where you can create new folders and access your files.  This drive is normally not mapped on Mac allocations.  To connect to your U-drive from a Mac, click on the Finder, go to the “Go” menu, and click on “Connect To Server.” Enter smb://winfile02.vassar.edu/home$/[username] in the Address field, click the “+” button to save to favorites, and click “Connect” to mount the space.  The space gets mounted at /Volumes/[username], but it should also appear on the desktop, depending on how the Finder preferences are set.

Once you have created new folders to organize your U-drive, you can create shortcuts, default folders, libraries, etc. that will simplify access to your files.  Unfortunately, the process must be repeated, due to load balancing, in order to implement access points on each server hosting the particular software being used.  You should use the same name on each server for whatever access points you create.  Since you cannot specify which server will be used for each Citrix/Vapps session, it may take a few VApps sessions (logging out and logging back in) before you have logged into each server and created identical access points on each.  Below are some examples of how to facilitate access to your U-drive.

  • SAS
    • Create SAS libraries linked to a folder on U-drive.  Click Tools → New Library. Give the library a name, click the “Enable at startup” box, browse to the appropriate folder on your U-drive (Look in: Computer), and click OK.
    • Make shortcuts to specific files.  Click Tools → New File Shortcut.  Give the shortcut a name and click the “Enable at startup” box.  Then, browse to the appropriate folder, and click OK.
  • JMP
    • Set file location preferences via the File → Preferences menu.  Select “File Locations” and set preferred locations for the “Data Files” and “Save As” directories.  Browse to the appropriate folder, click the box to “Always go to this directory…,”  Apply the changes and click OK.
    • Create a new Project via the File → New → Project menu or by clicking the “New Project” icon (jmp_new_project) in the Projects window.  Right-click on the new Project to add folders and documents from your U-Drive and change other settings.
  • SPSS
    • Define startup folders for Open and Save dialogs.  Select Edit → Options and click on the “File Locations” tab.  Browse to the desired folders on your U-Drive.  Click Apply, and then OK.  Provide Session Journal location and file name, if desired.
  • MATLAB
    • Reset default “userpath” and change startup folder to new userpath.
  • Origin Pro
    • Specify your “User Files Folder.”  Select Tools → Options and click on the “System Path” tab.  Click on “User Files Folder” and click the “Change…” button.  Browse to the designated folder on your U-Drive. Click OK to select the folder, to change the path of the folder, to close the restart notification, and finally to close the Options window.  Restart Origin to implement the change.

Remember that you will have to repeat the process on subsequent sessions until you have done so on each server hosting a particular application.  For a seamless experience, use the same names on each server when creating libraries and shortcuts.

Share

Publishing a Google Presentation in Moodle

by Amy Laughlin

Upload a PowerPoint or Keynote slideshow to Google drive and embed it in your Moodle site, and any changes you make to your presentation will be immediately reflected on your Moodle site. Your students will be able to view the presentation directly from within Moodle.

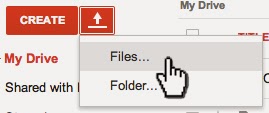
Click the upload arrow in your Google Drive and then choose Files

Upload-Files

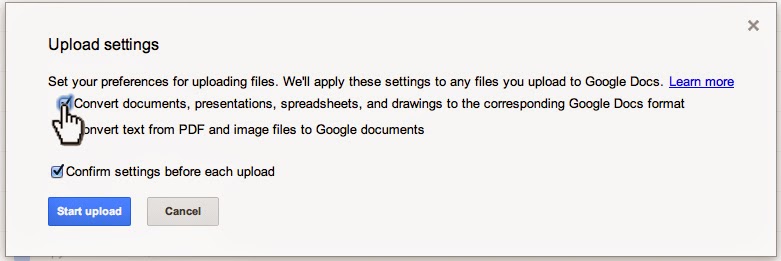
Make sure conversion is turned on:

Upload-Settings-Convert

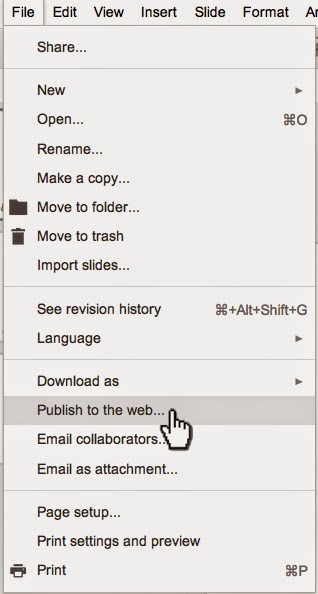
Once your presentation is uploaded, open it in your Google drive and click File > Publish to the Web.

File-Publish-to-the-Web

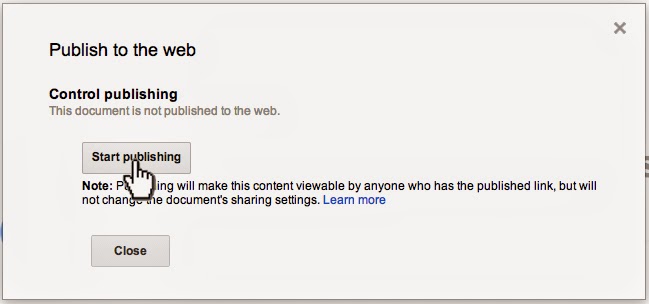
Then choose > Start publishing

Publish-to-the-Web

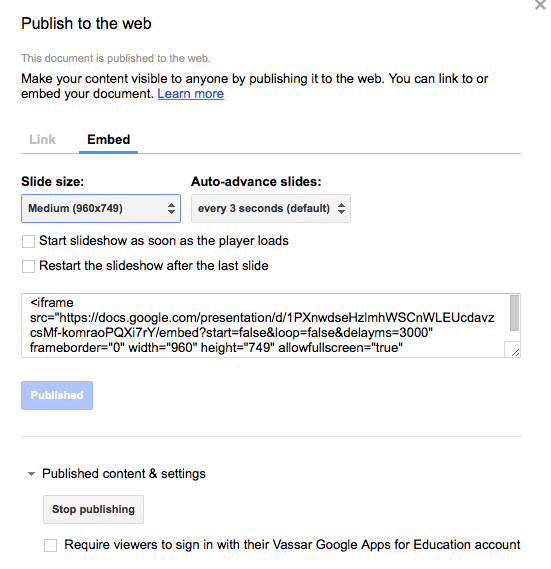
You will then see a dialog box that allows you to choose the size of your presentation and whether to Link or Embed. Choose the Embed tab, and copy the iframe source code.

Screen Shot 2014-10-20 at 2.33.16 PM

Now return to your Moodle site, turn editing on, and click on > Add an activity or resource.

Screen Shot 2014-10-20 at 2.41.48 PM

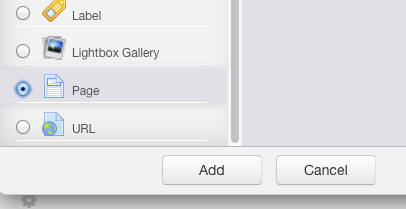
Choose > Add Page

Screen Shot 2014-10-20 at 2.42.28 PM

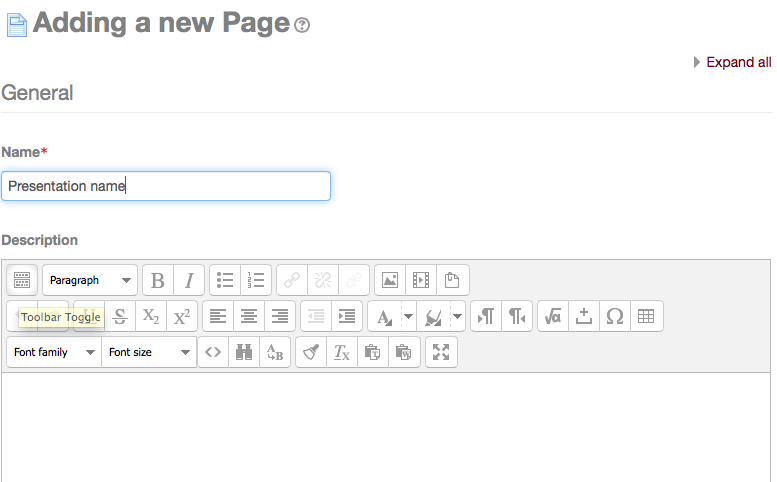
Add the name and description of your presentation. Make sure the toolbar toggle is turned on to reveal all the toolbar options. The toolbar toggle button is the first button in the upper left corner of the toolbar.

Screen Shot 2014-10-20 at 2.44.03 PM

Scroll down to the Content section (below the page description).

Screen Shot 2014-10-20 at 2.56.52 PM

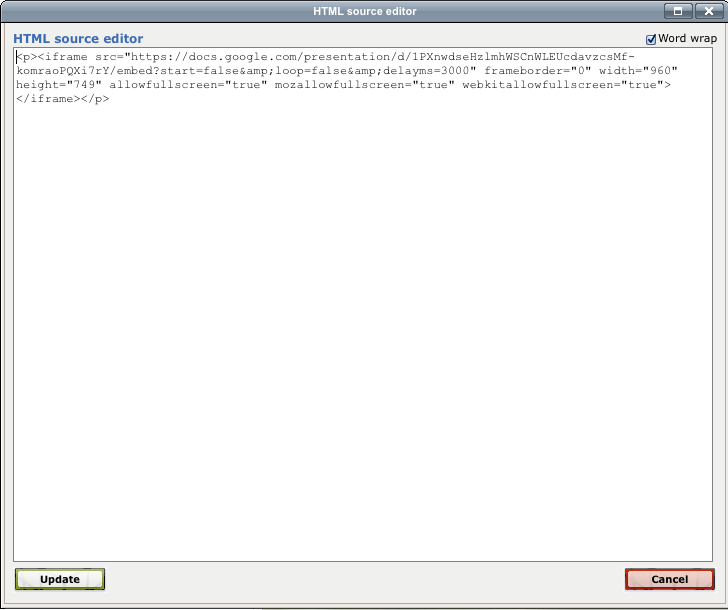
Click on the edit HTML source button (<>).

Screen Shot 2014-10-20 at 2.44.15 PM

Paste in the Embed code that you copied from the Google Presentation Publishing page, then choose Update, to save.

Screen Shot 2014-10-20 at 3.04.04 PM

Click either the “Save and Return to Course” or “Save and Display” button at the bottom of the screen.

Your Google Presentation is now live and published to your Moodle site. You can edit and update your slideshow from your Google Drive and your changes will automatically be reflected in your Moodle site. Note that you may need to refresh your browser page in order to see the slideshow.

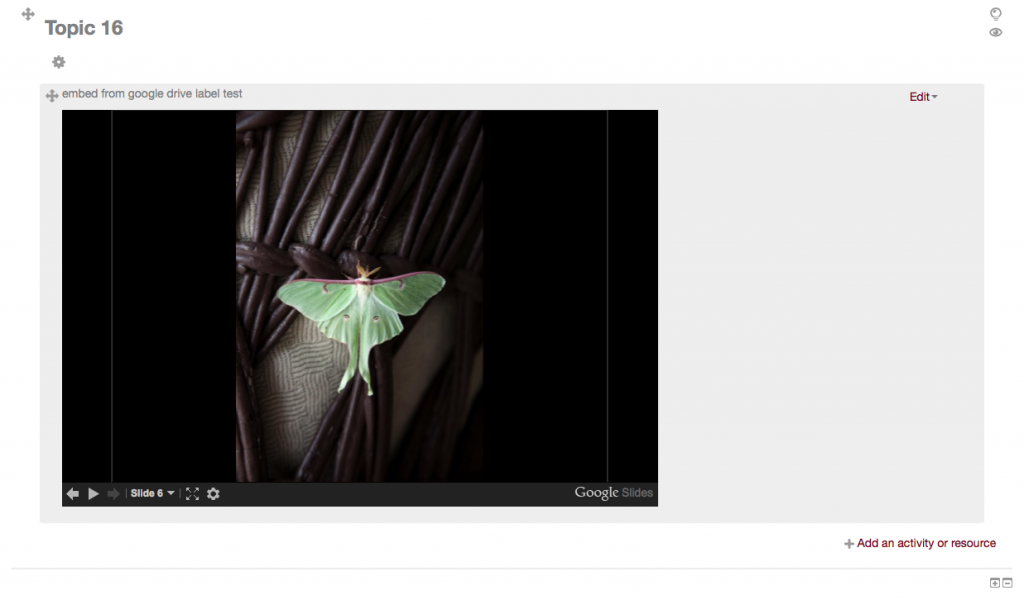
From your course page in Moodle, your presentation will appear like this:

Screen Shot 2014-10-20 at 3.12.14 PM

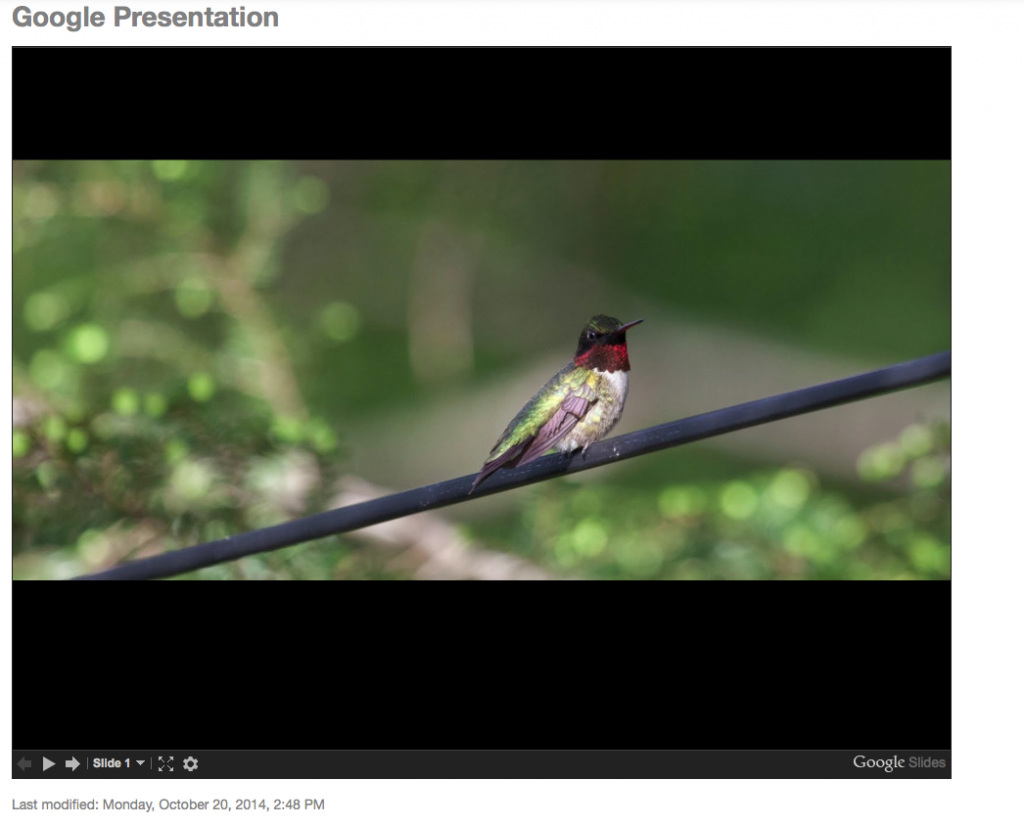
When your students click on the presentation file, a new Moodle screen will open displaying the slideshow:

Screen Shot 2014-10-20 at 3.12.35 PM

You may also embed your presentation as a Label instead of a Page in Moodle. When adding and Activity or Resource, choose Label instead of Page (all other steps remain the same), and your slideshow will be immediately visible from a section on your course page.

Screen Shot 2014-10-20 at 3.13.15 PM

 Works with video too.

If you want to embed video that is stored on your Google Drive you can copy the iframe code from the Google Drive Viewer. This is a great option if your video is not posted on YouTube or Vimeo.

Screen Shot 2014-10-21 at 12.42.30 PM

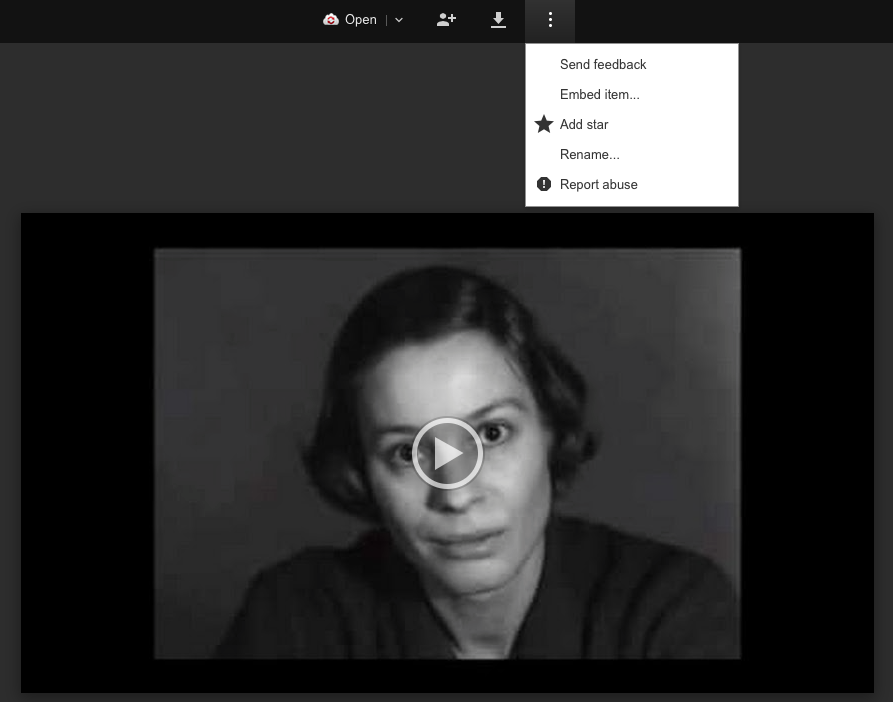
After uploading your video to Google Drive, select it and choose Open with > Google Drive Viewer, from the More drop-down menu. Once the video is open in Google Drive Viewer, click on the three vertical dots on the top menu, then choose Embed item.

Screen Shot 2014-10-21 at 12.33.09 PM


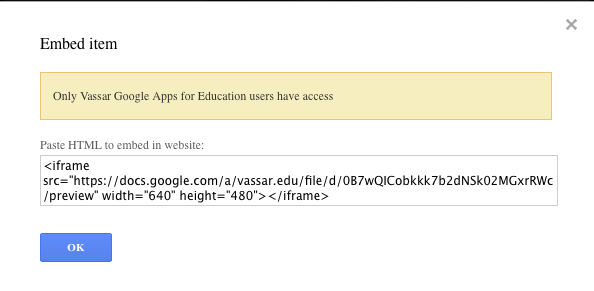
This screen will appear:

Screen Shot 2014-10-21 at 12.33.43 PM

Copy the embed code into a page or label using the HTML editor button in your Moodle site, following the same procedure as described above, to embed a slideshow presentation.

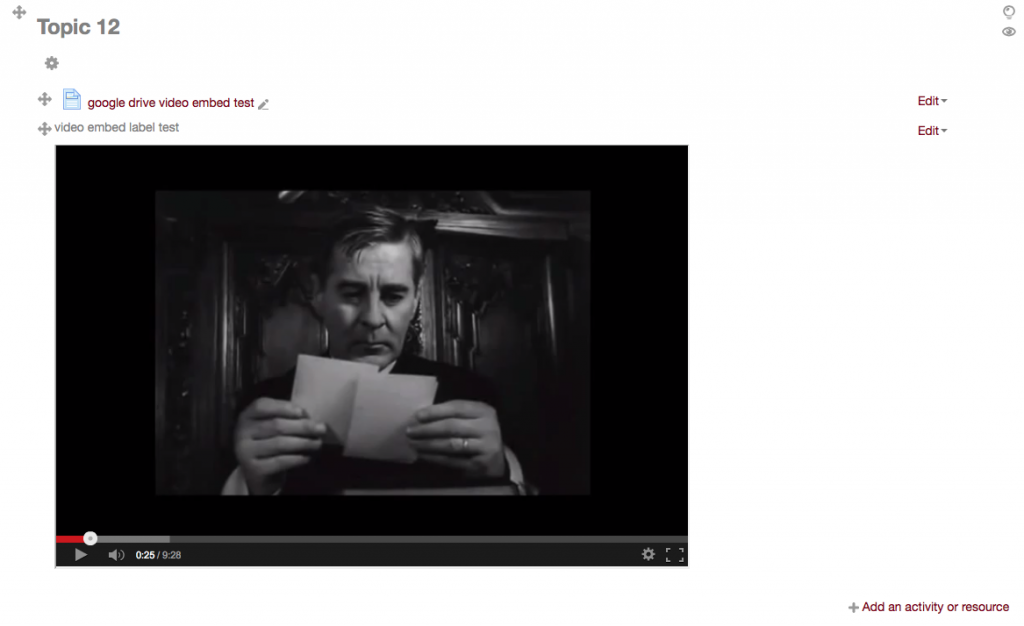
The resulting video will look like this in you Moodle site:

Screen Shot 2014-10-21 at 12.31.48 PM

If you embed the video into a Moodle page then you will see the page icon. When clicked, it will open a separate window for viewing the video. If you embed the iframe code into a Moodle label you will see the video embedded in your course front page.


Share

Remote Learning at a Residential College

by Steve Taylor

Since shortly after the web was developed, colleges and universities have used it for conducting distance education programs. Leaders in the practice included public institutions, whose mission included serving a wide geographical area of non-traditional students; large universities, who were challenged to provide alternatives to courses taught in huge lecture halls; and professional schools and trade schools, whose focus was on procedural skills. The emergence of MOOCs in 2012 brought more attention to the practice. It has not been obvious, however, how distance learning technologies could benefit small, private, residential, liberal arts colleges like Vassar. Many have doubted— reasonably so—  that an online course could offer a better learning experience than a face-to-face course with a small student/faculty ratio. At Vassar this summer, we identified a use for distance learning technologies that borders on the ironic: a residential college connecting with its students when they’re not in residence; an institution known for small class sizes interacting with a student cohort of 700. We used Moodle to enhance our summer common reading program for incoming students.

Vassar College has administered a common reading program for first-year students every summer since 2006. The Dean of Freshmen’s office mails a copy of the chosen book (this year’s was Alison Bechdel’s graphic memoire, Fun Home), along with other orientation materials, to each admitted student’s home address. The students are instructed to read the book, but there have been no other requirements. For the summer of 2014, Dean Susan Zlotnick wanted to enhance the common reading experience with some online interaction, using Moodle. Over the course of several weeks, ACS produced three short videos, each with a different faculty member speaking about an aspect of the book, and inviting students to respond to one of several discussion prompts. Student participation was high, for an activity that had no penalty for non-participation. 427 of the 670 students (64%) posted responses, most of them substantial in length.

The goals of the common reading program are to give incoming students a preview of what classes at Vassar might be like, and to give them an opportunity to have a common intellectual experience with each other before courses begin. By all accounts, that was successful. This experience raises an interesting question: what other aspects of Vassar life might be enhanced by having an online space for shared information and social interaction?

Share

GIS Tools for Teaching and Research

by Baynard Bailey

Anthropology Professor April Beisaw is a very active user of GIS (Geographic Information Systems) and other technologies in her research and in her classroom. ACS recently produced a video featuring Professor Beisaw employing mobile mapping devices in the field (devices she was able to purchase via the Frances D. Fergusson Technology Exploration Fund). Using the GPS mobile mapping device makes it easy to collect data that can then be imported/loaded into GIS to make nice maps. The video features April Beisaw using mobile mapping devices for field research.

Professor Beisaw continues to be a dynamic user and an advocate for using various GIS (Geographic Information Systems) technologies in her classroom. Last year she asked that QGIS be added to the base image for public computers on campus. I didn’t know about QGIS until April pointed it out to me. QGIS is a free and open source tool that empowers users to “create, edit, visualize, analyze and publish geospatial information”. It is also cross-platform, so that means you can use it on your Mac, Windows or Linux machine. (As an educator, I really appreciate it when software is free and cross platform!) Not too long ago, April gave a little demo in her office showing me and a couple Economics professors how to import maps into QGIS and how to get started creating your own customized maps. It seemed like a great tool for teaching and research, although there is a bit of a learning curve.

All of these maps were made with free QGIS:


I should also mention that Vassar has a GIS lab (using ArcGIS) in Ely Hall 114 and that GIS is available on the SciVis Lab machines. Vassar GIS users can also arrange a consultation with Stephanie LaRose, who is a GIS specialist that comes to campus a couple days a week. If faculty or students are interested in pursuing any of these technologies or resources and would like help, please contact Academic Computing Services by emailing acs@vassar.edu.

Share