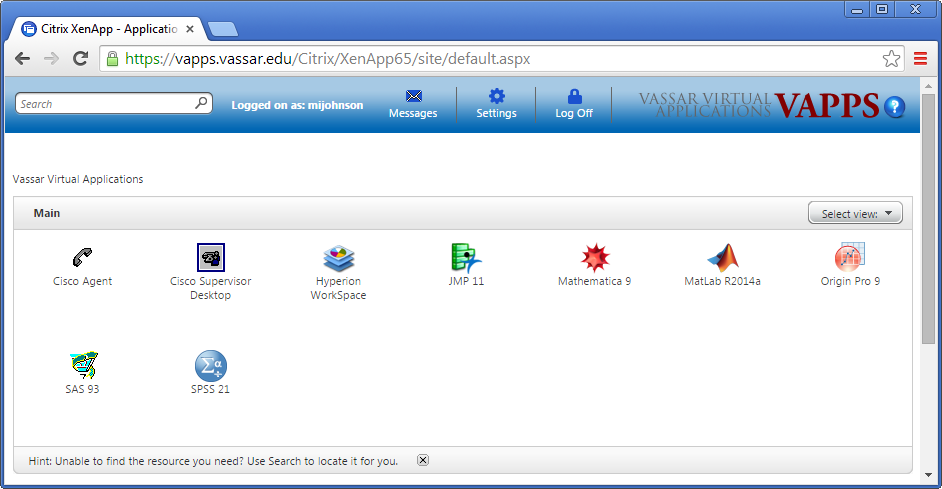
Citrix is an application virtualization product that allows users to connect to a suite of applications not installed on your computer from a wide range of computer systems and mobile devices, both on and off campus. One way to access Vassar’s Citrix applications is to install the Citrix Receiver on your computer or device. Alternatively, you can use a web browser to access the Citrix applications via VApps (Vassar Virtual Applications), which can be found at http://vapps.vassar.edu. Academic applications available on Citrix, via either the Citrix Receiver or VApps, include JMP, MATLAB, SAS, and SPSS, among others. The VApps web interface is shown in Figure 1.
LOAD BALANCING
While the ability to access software via Citrix is an invaluable resource for faculty and students alike, both factions have historically found the file system to be confusing and frustrating. Faculty frequently inquire, “Where should I save my files?” or “Where did my files go?” Much of the confusion results from the fact that all applications on Citrix are configured to be load balanced between two or more servers.
Load balancing is a way to distribute incoming traffic among servers hosting the same application content. Load balancing aims to optimize resource use, maximize throughput, minimize response time, and avoid overload of any single resource (Wikipedia, 2014). When one application server becomes unavailable, the load balancer directs new application requests to other available servers in the pool. When you launch an application on Vassar’s Citrix system, you will be directed to a given server based upon a set of rules designed to keep the system load balanced. There is no way to specify a specific server when you log on. If you were to save files to the Citrix server during one session (Server A), there is a 50% chance (or more) that you will be directed to a different server (Server B) on a subsequent session. When this happens, you will not have access to files saved during your previous session. It will seem like your files have disappeared. Eventually, you will end up back on Server A, and your files magically reappear. The load balancing configuration used by Vassar’s Citrix applications is likely the primary reason many Citrix users have had been so baffled by the file system.
SAVING FILES
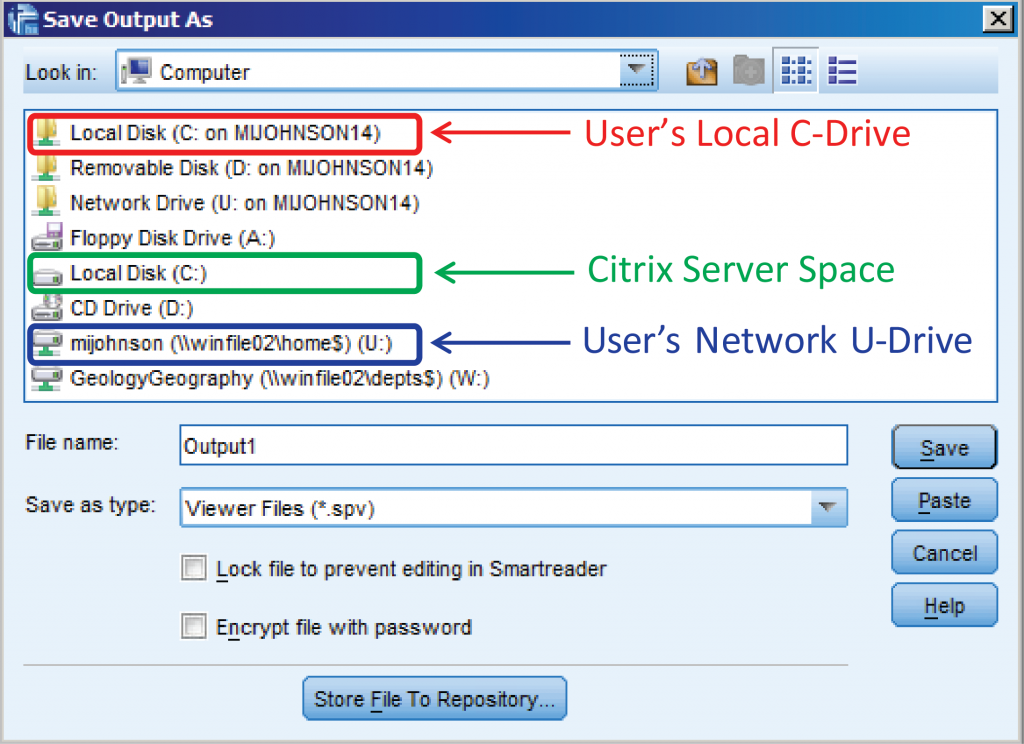
Where should you save your files when working on Citrix? There are a few options to choose from. Select “Save As” and scroll to “Computer” in the drop down menu. You will see a number of drive options similar to those shown in Figure 2.

Figure 2. Common options for saving files on Citrix are shown. Do not save files to the Citrix server space, indicated by the green box. Your network U-drive, indicated by the blue box, is the ideal place to store your Citrix files. Alternatively, you may store files on your local drive.
Your U-drive, a network drive that you can access from any Citrix server, is the best place to store your Citrix files. It is by far the safest environment to store files, because it is backed up 24/7/365, with up to 3 levels of media. Each user is allotted up to 2 GB of U-drive storage. Your U-Drive will be identified as: username (\\winfile02\home$) (U:). Your Vassar user name will replace “username” as shown in Figure 2. Students’ U-drives will be identified as: username (\\stufile02\home$) (U:). If you choose to save to your local machine, you will not, in most cases, be able to access those files when you are working from another location. For example, files saved to your office desktop computer will not be accessible when you are working from home.
SIMPLIFYING ACCESS TO YOUR FILES
Once you have created new folders to organize your U-drive, you can create shortcuts, default folders, libraries, etc. that will simplify access to your files. Unfortunately, the process must be repeated, due to load balancing, in order to implement access points on each server hosting the particular software being used. You should use the same name on each server for whatever access points you create. Since you cannot specify which server will be used for each Citrix/Vapps session, it may take a few VApps sessions (logging out and logging back in) before you have logged into each server and created identical access points on each. Below are some examples of how to facilitate access to your U-drive.
- SAS
- Create SAS libraries linked to a folder on U-drive. Click Tools → New Library. Give the library a name, click the “Enable at startup” box, browse to the appropriate folder on your U-drive (Look in: Computer), and click OK.
- Make shortcuts to specific files. Click Tools → New File Shortcut. Give the shortcut a name and click the “Enable at startup” box. Then, browse to the appropriate folder, and click OK.
- JMP
- Set file location preferences via the File → Preferences menu. Select “File Locations” and set preferred locations for the “Data Files” and “Save As” directories. Browse to the appropriate folder, click the box to “Always go to this directory…,” Apply the changes and click OK.
- Create a new Project via the File → New → Project menu or by clicking the “New Project” icon (
 ) in the Projects window. Right-click on the new Project to add folders and documents from your U-Drive and change other settings.
- SPSS
- Define startup folders for Open and Save dialogs. Select Edit → Options and click on the “File Locations” tab. Browse to the desired folders on your U-Drive. Click Apply, and then OK. Provide Session Journal location and file name, if desired.
- MATLAB
- Reset default “userpath” and change startup folder to new userpath.
- Origin Pro
- Specify your “User Files Folder.” Select Tools → Options and click on the “System Path” tab. Click on “User Files Folder” and click the “Change…” button. Browse to the designated folder on your U-Drive. Click OK to select the folder, to change the path of the folder, to close the restart notification, and finally to close the Options window. Restart Origin to implement the change.
Remember that you will have to repeat the process on subsequent sessions until you have done so on each server hosting a particular application. For a seamless experience, use the same names on each server when creating libraries and shortcuts.


