Category Archives: Matteo

Conclusion

Experimental vs. Theoretical Values

It was immediately apparent when I began collecting data for this experiment that the equations I derived to anticipate voltage and frequency values were not entirely accurate. Here I will calculate expected curve shapes and expected values of frequency and decay, and and compare them to experimentally measured values. The majority of the difference in theoretical vs measured data is the fact that there is some resistance in the circuit. It may be possible to discover this resistance from the future tests, if not from the current data.

Shape Of Potential Curve

1465 nF Capacitor

Figure 1. 1465 nF Capacitor and 996 mH Inductor in series.

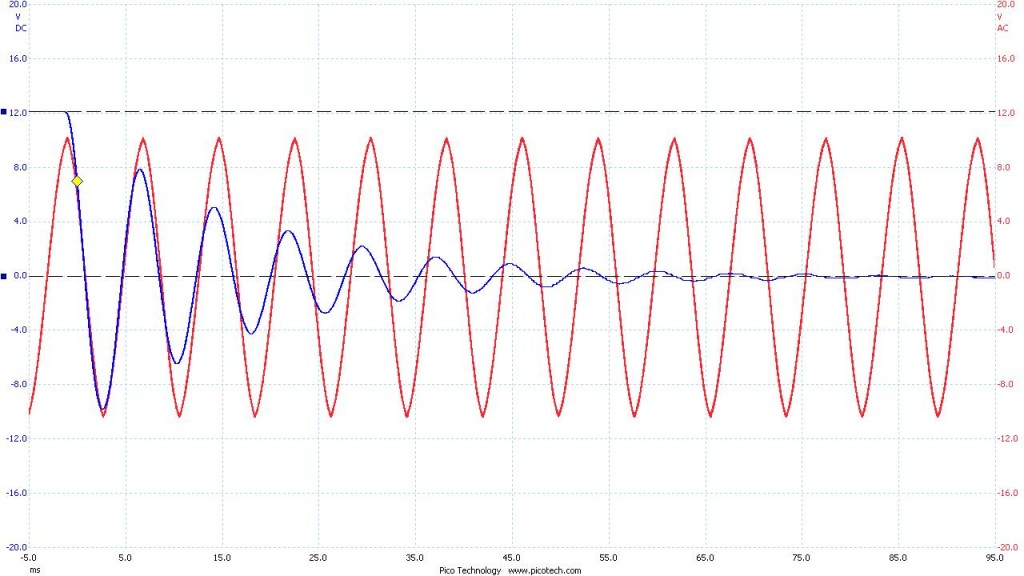
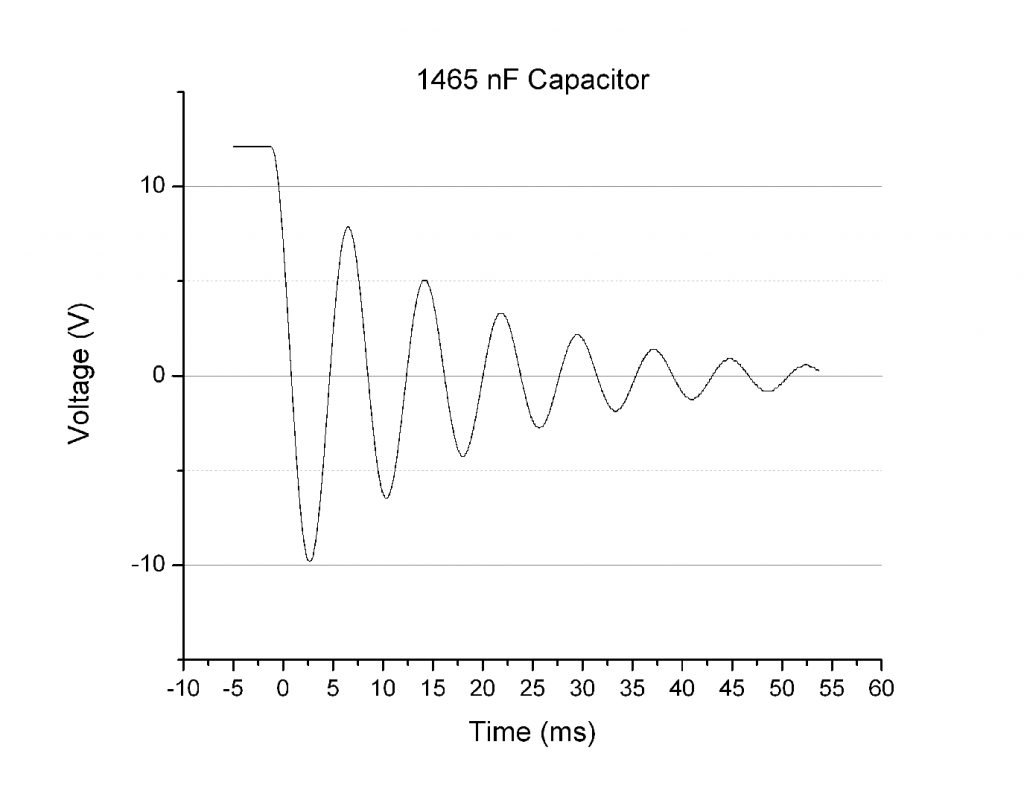
In theory, the circuit I constructed was a LC circuit. This means there was no resistor in series with the capacitor and inductor components, and that the wires have negligible resistance. Theoretically the oscillations of the voltage after the capacitor discharged through the inductor should continue indefinitely. This is analogous to how an object on a spring would oscillate forever without drag/friction forces acting upon it. That being said, it is readily apparent that the oscillations did not continue indefinitely. In fact they took around a 10th of a second to dissipate (in the case of the 1465 nF capacitor and 996 mH inductor circuit above). This means that there is damping occurring on the oscillations. So while theoretically I built an LC circuit, experimentally it behaved more like a damped LC circuit, or an RLC circuit, as if there was a resistor in series with the capacitor and inductor. This means that the relevant governing equation was not V\left( t\right)=V_{0}sin \left( \omega _{0}t-\delta \right)\left , but rather V\left( t\right) =V_{0}e^{-\beta t}\sin \left( \omega _{1}t-\delta \right) . Below (Figure 2) is the demonstration of expected shape (red) and measured shape (blue) of the voltage curve vs time as seen in my “Preliminary Data” post:

1465nF, 996mH, 128 Hz

Figure 2

Frequency

To review,

 f = \frac{\omega}{2\pi}         (1)

In Simple Harmonic Motion

 f = \frac{\omega_{0}}{2\pi} ; \omega_{0}=\frac{1}{\sqrt{LC}}.         (2)

But as we just discussed, because the circuit is not ideal and has an equivalent resistance, these oscillations are actually described by Damped SHM, the equations being as follows:

V\left( t\right) =V_{0}e^{-\beta t}\sin \left( \omega _{1}t-\delta \right)        (3)

\omega _{1}\equiv \sqrt {\omega _{0}^{2}-\beta ^{2}}        \beta \equiv \frac{R}{2L}       (4)

Thus

 f= \frac{\sqrt{\frac{1}{LC} - (\frac{R}{2L})^2}}{2\pi}        (5)

Where, solving for R, we can estimate the equivalent resistance of the circuit:

 R=\sqrt{\frac{4L}{C}-(4 \pi L f)^2}          (6)

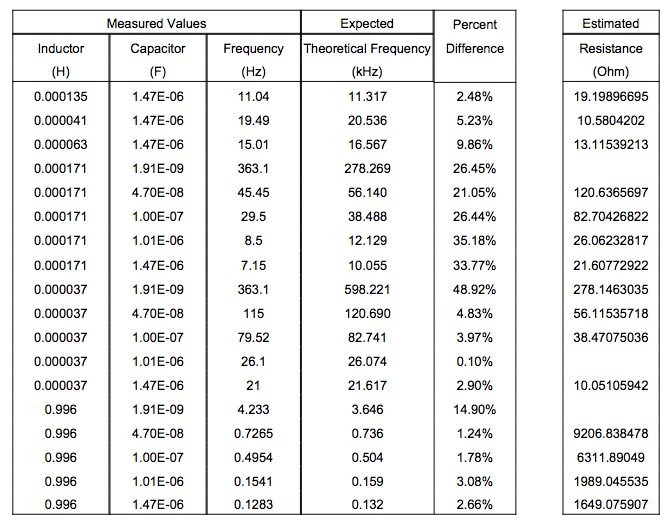
 Below is a table of values (Figure 3). On the left are all of the the experimentally measured values from this project. The expected theoretical frequency was calculated using Equation (2). The resistance of the circuit was estimated using Equation (6).

Figure

Figure 3

While the measured frequencies are not always very close to the predicted value, they are all well within an order of magnitude of each other, meaning the relationship defined by Equation (2) is clearly evident.

The estimated values of resistance, on the other hand, are extremely improbable. The resistivity of small connection wires is on the order of 10^-2 Ohms or lower. This indicates either a mistake in my derivation of resistance as a function of capacitance, inductance, and frequency, or a relationship that I don’t quite understand. It is possible that the equivalent resistance of the circuit changes as a function of voltage, or the change in current, in a way I do not know about.

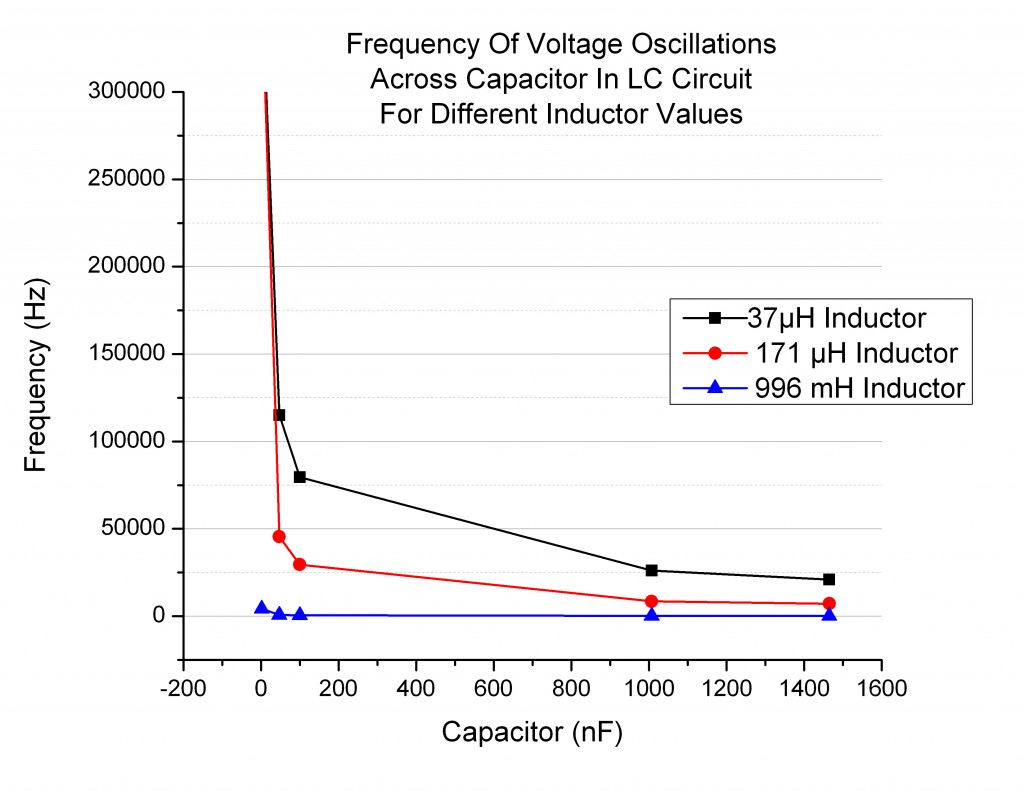
Overall, the graphs of frequency as a function of L or C (Figure 4) were the correct shape.

Figure 5

Figure 4

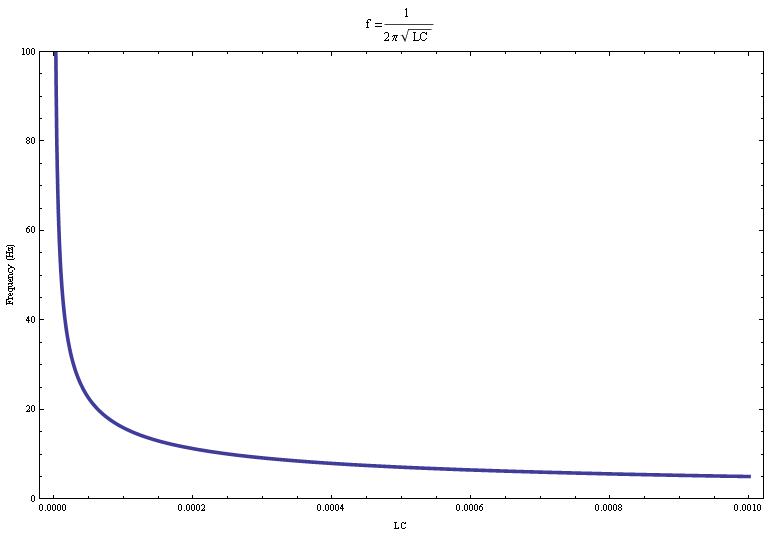
They reflect the predicted behavior of a  \frac{1}{\sqrt{x}} relationship, whose plot looks very similar (Figure 5). In our case the actual relationship is  f = \frac{1}{2 \pi \sqrt{x}}.

Screen Shot 2014-05-20 at 9.01.56 PM

Figure 5 (Mathematica workbook: https://vspace.vassar.edu/mabjornsson/1%20over%20sqrt%20x.nb )

Exponential Decay and Circuit Resistance

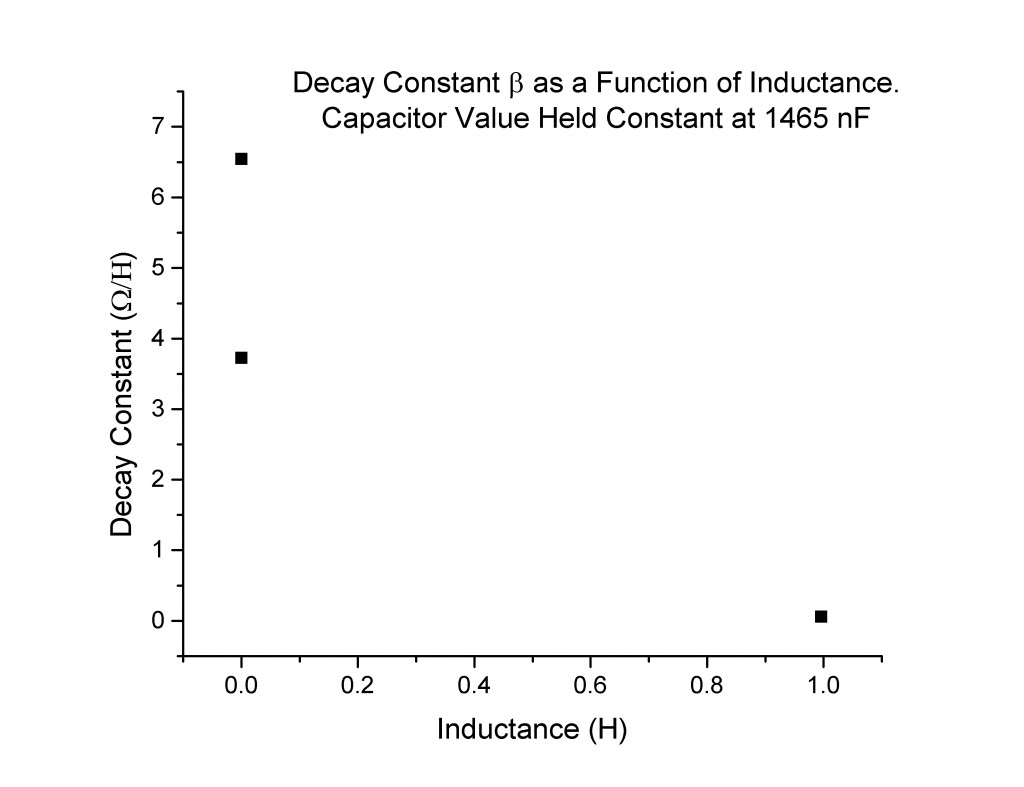
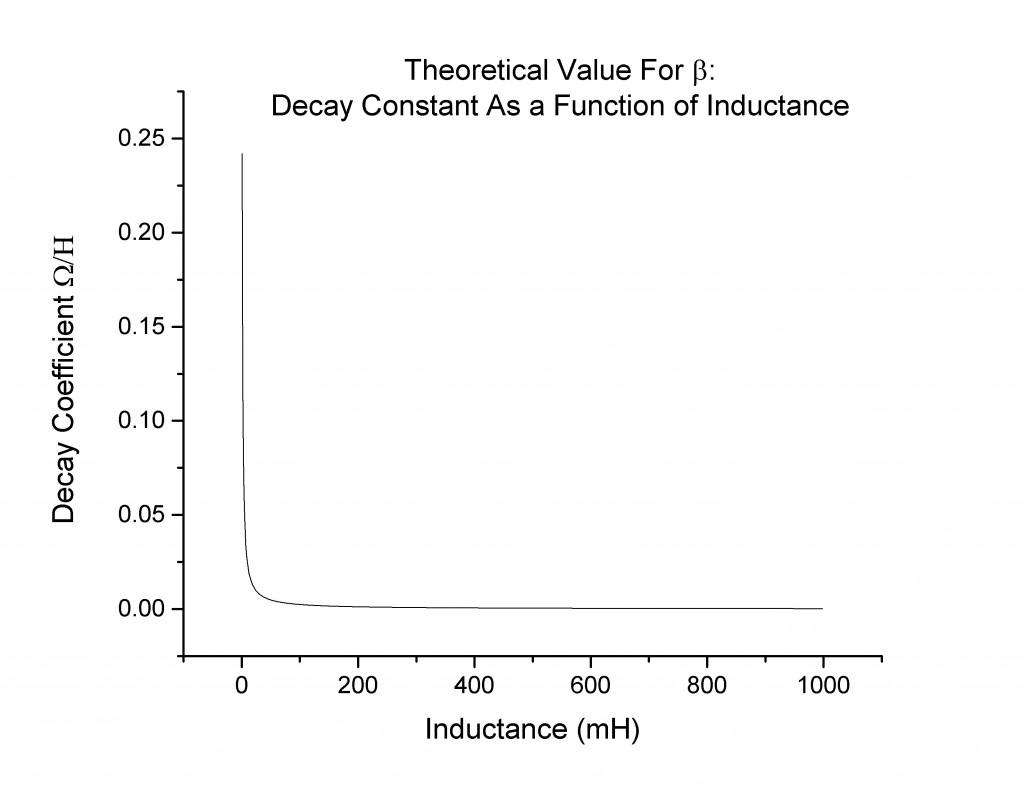
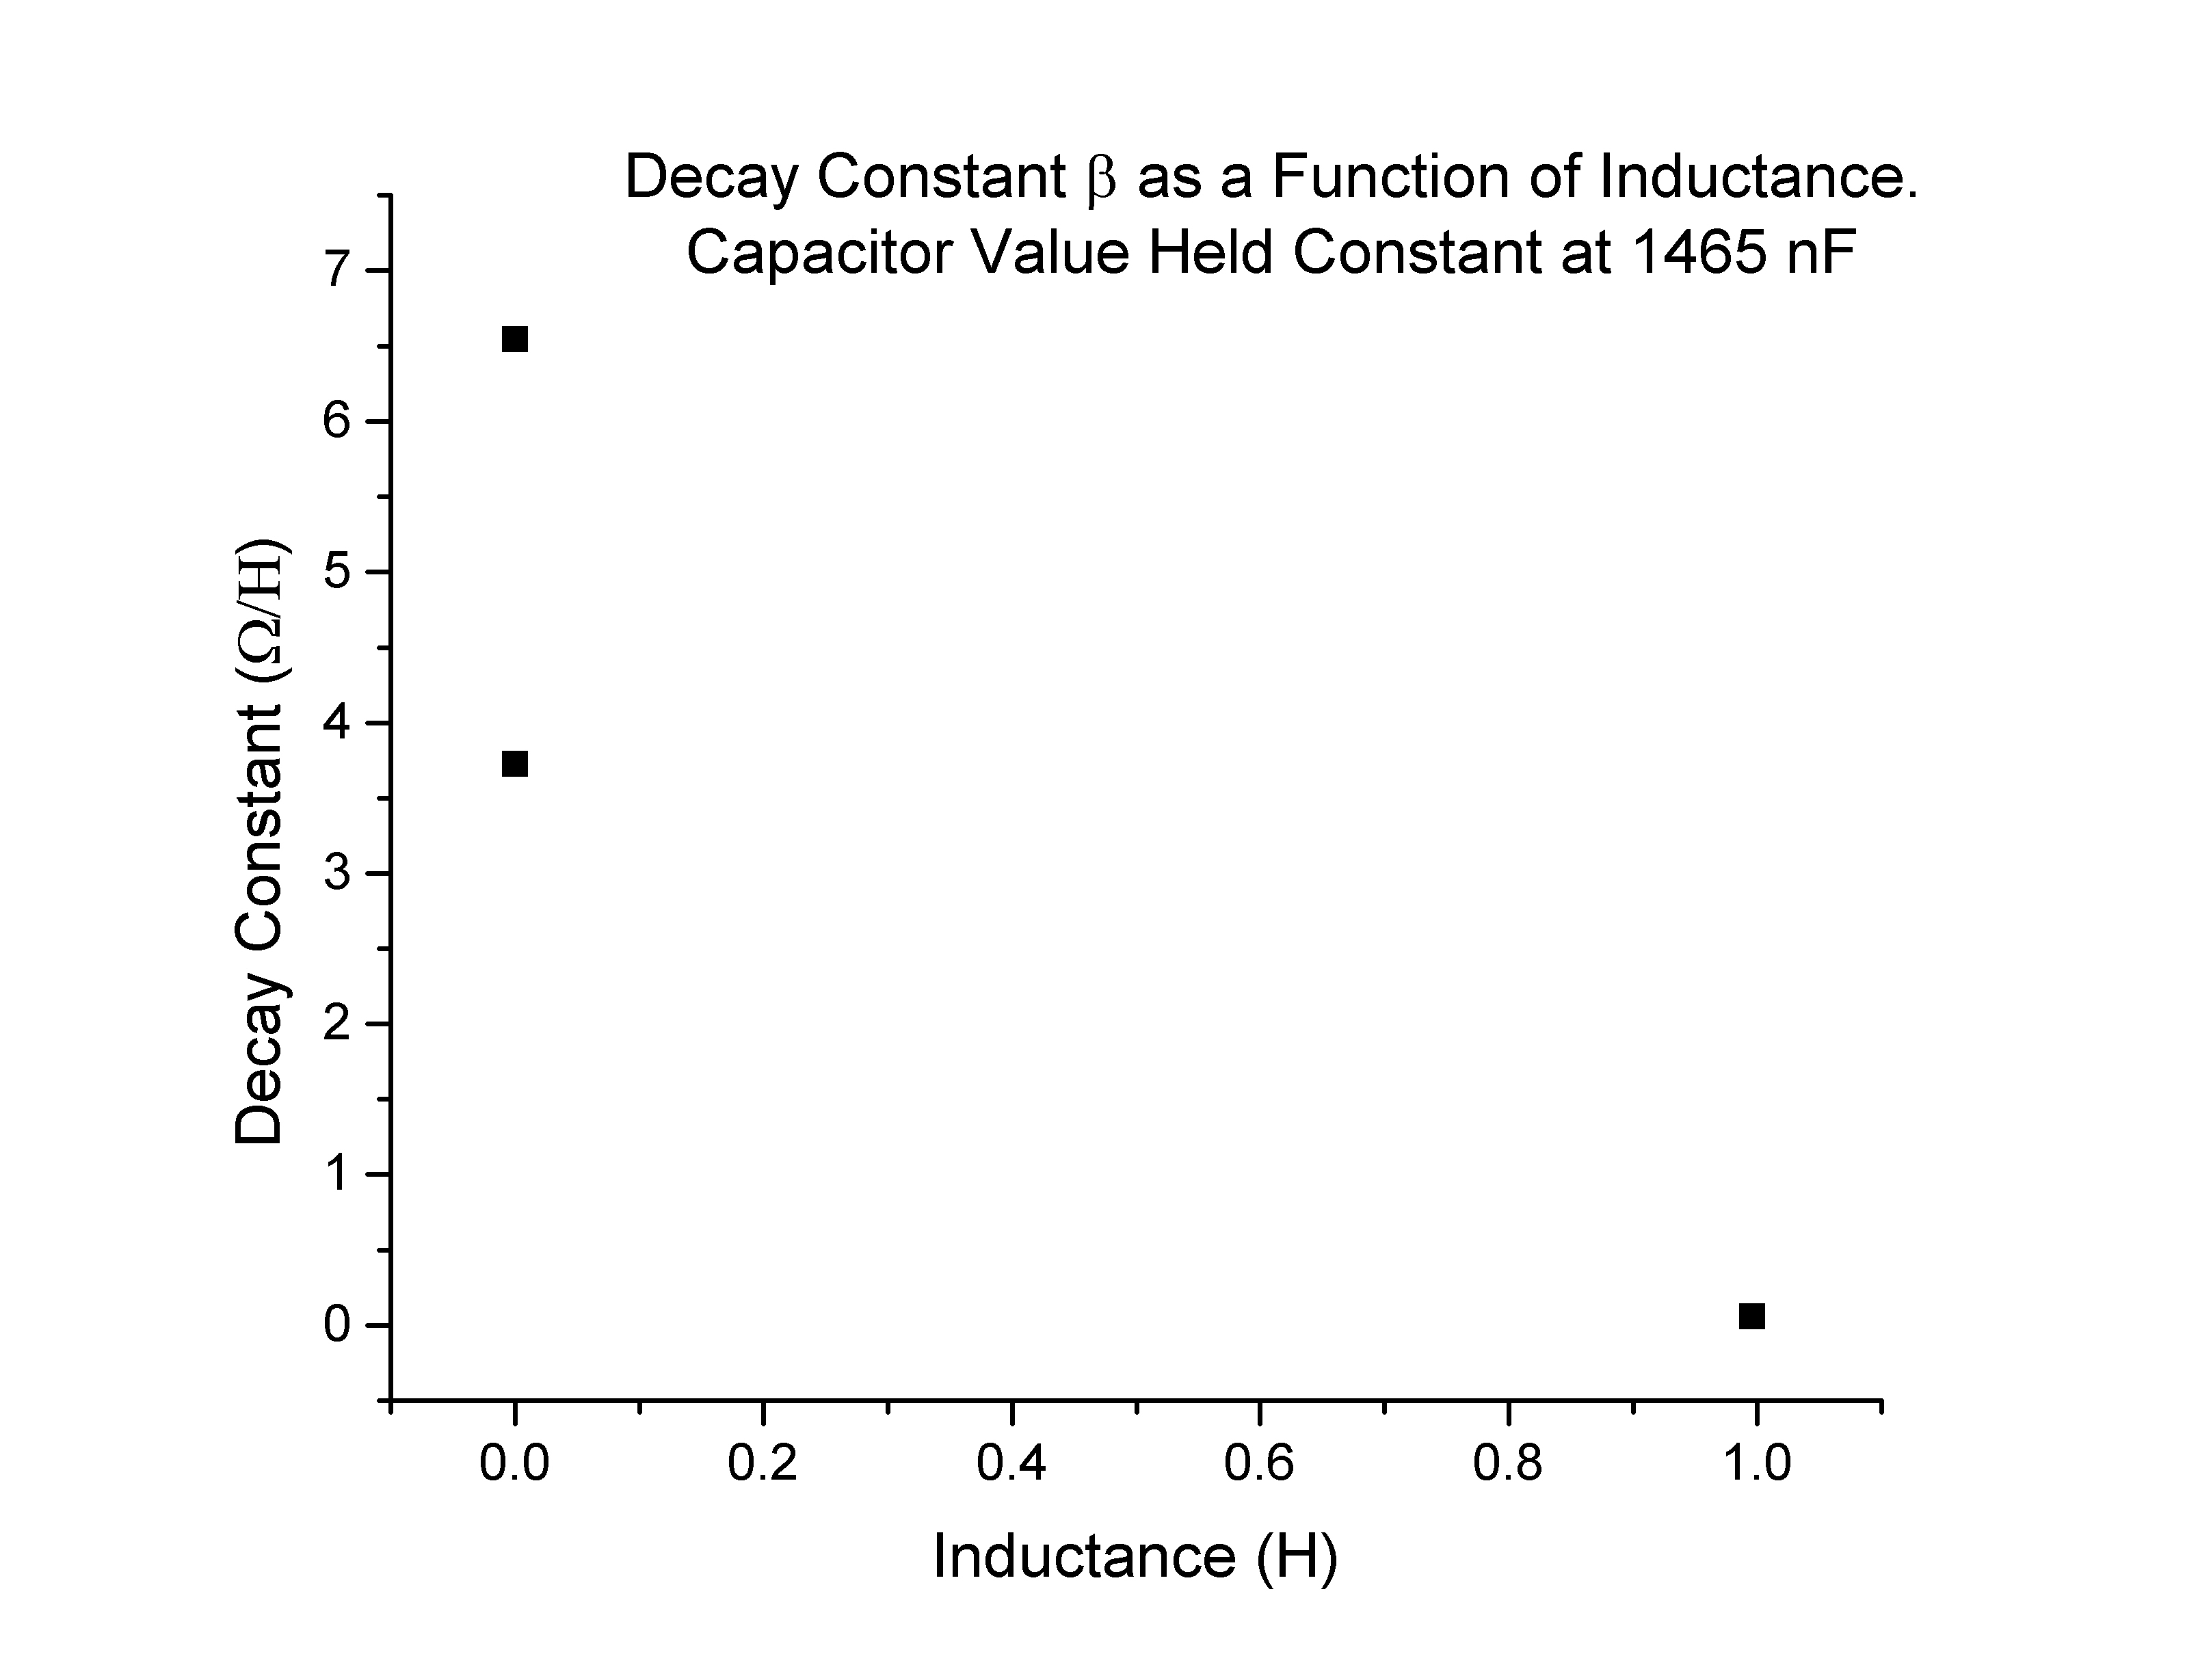
When the experimentally measured decay coefficient β is plotted as a function of inductance, the data points are sparse, and one should be cautious of drawing too many conclusions. That being said, the points I collected (Figure 6) do seem to match the expected values (Figure 7):


Figure 13

Figure 6

Graph3

Figure 7

Finding Resistance Using β

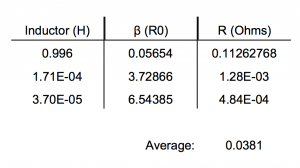
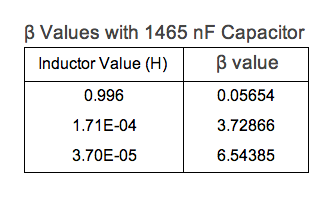
The decay coefficient β is related to L and R. Thus, since we know β and L experimentally, it should be fairly straightforward to calculate R empirically. In theory the resistance of the circuit should be the same for each measurement of β and L. Below is a table of measured values of β and L (Figure 8):

Screen Shot 2014-05-20 at 9.23.11 PM

Figure 8

A value of 0.0381 Ω is a reasonable order of magnitude for a circuit with theoretically no inherent resistance. This order of magnitude is also large enough to be largely responsible for the decay of the voltage function across the capacitor.

Can Significant Conclusions Be Drawn From This Data?

With scatter plots with only three data points, the answer is “no.” To confidently confirm that my data was following anticipated trends I would need many, many more points. The most conclusive and illuminating data that I did generate wast the Voltage vs. Time graphs. These graphs were supposed to be undamped sinusoidal waves, but instead exhibited very clear damped oscillation. The collection of these curves was easy to repeat and allowed me to generate very reliable curves. These graphs confirmed that there must indeed be a significant equivalent resistance in the circuit to damp the oscillations.

Applications Of Findings

This experiment could potentially be an effective way to anticipate the inherent resistance of a circuit. My first method of using L, C, and f to find the resistance, clearly did not work, but finding the decay coefficient and from there calculating R, could very well be effective. From my limited data I got a reasonable solution, but would have to generate far more data points to confirm this resistance. It would be particularly interesting to use this method in an instructional lab if there was some way to actually measure the resistance of the circuit (maybe known values of wire resistivity, or a very sensitive meter). It would provide students with data analysis experience, such as fitting curves and using Origin Pro, as well as having hands on experience with damped harmonic systems.

Changes To Experiment

The biggest change I would make to this experiment would be to have a far greater array of capacitors and inductors at my disposal. I did not have enough to produce satisfying data. One problem I kept running into when collecting data was that one of my inductors was several orders of magnitude bigger than the others. It could have been handy to have just made my own inductors out of coils of wire. This way I would be able to change the inductance at will. Ideally I would also exchange many capacitors for one variable capacitor. It would streamline the data collection and allow for more methodical, precise data collection. I would also use components and measurement devices that could handle more than 15-20V due to the fact that such low voltage has a greater window for interference.

Sources Of Error

I have no idea how much my measuring devices and power source effect the overall resistance of the circuit. I also do not know if there are other sources of induction (albeit minor) within my circuit setup, either within components (such as the switch) or from the wires of my measurement tools coiling around themselves. There were many times when the discharge curve across the capacitor would take a strange shape that I can only attribute to some form of saturation, either the probe or capacitor. I do not know how this my have impacted my data.

Share

Final Data

In this post I will present my actual data findings with minimal interpretation. In the next blog post, “Conclusion,” I will interpret the data I collected and compare it to  expected values.

Preliminary Data Recap:

In my previous post I had measured the discharge of several different capacitor values in series with an inductor.

Below were the resulting plots of Voltage vs Time (Figures 1-3):

1465 nF Capacitor

Figure 1

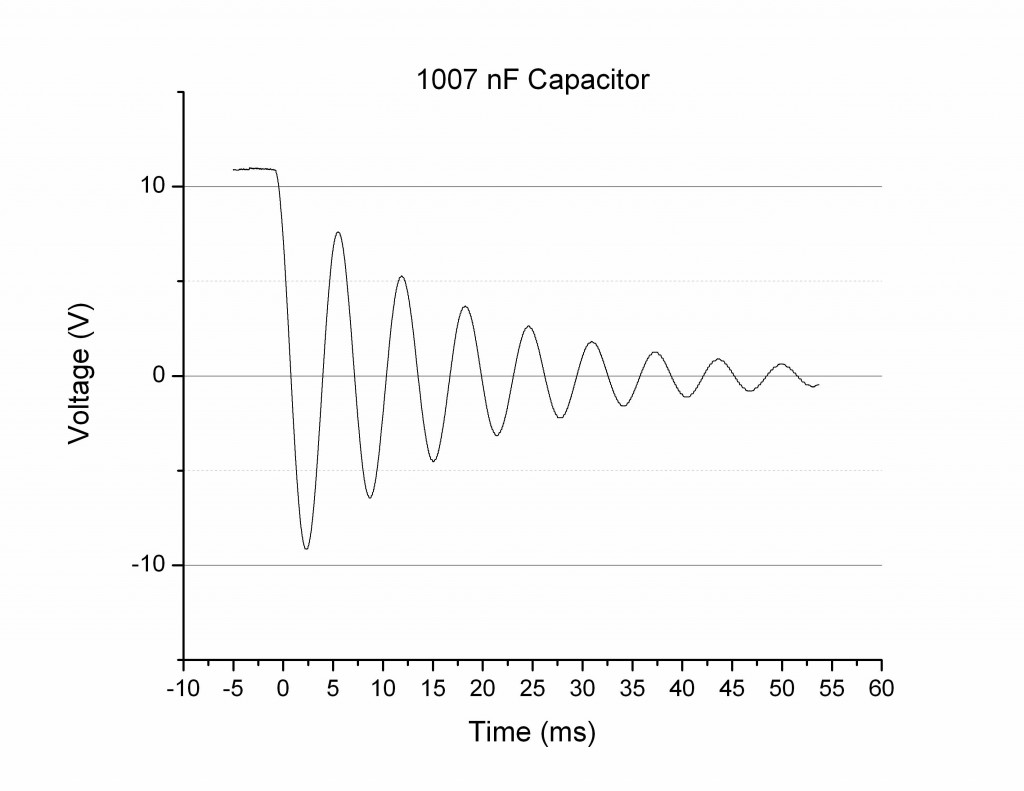
1007 nF Capacitor

Figure 2

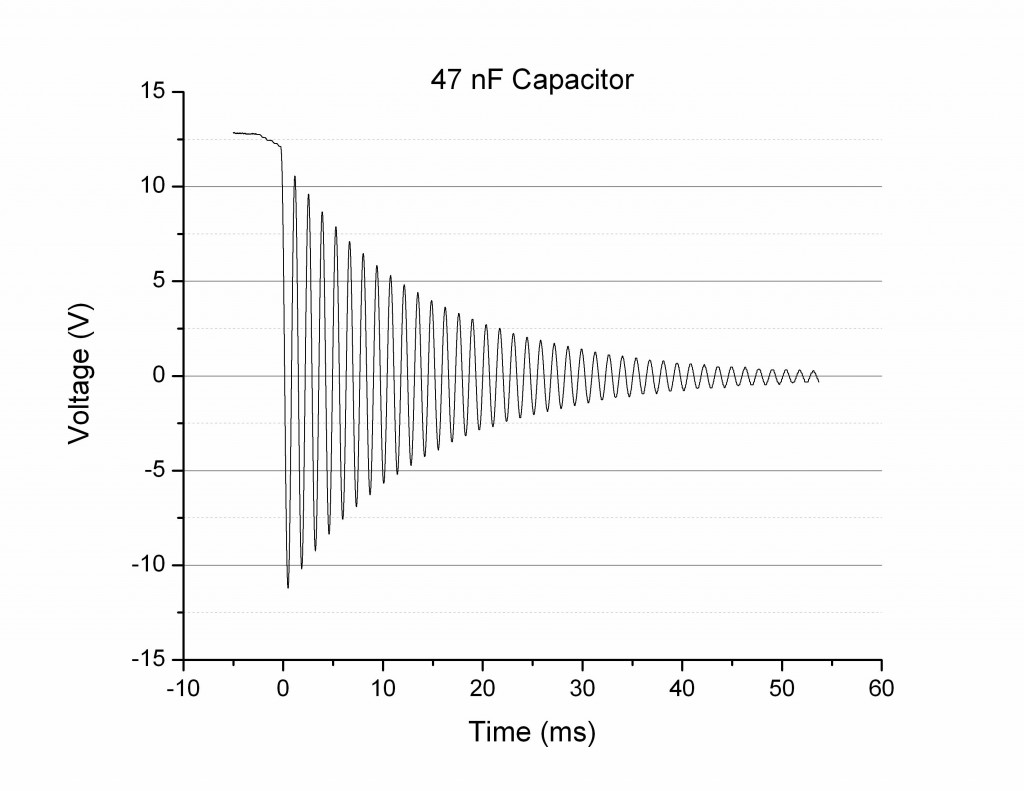
47 nF Capacitor

Figure 3

For the 1465, 1007, and 47 nF capacitors the measured frequency of oscillation was 128, 155, and 730 Hz, respectively.

Voltage As a Function Of Time  and Frequency of Oscillation

It is helpful to layer these three plots on top of each other (Figure 4). In doing so we can readily compare the curves to each other.

Figure 4

Figure 4

From Figure 4 it is evident that the higher the capacitor value, the lower the frequency of oscillation. This is not surprising, given the equation that the frequency and inductor*capacitor product are inversely related: \omega_{0} = \frac{1}{\sqrt{LC}}.

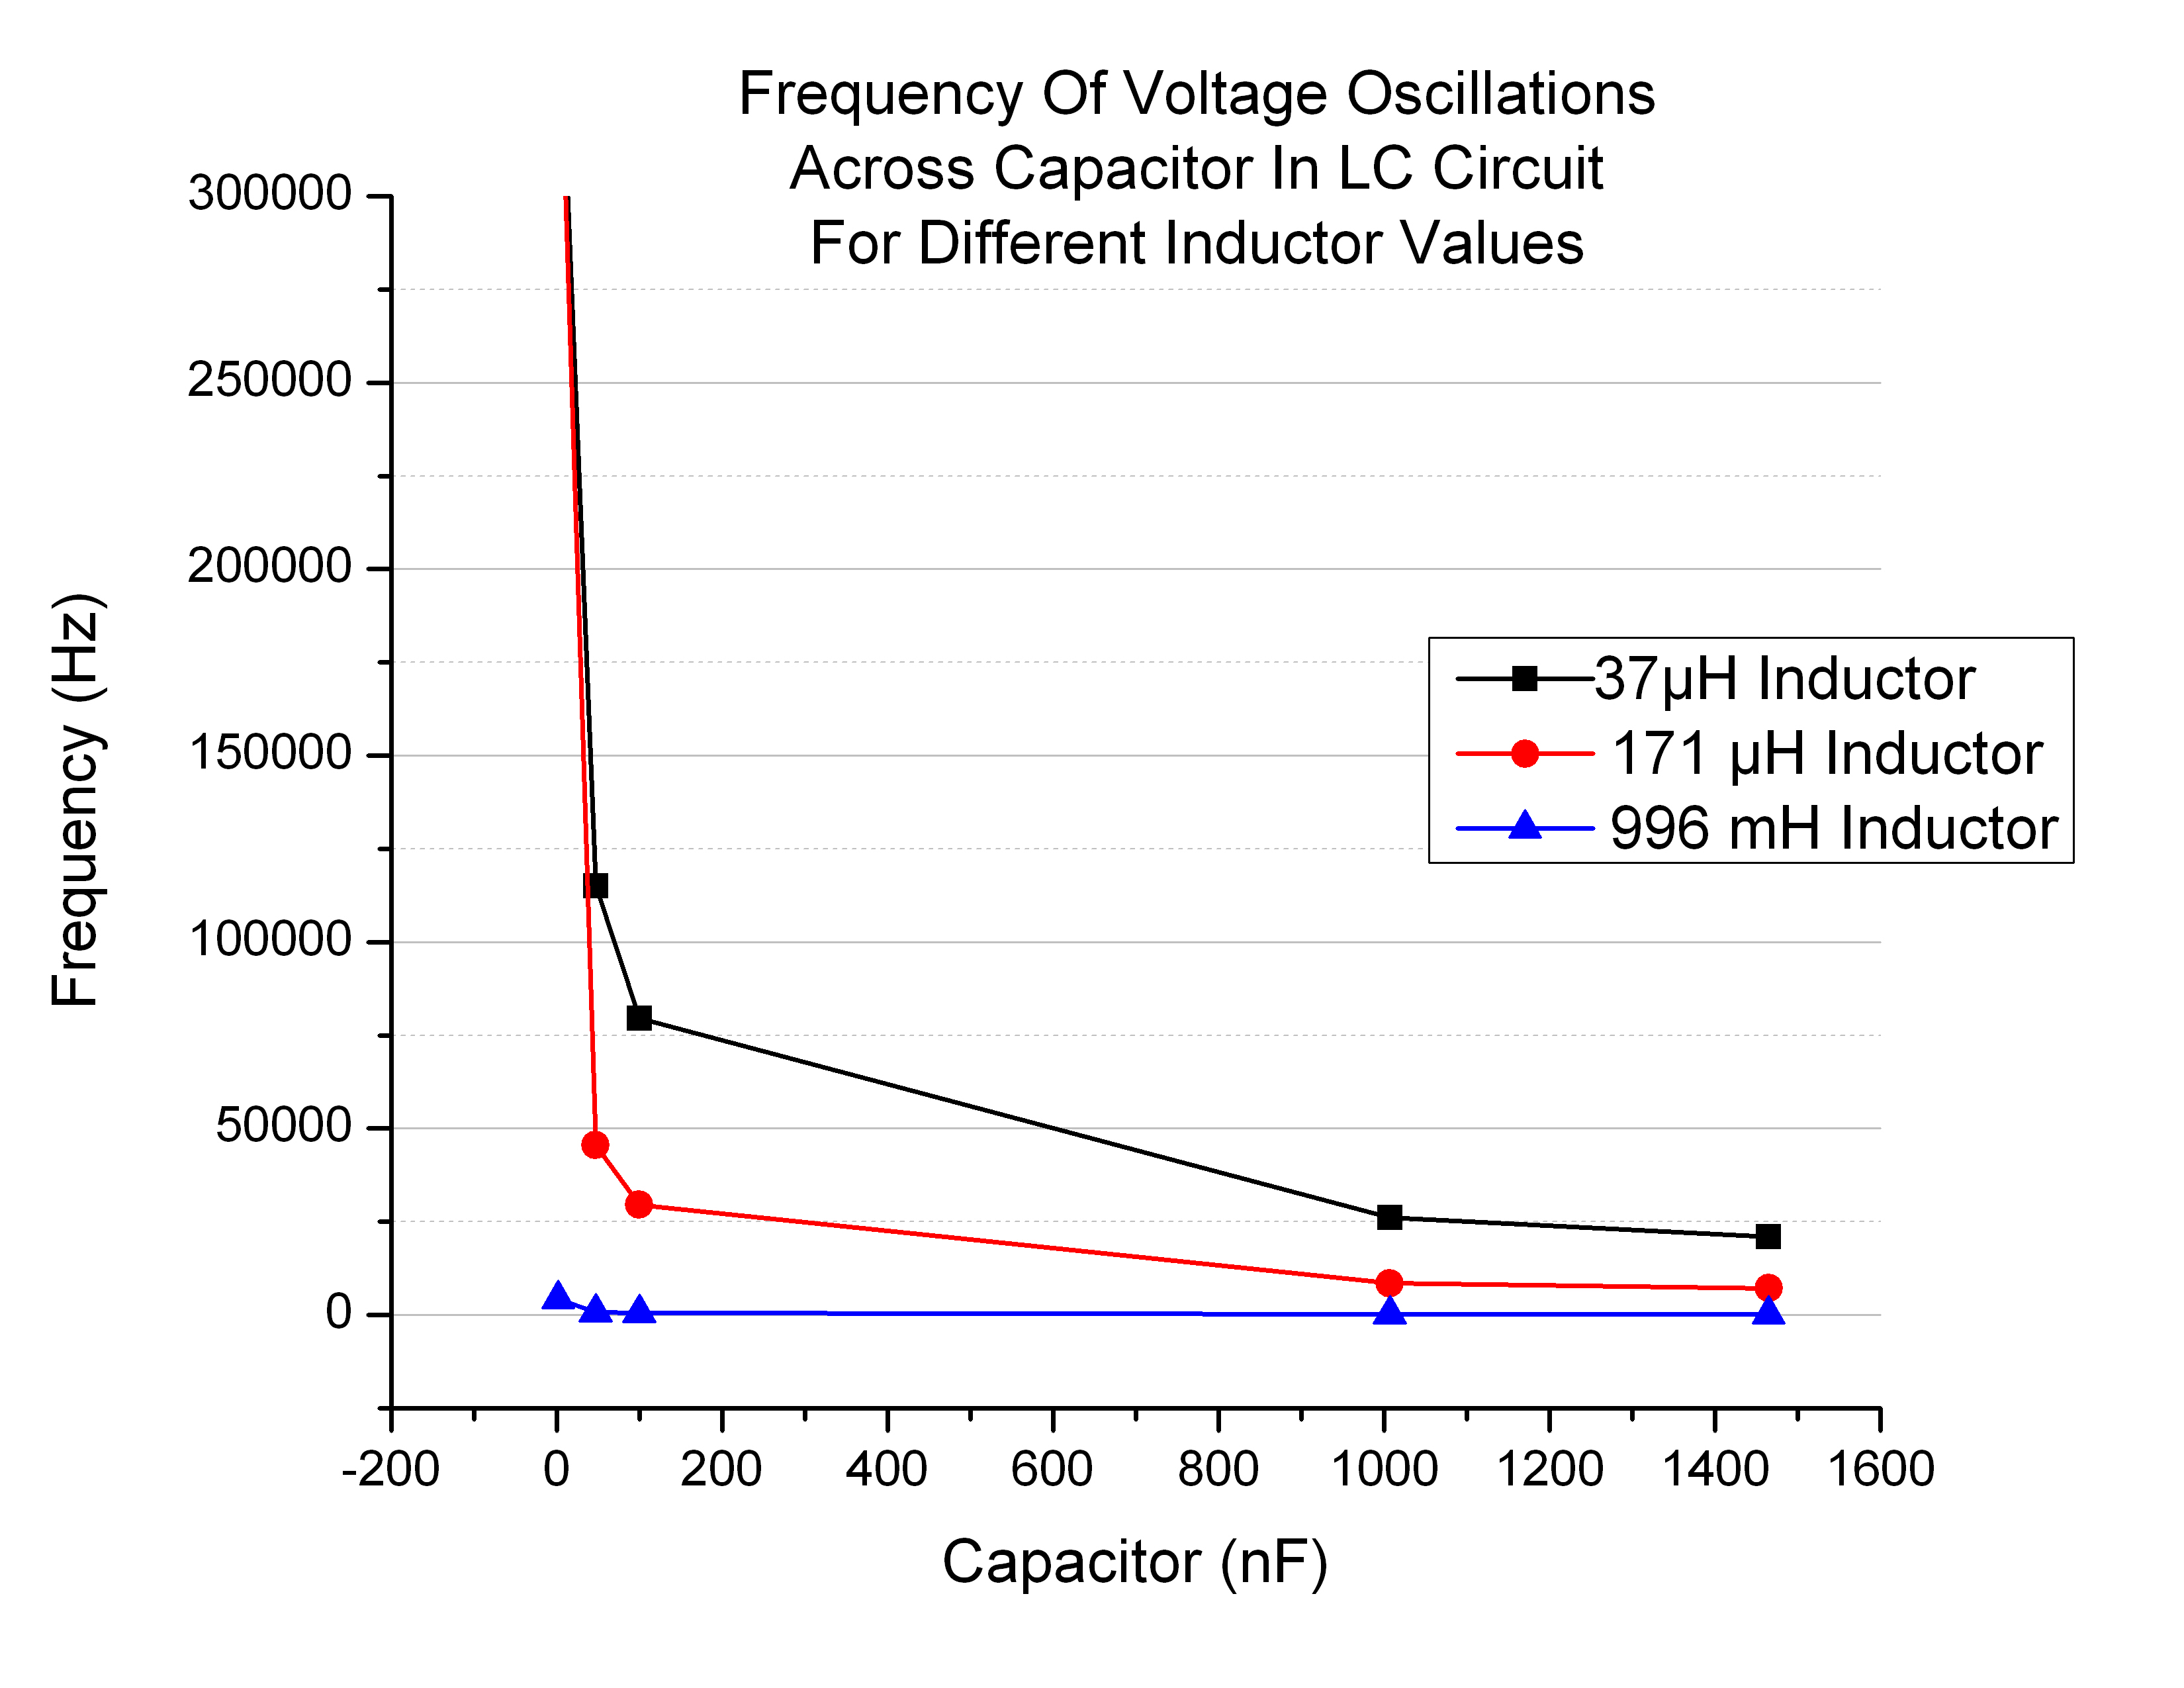
How are frequency and capacitance, or frequency and inductance related? I recorded the frequency of oscillation in several different LC circuits to try and illustrate this relationship. For three different inductor values I discharged five different capacitor values. The resulting plot (Figure 5) is below:

Figure 5

Figure 5

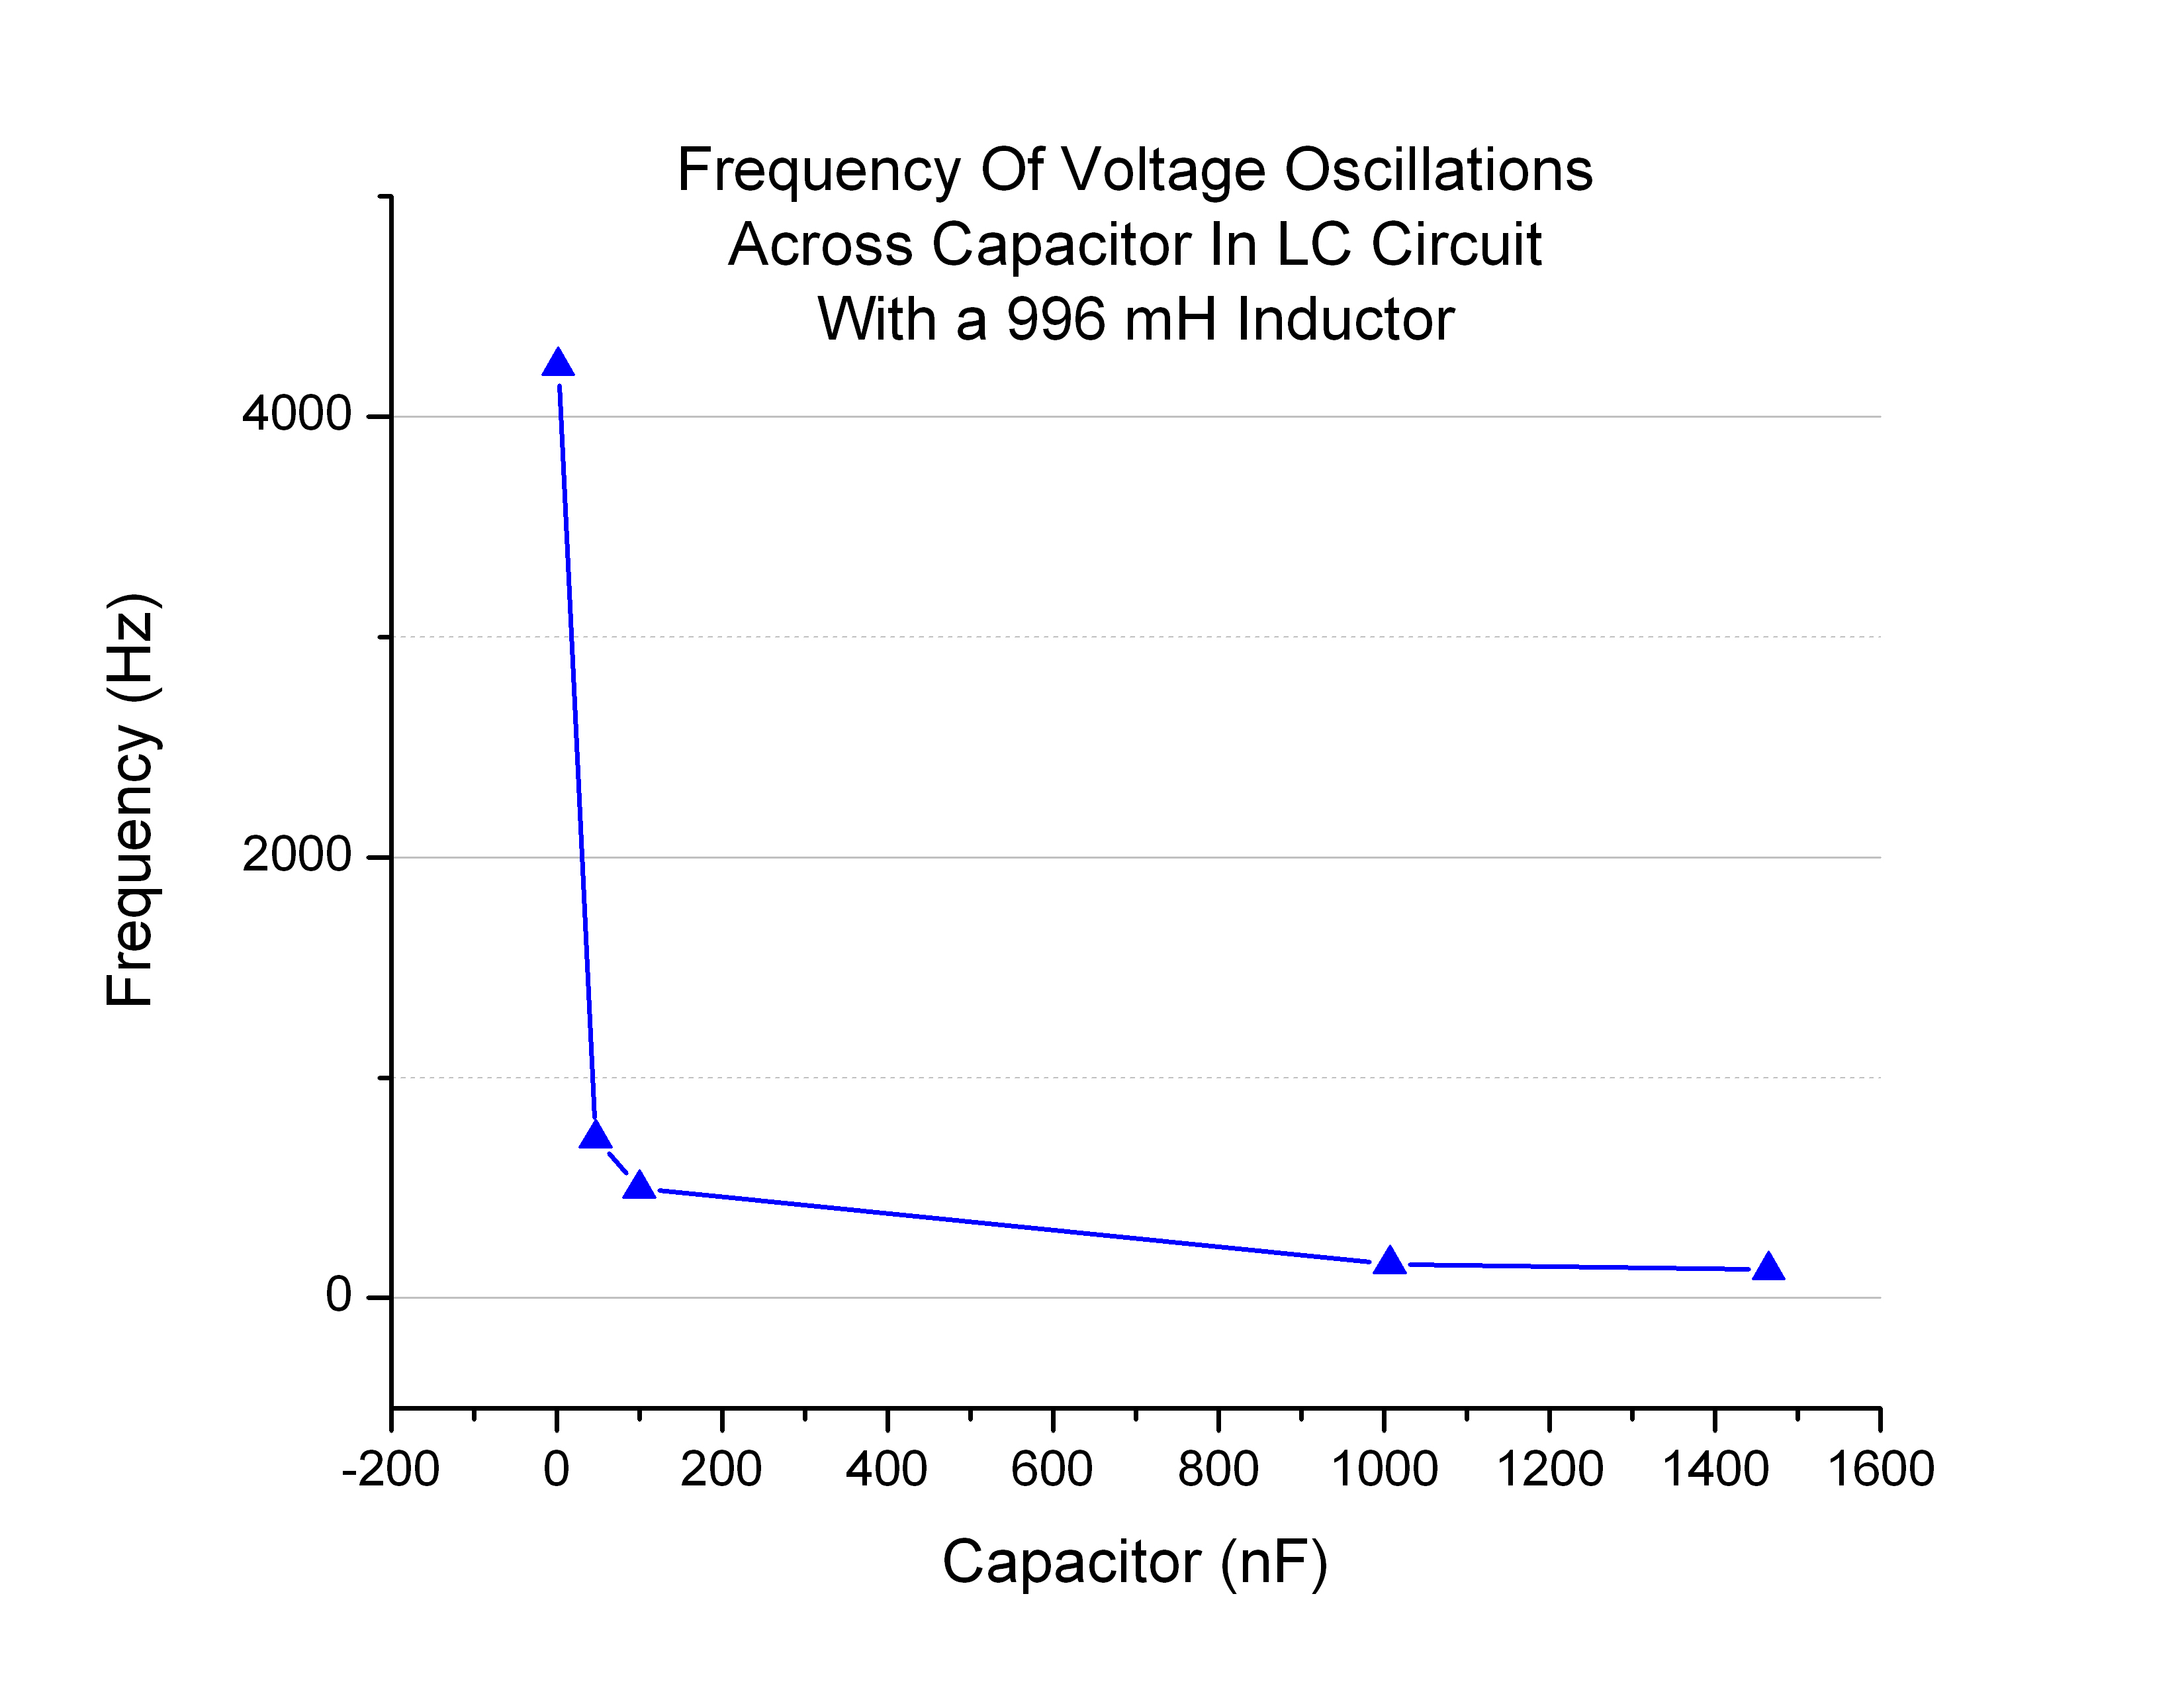
Because it is harder to see the shape of the blue line in Figure 5, I plotted it separately (Figure 6):

Figure 6

Figure 6

Figures 5 and 6 experimentally illustrate the inverse square root relationship between frequency and capacitance/inductance.

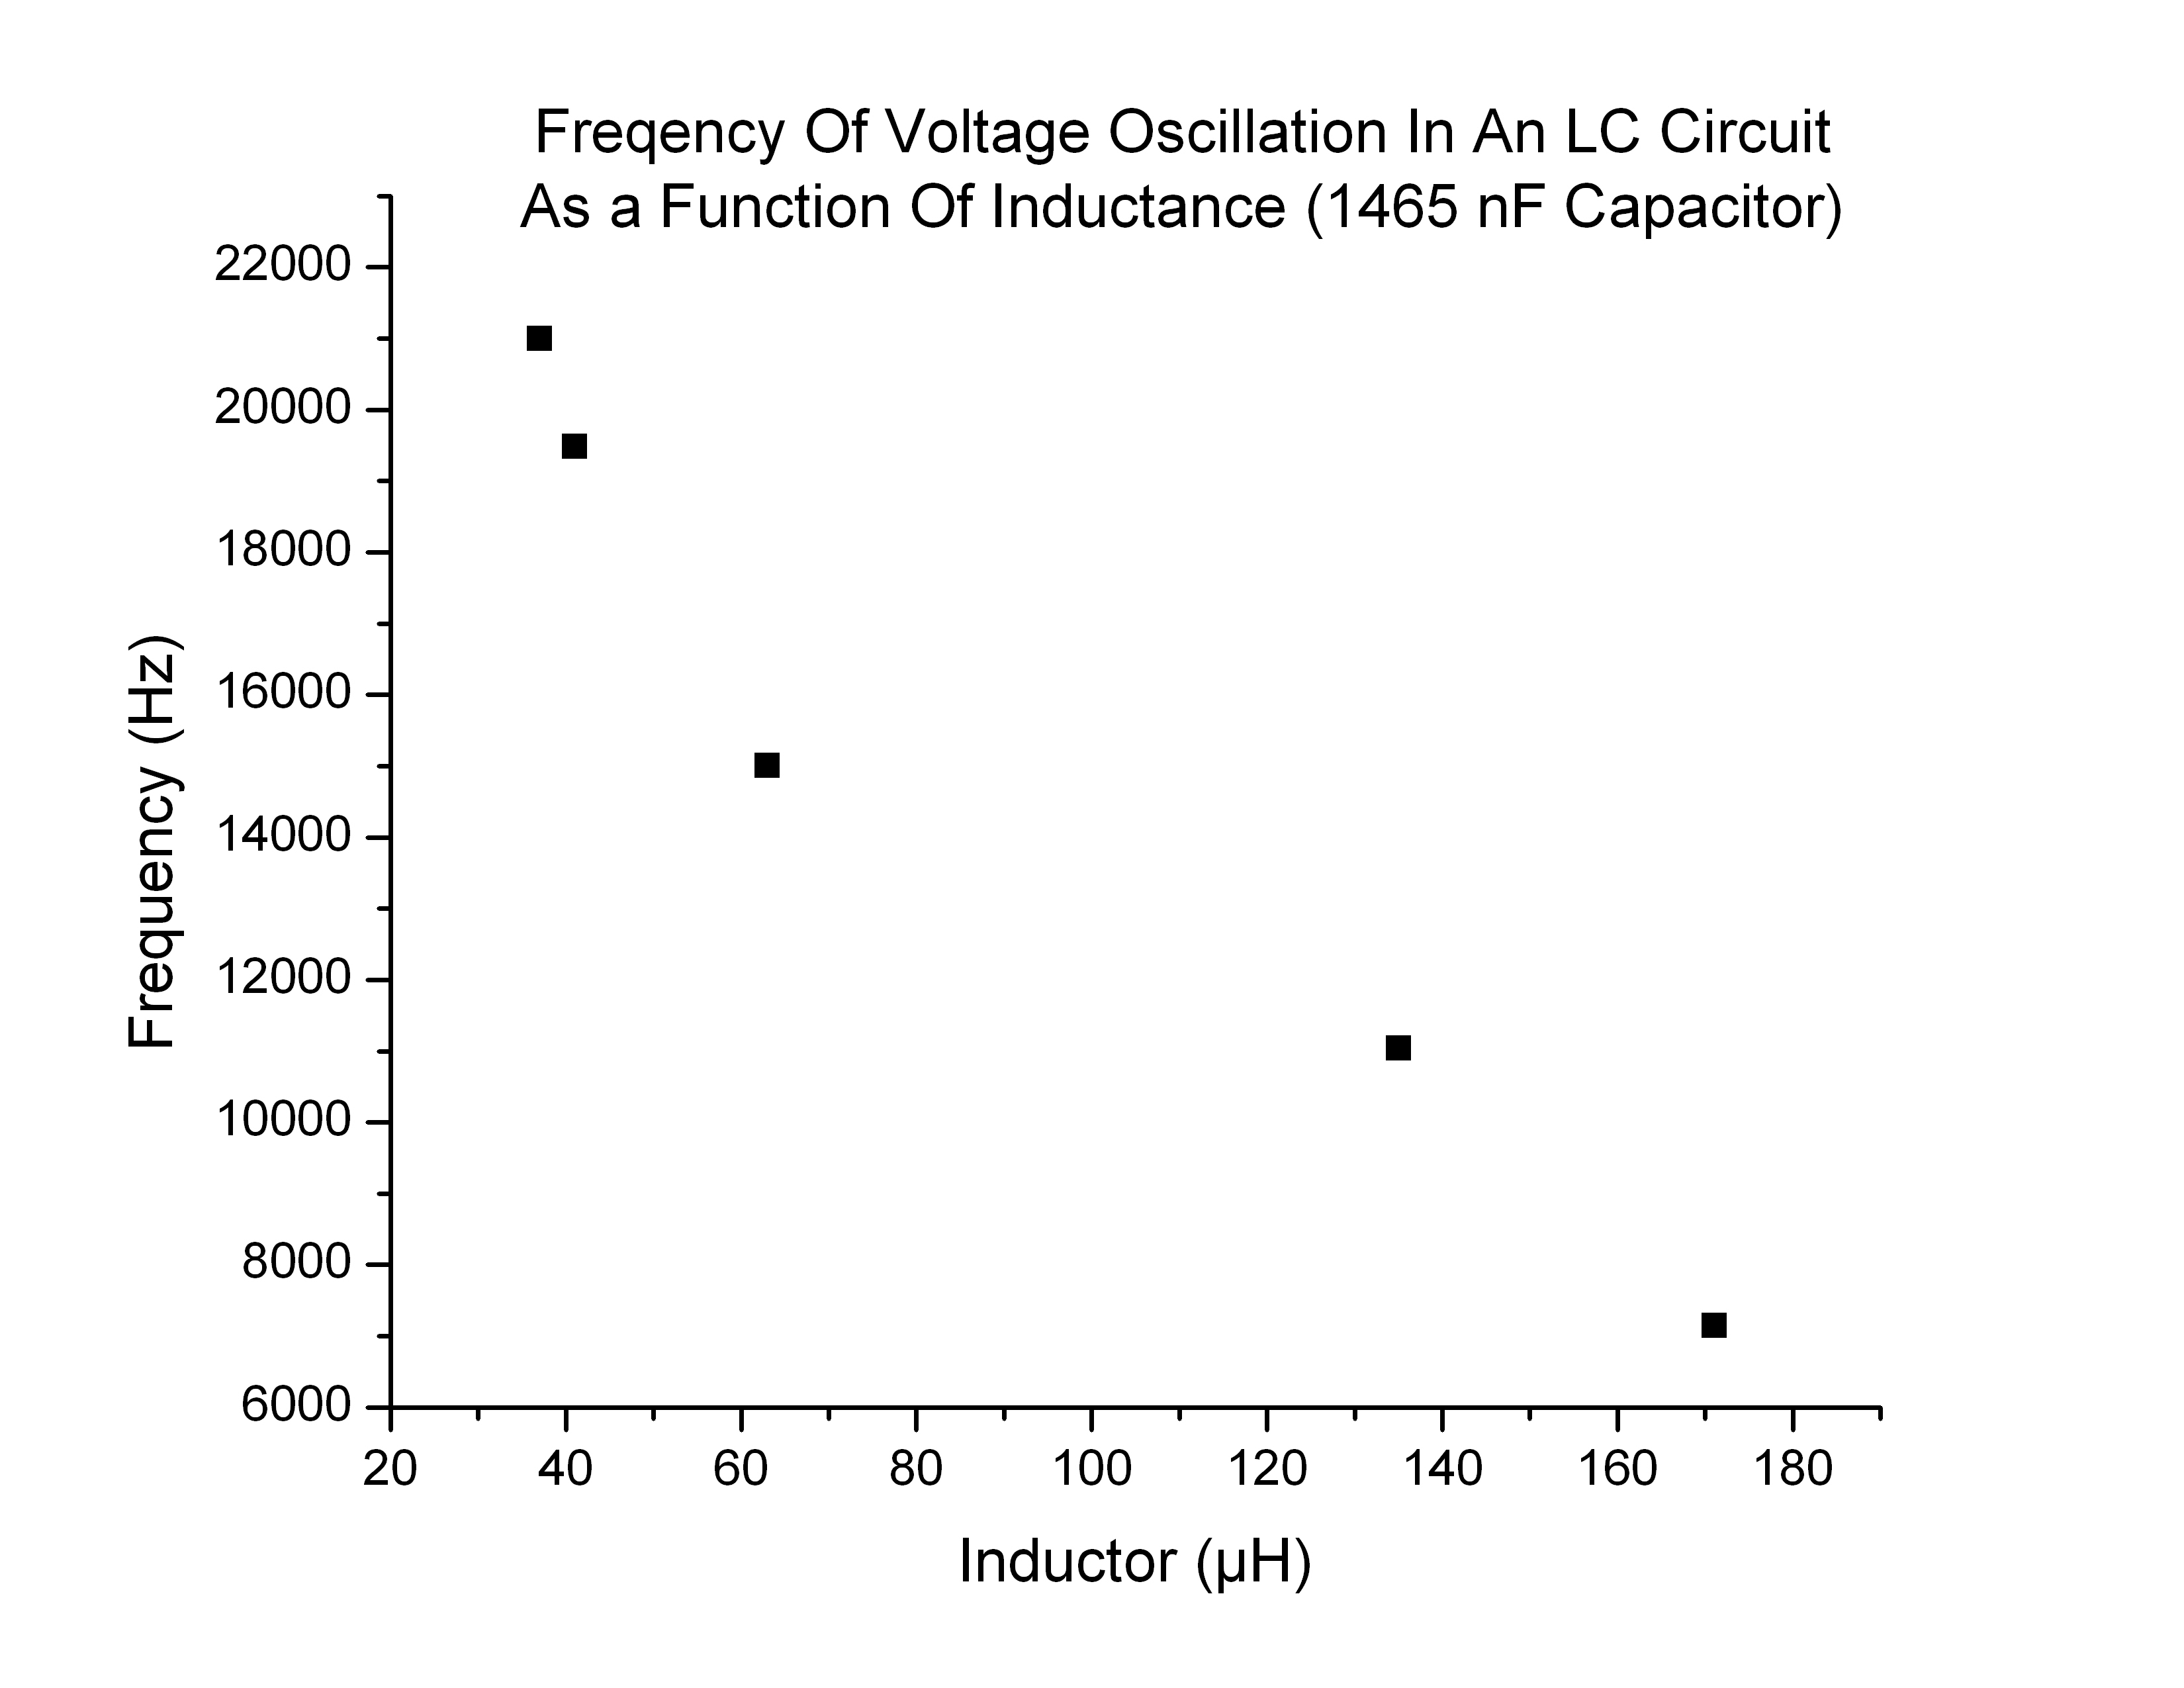
I then plotted the frequency of oscillation with respect to inductor value (Figure 7):

Hz vs uH

Figure 7

 Exponential Rate Of Decay

If you take a look at Figure 4 again, notice that despite changing capacitor values, the exponential decay of each curve is relatively the same. The decay for each curve is the same because the decay coefficient β is a function of resistance and inductance, not capacitance(\beta\equiv \frac{R}{2L}). In Equation (1) you can see the decay term of the voltage, e^(-βt):

V(t)=V_0e^{-\beta t}cos(\omega_1t-\delta)           (1)

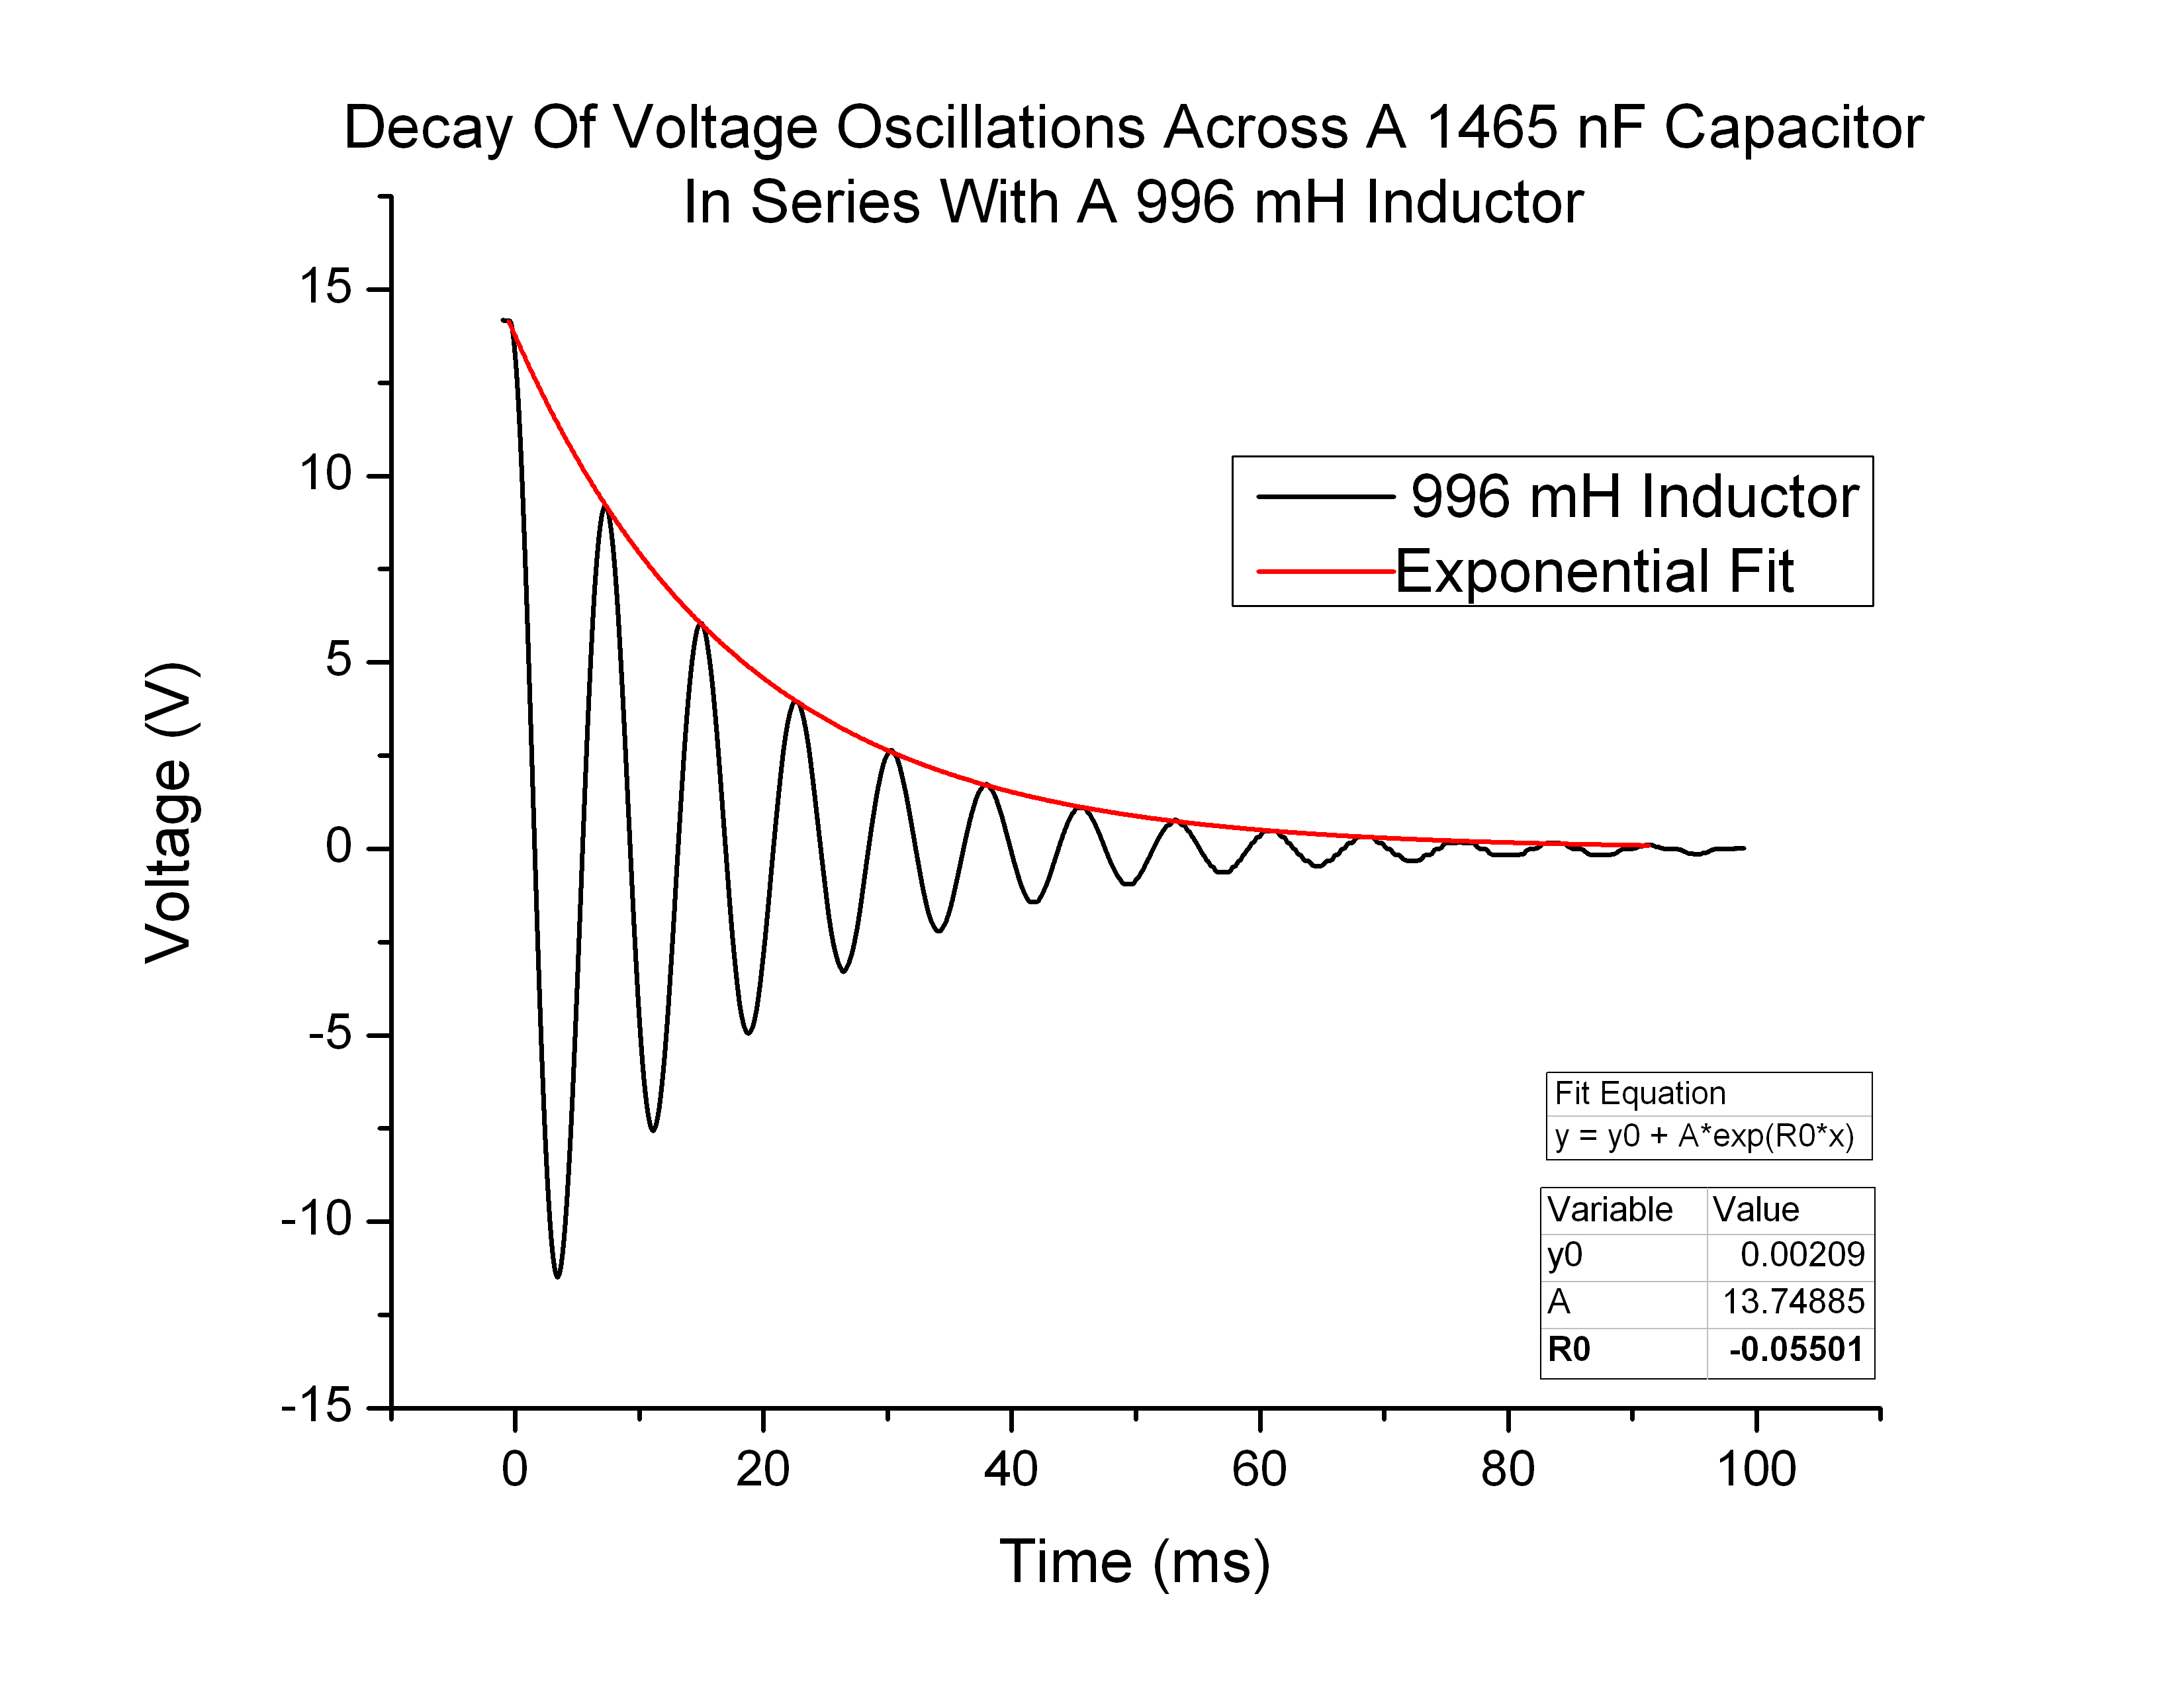
In order to measure the decay constant I used Origin Pro to fit an exponential curve to the peaks of the voltage plots. The formula used for this function fit was as follows:

gif.latex

Where R0 is the decay coefficient, -β

Figure 8 below is an example of this function fit:

996 mH exp fit

Figure 8

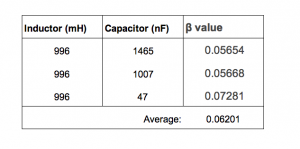
I fit an exponential function to the 996 mH and 1007 nF, 47 nF oscillations as well, resulting in the table below (Figure 9):

 beta values

Figure 9

Theoretically the β value should be the same for all of them.

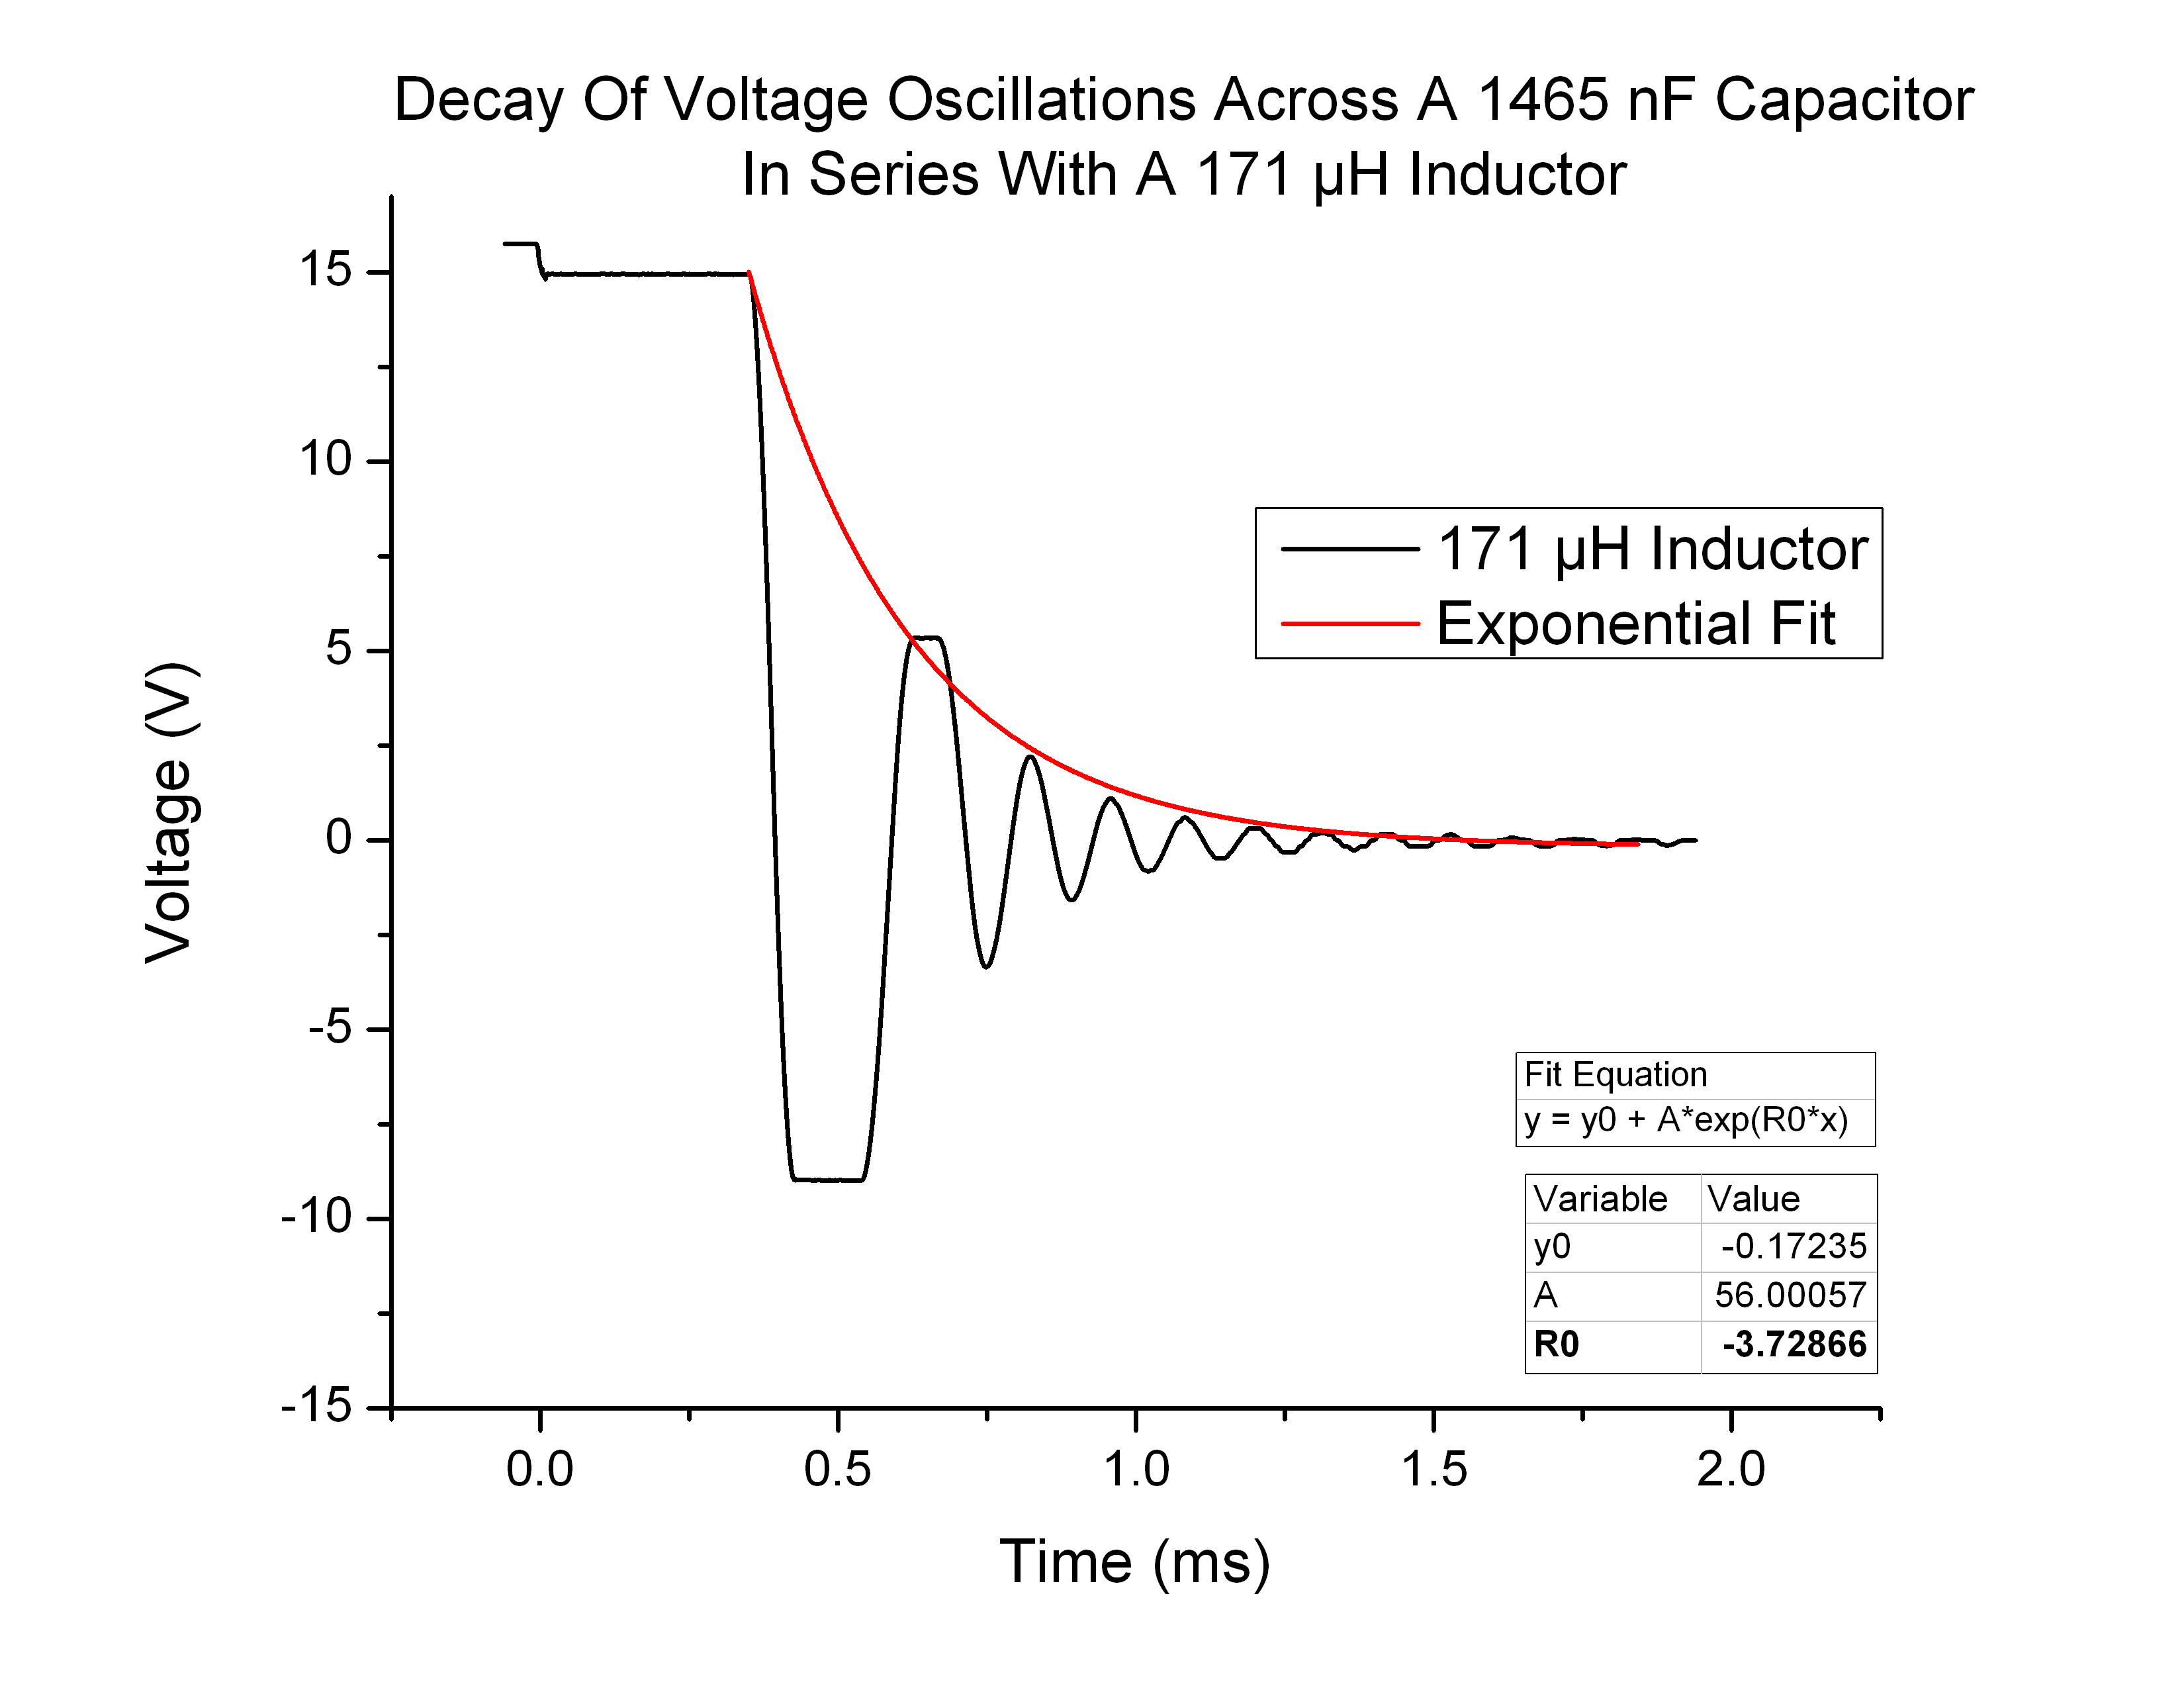
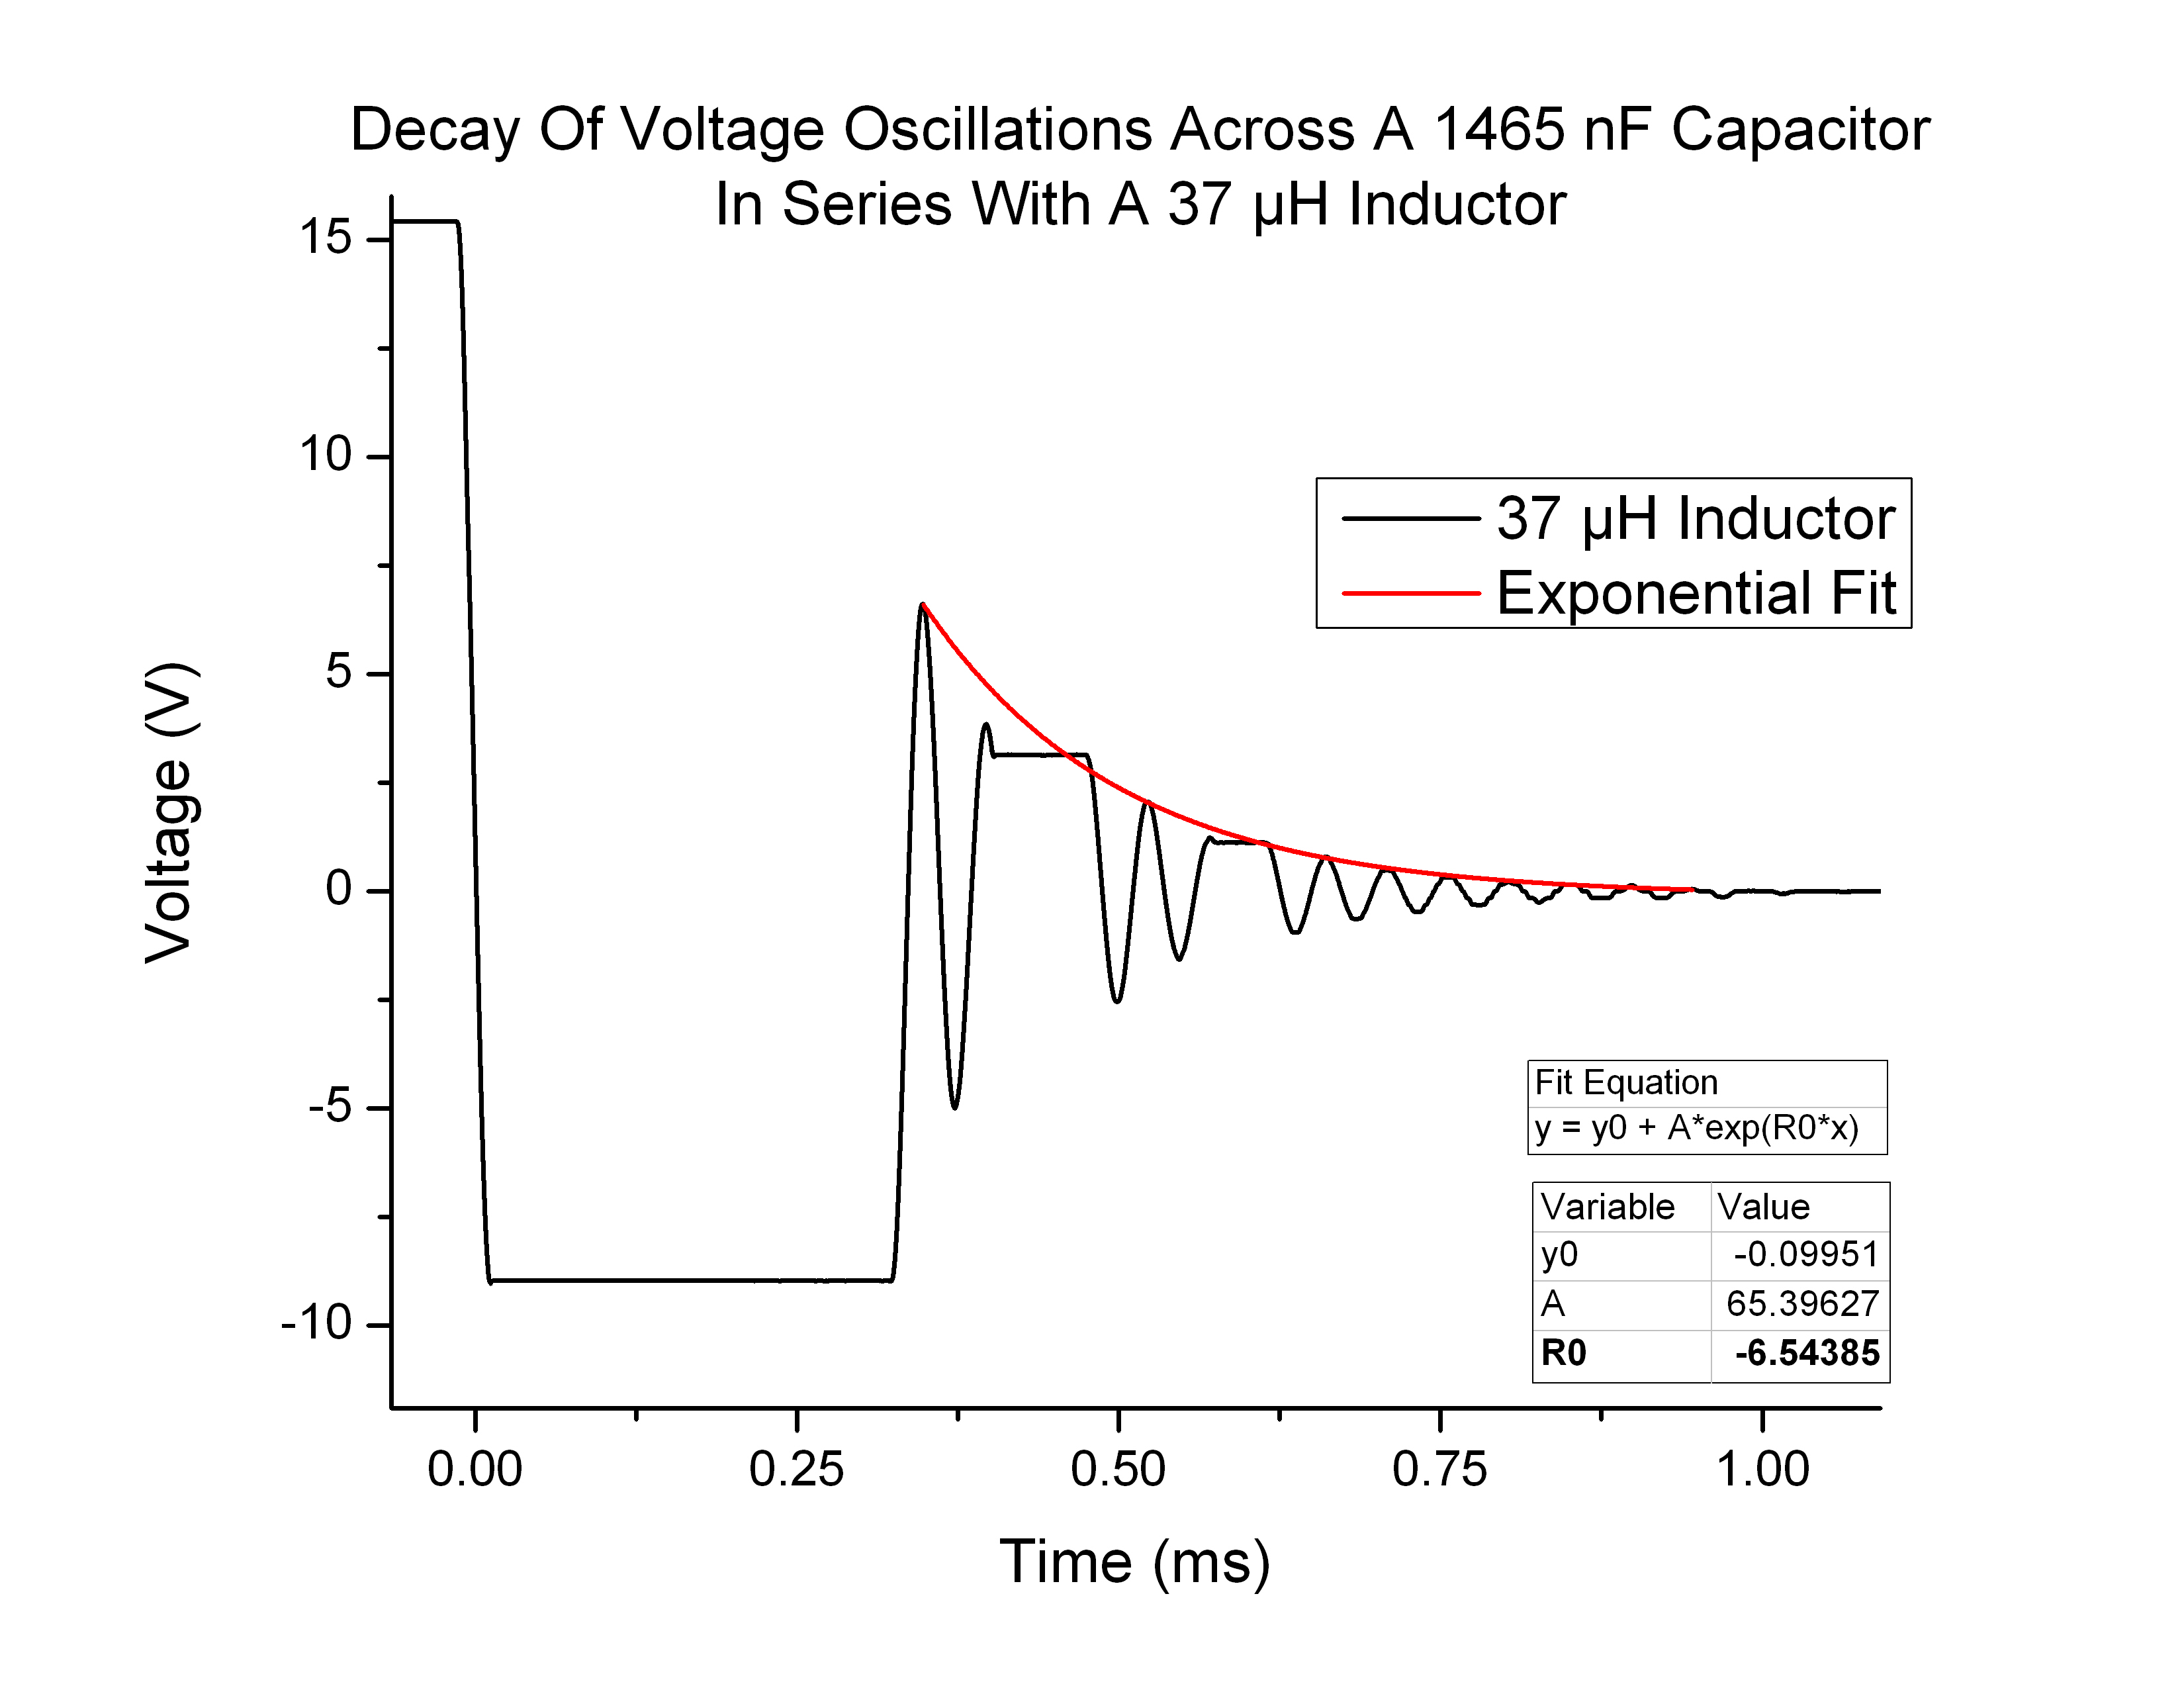
In order to explore how the decay coefficient β changes I needed to change the inductor values. Because the voltage curves were more manageable at greater LC values, I used the largest capacitor I had and varied the inductor value.  The results were as follows (Figures 10-11):

37 uH exp fit

Figure 10

171 uH exp fit

Figure 11

The resulting decay coefficients are as follows (Figure 12):

Screen Shot 2014-05-20 at 3.59.39 PM

Figure 12

Which can also be represented in as a scatter plot, despite having so few points(Figure 13):

Figure 13

Figure 13


Share

Preliminary Data

Measuring and Modeling Physical RCL Circuits

Extended Derivations of LC and RLC circuit behavior.

EM circuit DC

To derive the equations governing the voltage across the capacitor I start with Kirchoff’s Loop Law:

\Delta V_{L}+\Delta V_{C}=0           (1)

Substituting in for the values of voltage across a capacitor and inductor we get:

 L\dfrac {dI\left( t\right) } {dt}+\dfrac {Q\left( t\right) } {C} =0         (2)

The current can be expressed as the rate of change of charge on the capacitor:

 I\left( t\right) =\dfrac {dQ\left( t\right) } {dt}         (3)

 L\dfrac {d^{2}Q\left( t\right) } {dt^{2}}+\dfrac {Q\left( t\right) } {c}=0         (4)

This expression is analogous to the equations governing Simple Harmonic Motion (SHM):

 F_{spring}=-kx           (5)

F_{net}=ma= m\dfrac {d^{2}x\left( t\right) } {dt^{2}}         (6)

m\dfrac {d^{2}x\left( t\right) } {dt^{2}}+kx =0           (7)

The solution to this second order differential equation can be written as.

x\left( t\right) =x_{0}\sin \left( \omega _{0}t-\delta \right)           (8)

Similarly the general solution for charge across the capacitor can be given by:

Q\left( t\right) =Q_{0}\sin \left( \omega _{0}t-\delta \right)           (9)

Thus the Voltage across the capacitor, \Delta V=\dfrac {Q\left( t\right) } {C}, can be written as:

\Delta V\left( t\right)=\dfrac {Q_{0}} {C}sin \left( \omega _{0}t-\delta \right)\left                   (10)

\Delta V\left( t\right)=V_{0}sin \left( \omega _{0}t-\delta \right)\left                   (11)


RLC circuit (damped oscillation)

EM circuit DC R


The RCL circuit can be similarly derived by adding a third term for the voltage across the resistor to Kirchoff’s Loop Law.

\Delta V_{L}+\Delta V_{R}+\Delta V_{C}=0       (12)

 L\dfrac {d^{2}Q\left( t\right) } {dt^{2}}+R\dfrac {dQ\left( t\right) } {dt}+\dfrac {Q\left( t\right) } {c}=0      (13)

\dfrac {d^{2}Q\left( t\right) } {dt^{2}}+\dfrac {R} {L}\dfrac {dQ\left( t\right) } {dt}+\dfrac {1} {LC}Q\left( t\right) =0      (14)

Here we define

\dfrac {1} {LC}\equiv \omega _{0}^{2}    and    \dfrac {R} {L}\equiv 2\beta       (15)

To simplify our second order differential equation to:

\dfrac {d^{2}Q\left( t\right) } {dt^{2}}+2\beta \dfrac {dQ\left( t\right) } {dt}+\omega _{0}^{2}Q\left( t\right) =0      (16)

Again, this equation is analogous to Damped Simple Harmonic Motion, described below:

 F_{spring}=-kx -b\dfrac {dx\left( t\right) } {dt}         (17)

F_{net}=ma= m\dfrac {d^{2}x\left( t\right) } {dt^{2}}       (18)

m\dfrac {d^{2}x\left( t\right) } {dt^{2}}+kx -b\dfrac {dx\left( t\right) } {dt}  =0       (19)

The general solution to this differential equation, describing an underdamped system (where \beta  < \omega _{0}), is as follows:

\omega _{1}\equiv \sqrt {\omega _{0}^{2}-\beta ^{2}}       (20)

V\left( t\right) =V_{0}e^{-\beta t}\sin \left( \omega _{1}t-\delta \right)       (21)

This solution describes a sinusoidal function whose amplitude decays as a function of e^{-\beta t}.

While in theory my experimental setup is an LC circuit, and should be described by SHM, in reality there should be some form of resistance in the circuit, causing the oscillations to decay over time as described in Damped SHM.

Experimental Setup:

EM-schematics

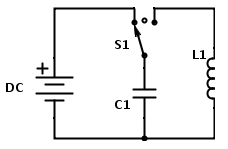
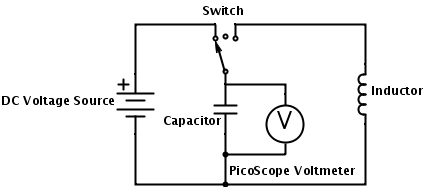
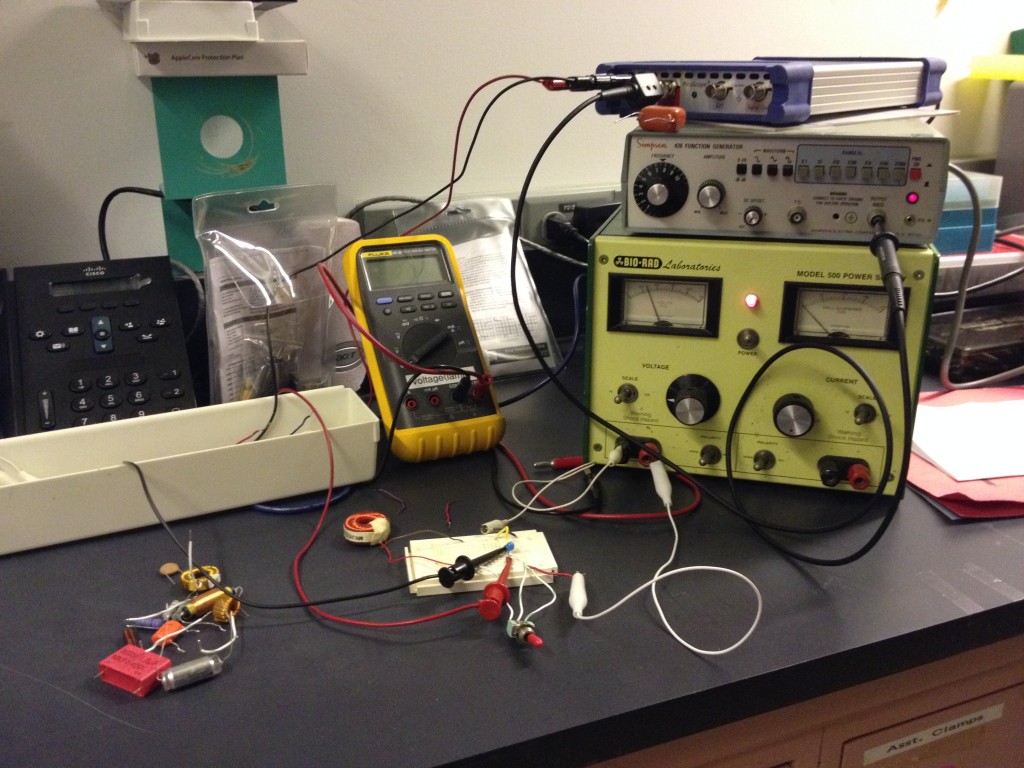
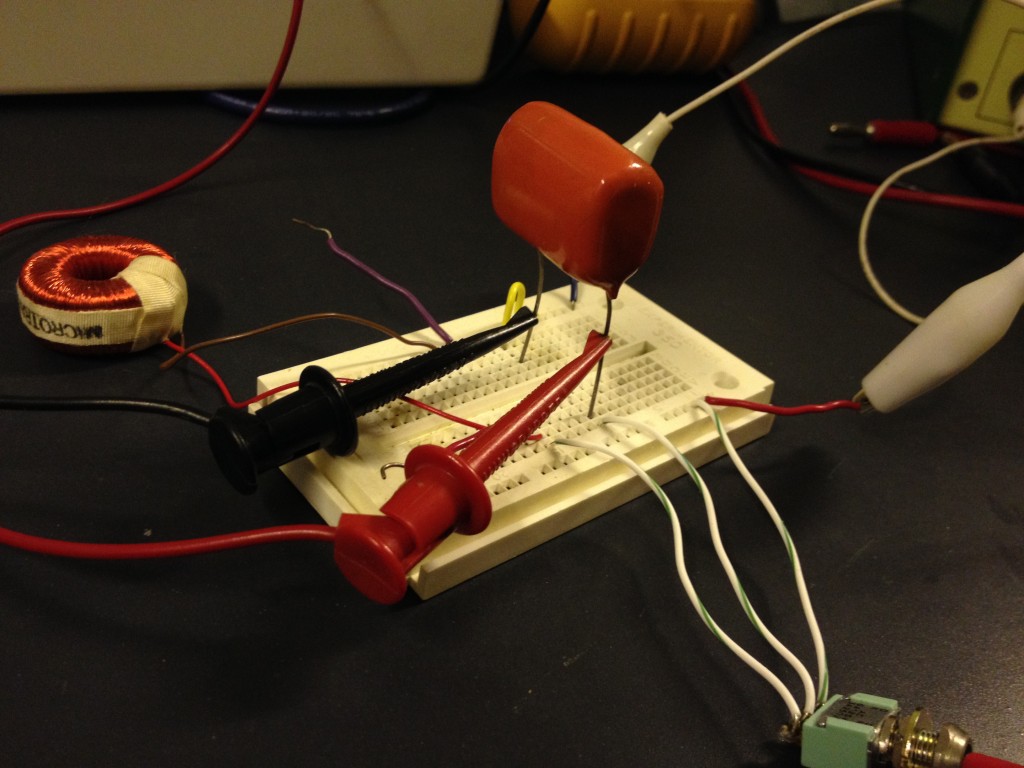
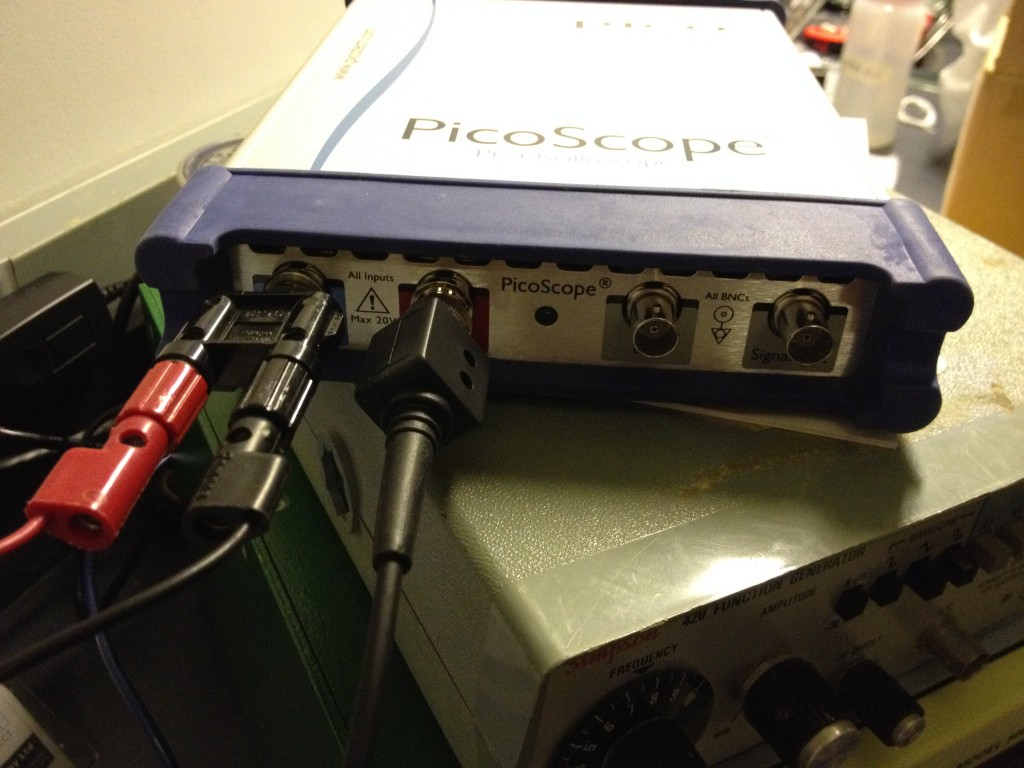
The above diagram represent the physical circuit I built to observe the voltage oscillations of an LC circuit. This circuit has two functions. The first, when the switch connects the loop to the left, charges the capacitor with the voltage source. The second, when the switch completes the right loop, discharges the capacitor through the inductor. The right and left loops are independent of each other because of the switch. Connected in parallel across the capacitor is the PicoScope. This device records the voltage across the capacitor over time. Below are photographs of what experimental setup actually looked like:

DC power source, signal generator, oscilloscope, circuit (and multimeter)

DC power source, signal generator, oscilloscope, circuit (and multimeter).

Circuit Setup

Circuit setup. LC circuit with DC power source, switch, capacitor, inductor, and oscilloscope.


Voltage difference and reference signal

Oscilloscope with Channel A: Voltage difference, Channel B: reference signal.

First Data:

This project held a few challenges of its own before I even got to collecting data. Completely unfamiliar with the Picoscope (digital oscilloscope) probe and software, it took me a few days to figure out how to efficiently collect data with the setup.
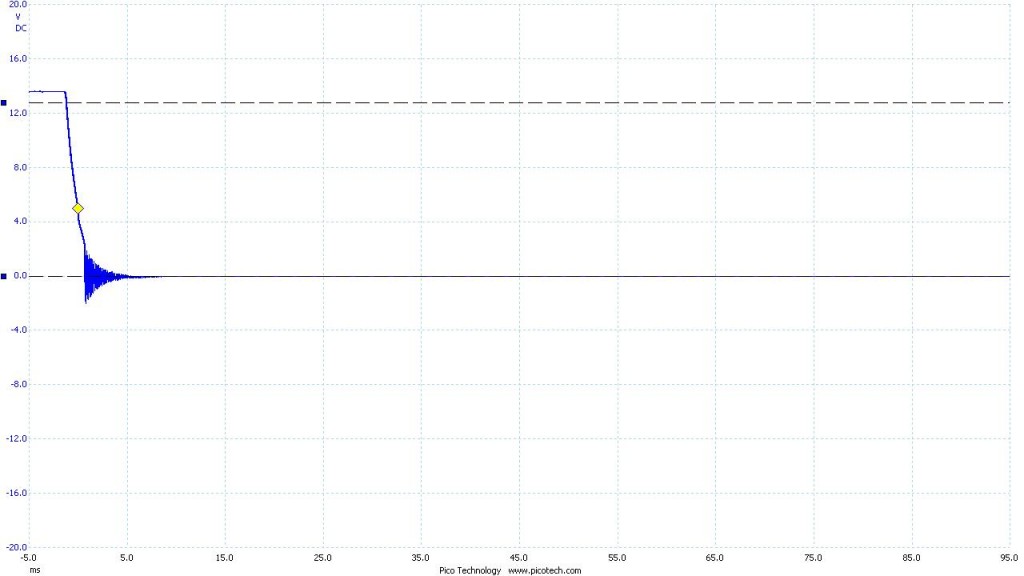
My first attempt at taking data did not go well. With the oscilloscope I could see the voltage difference across the capacitor that I wanted, but when I switched the circuit to discharge the capacitor, the voltage dropped to zero immediately. I was looking for some sort of sinusoidal curve, possibly decaying very quickly (in ideal conditions the curve would never decay).

Searching for answers as to why I wasn’t seeing anything, attempted to estimate how long any capacitor would take to discharge.

The charge on a capacitor as a function of time (in an RC circuit) is given by Q=Q_{0}e^{-tk}, where k=\dfrac {1} {RC}. At the time I was using components of unknown value. I visited Larry Doe’s workshop in Blodget and measured the resistance, capacitance, and inductance values of all my components. The capacitor I had picked for my initial measurements had a value of 0.1 μF. What this means is the charge on the capacitor had discharged e^{-1} of it’s initial value (about 37% of it’s initial value) at t=RC . In this scenario the R is the resistance of the circuit. Using an estimation of 0.0001 Ω for 5 cm copper wire as the equivalent resistance of the circuit, and 10^-7 F as the capacitance, the charge on the capacitor should reach one third it’s initial value in 10 ps. To me this illustrated the incredibly short time period at which that particular LC combination would oscillate, and potentially decay.

Second Attempt:

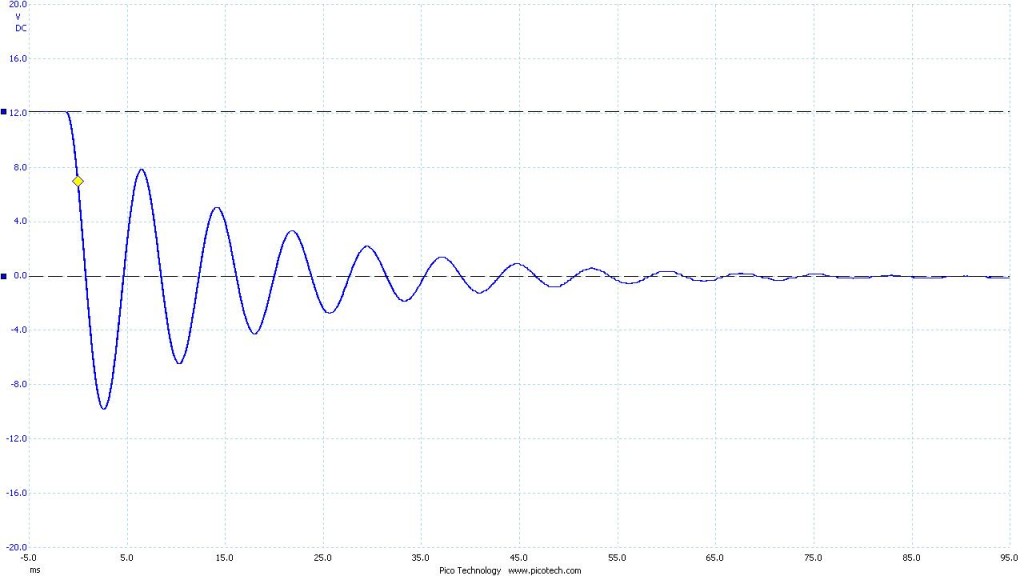
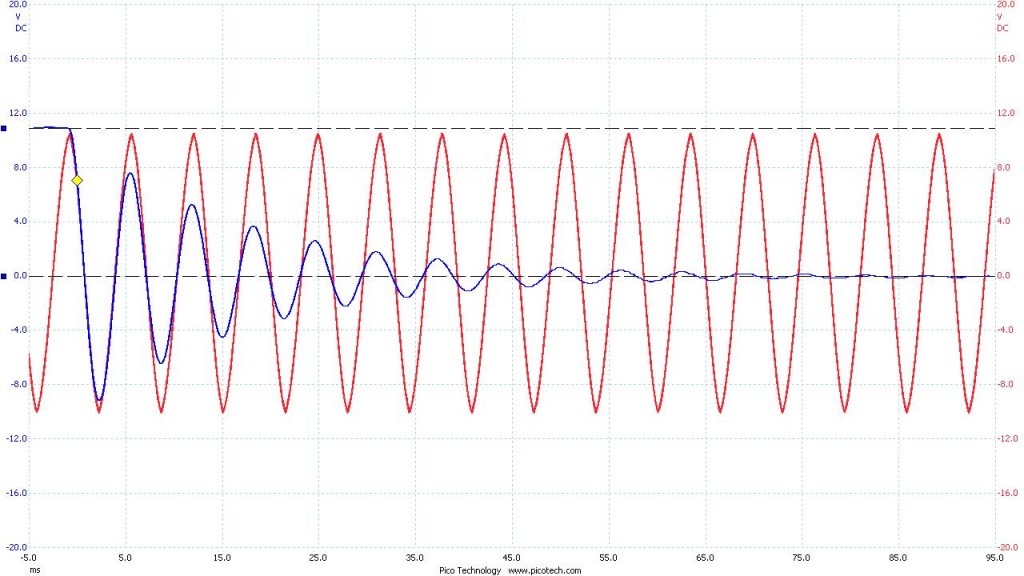
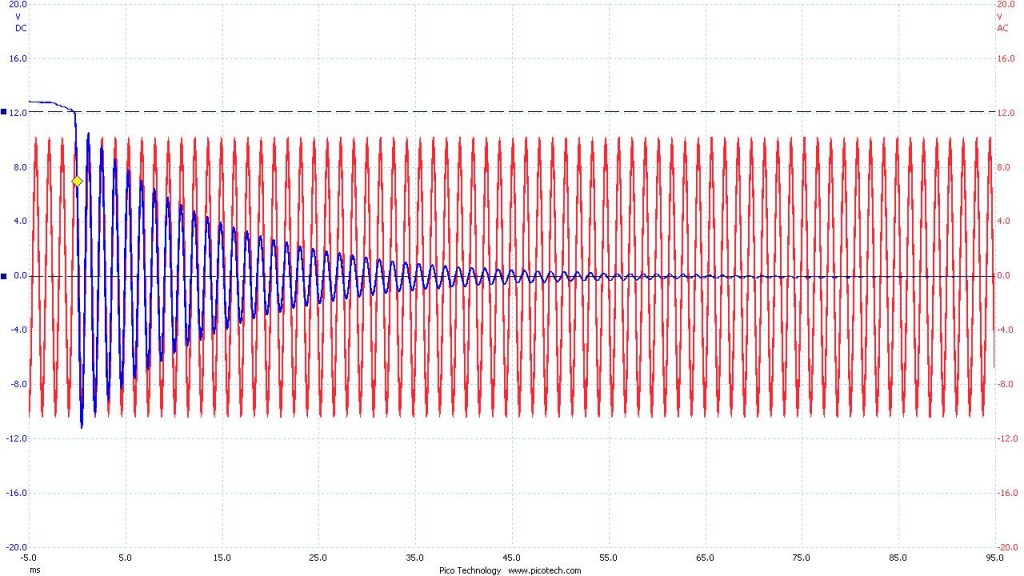
To maximize the time it took the system to discharge I used the highest valued capacitor and inductor I had. The resulting curve was far more manageable. Below is the data I collected with the oscilloscope. The blue curve you see is voltage across the capacitor as a function of time. The total time shown for each image is 100 ms. The red curve is an artificially generated curve for reference. It represents the expected shape of the blue curve. In an ideal LC circuit there is no resistor, and thus no decay over time. Theoretically an ideal LC circuit would oscillate indefinitely.

Figure 1. Capacitor: 1465 nF   Inductor: 996 mH

1465nF, 996mH, 128 Hz

1465nF, 996mH, Oscillation: 128 Hz

Figure 1.1 With reference wave

1465nF, 996mH, 128 Hz

Oscillation: 128 Hz

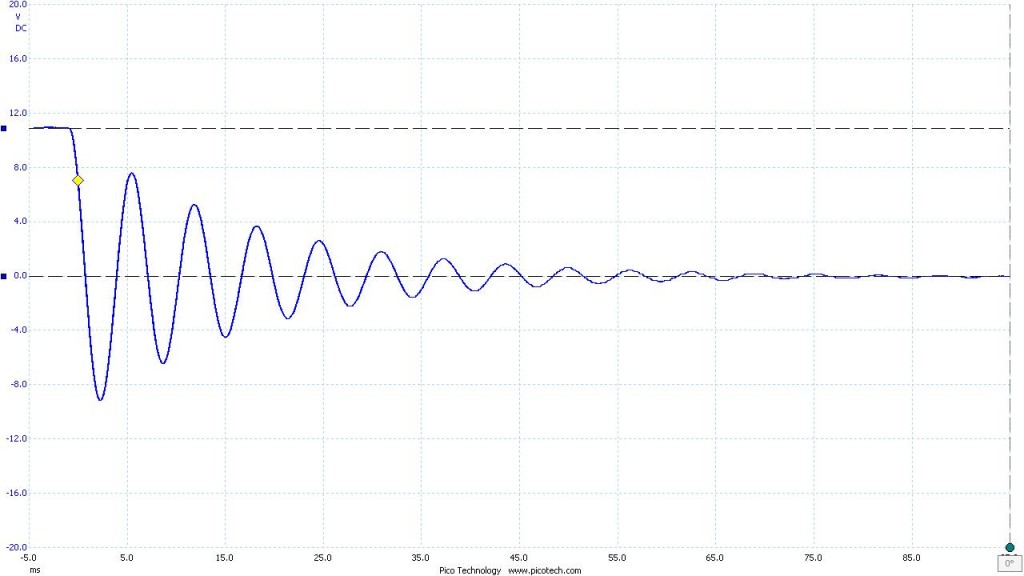
I then used successively lower and lower capacitor values to approach my initial test where the capacitor discharge was far too quick to measure. The duration of measurement, initial voltage across the capacitor, and inductor value were held constant.

Figure 2. Capacitor: 1007 nF   Inductor: 996 mH

1007nF, 996mH, 155Hz

1007nF, 996mH, Oscillation: 155 Hz

Figure 2.1 With reference wave

1007nF, 996mH, 155Hz

Oscillation: 155 Hz

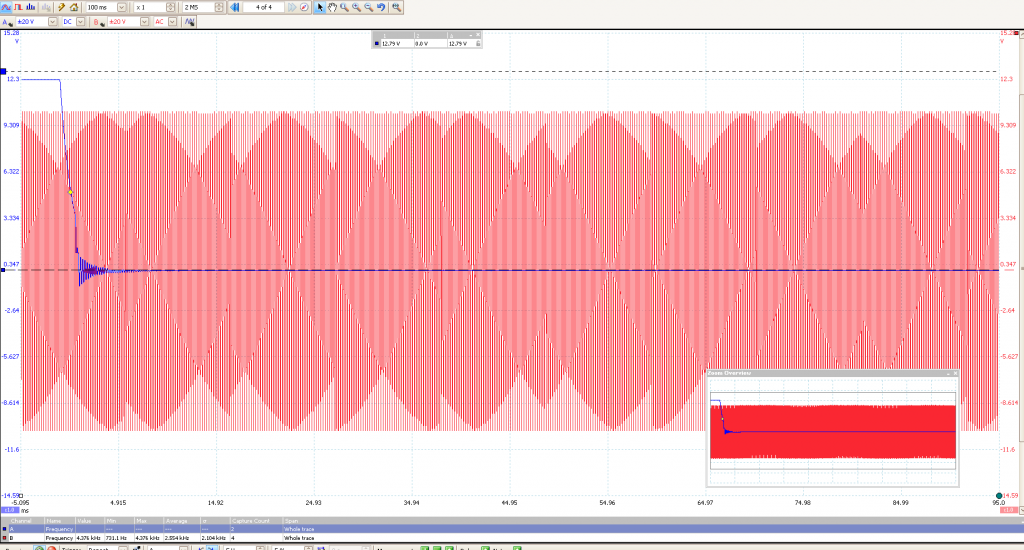
Figure 3. Capacitor: 47 nF   Inductor: 996 mH

47nF, 996mH, 730 hZ

47nF, 996mH, Oscillation: 730 hZ

Figure 3.1 With reference wave

47nF, 996mH, 730 hZ

Oscillation: 730 hZ

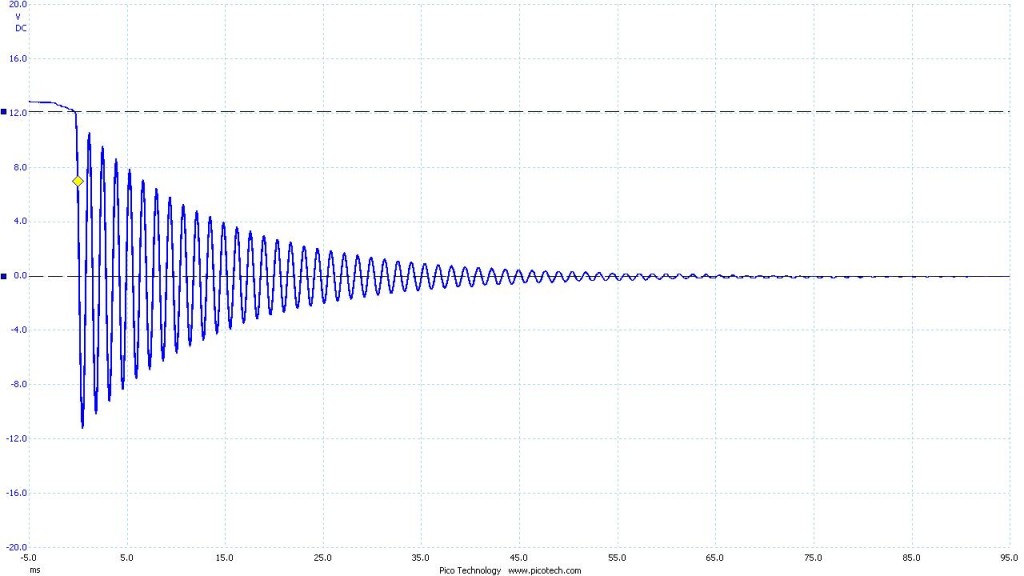
Figure 4. Capacitor: 1.9 nF   Inductor: 996 mH

1.9nF, 996mH, 4.23 kHz

1.9nF, 996mH, Oscillation: 4.23 kHz

Figure 4.1 With reference wave

1.9nF, 996mH,4.23 kHz

Oscillation: 4.23 kHz


Share

Project Plan

Measuring and Modeling Physical RCL Circuits

Purpose and Goals:

The purpose of this project is to demonstrate the difference between theoretical descriptions/relationships of basic LC circuits and experimental values. This is also an exercise in developing a deeper understanding of the theoretical equations governing these relationships. I will record the voltage drop across various components in each circuit and plot them in comparison to the theoretically predicted values. In addition, I will try to answer questions such as “What are the probable causes for deviation from predicted values?”

The first and most simple circuit I will work with is a basic LC circuit:

EM circuit DC

The DC power source charges the capacitor until it is discharged (via switch) into the right hand circuit. In theory the current should oscillate back and forth between the capacitor and inductor indefinitely if there was no resistance in the circuit. Actual experimental measurements should reveal some resistance due to the wires and components themselves. Below is the start of my derivations for the voltage across each components:

Kirchoff’s Loop Law states that the total voltage drop across the right hand circuit loop should be zero:

\Delta V_{L}+\Delta V_{C}=0       (1)

We know that the voltage drop across an inductor is equal to L(dI/dt) and across a capacitor is Q/C:

 L\dfrac {d^{2}Q\left( t\right) } {dt^{2}}+\dfrac {Q\left( t\right) } {c}=0     (2)

Which can be rewritten as

\dfrac {d^{2}Q\left( t\right) } {dt^{2}}+\omega _{0}^{2}Q\left( t\right) =0     (3)

Leaving us with the general solution to this second order differential equation

Q\left( t\right) =Q_{0}\cos \left( \omega _{0}t-\delta \right)      (4)

The derivation of the above equations will be more thorough in future posts.

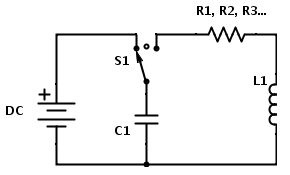
RLC circuit

This circuit is dampened with a resistor, and thus no longer resembles simple harmonic motion, but rather a damped harmonic oscillator.

EM circuit DC R


Kirchoff’s Loop Law now reads

\Delta V_{L}+\Delta V_{R}+\Delta V_{C}=0     (5)

 L\dfrac {dI} {dt}+RI +\dfrac {Q} {C} =0     (6)

Which leaves us with a new second order differential equation

 L\dfrac {d^{2}Q\left( t\right) } {dt^{2}}+R\dfrac {dQ\left( t\right) } {dt}+\dfrac {Q\left( t\right) } {c}=0    (7)

\dfrac {d^{2}Q\left( t\right) } {dt^{2}}+\dfrac {R} {L}\dfrac {dQ\left( t\right) } {dt}+\dfrac {1} {LC}Q\left( t\right) =0    (8)

\dfrac {1} {LC}\equiv \omega _{0}^{2}   (9)

\dfrac {R} {L}\equiv 2\beta     (10)

\dfrac {d^{2}Q\left( t\right) } {dt^{2}}+2\beta \dfrac {dQ\left( t\right) } {dt}+\omega _{0}^{2}Q\left( t\right) =0    (11)

Eq. (11) is the second order differential equation governing the charge on the capacitor as a function of time and thus describing the voltage drop and current through the other components of the circuit.

Predictions

Theoretically I should expect the voltage across the components in an LC circuit to oscillate indefinitely according to simple harmonic motion. I expect that with a real circuit this would not be the case. A physical LC circuit would actually behave as if a resistor was in series with the two components, causing the amplitude of the oscillations to decrease over time. This is because the circuit parts, such as the wires connecting each component, are not ideal and have resistance.

I predict that a graph of the voltage difference over time for a given component will appear as a decaying sinusoidal wave. In other words it should resemble an dampled oscillation.

Methods

I will use a PicoScope digital oscilloscope to measure the voltage difference across the capacitor in the LC circuit. In this way I will both be able to see the voltage the capacitor is initially charged to as well as record the transition from a steady voltage to an oscillating voltage.

Sources, Resources, and Parts Needed

Equipment Needed:

  • DC power source, AC frequency generator, Oscilloscope, Computer, Multimeter

Parts Needed:

  • Breadboard; various values of resistors, capacitors, and inductors; switch; wires/alligator clips

Helpful Texts:

  • Physics for Scientists and Engineers: A Strategic Approach with Modern Physics (2nd ed.) by Randall D. Knight
  • Introduction to Electrodynamics (4th ed.) by  David Griffiths
  • Data Reduction and Error Analysis for the Physical Sciences by Philip R. Bevington, D. Keith Robinson
  • Experimentation : an introduction to measurement theory and experiment design by D.C. Baird
  • Ordinary Differential Equations by Morris Tenenbaum and Harry Pollard
  • Class notes – Classical Mechanics (PHYS 210), Zosia Krusberg.

Websites:

Timeline

Week 1 – April 20th-26th. Acquire all equipment and parts needed for experiment: Talk to Larry Doe for parts and possibly a power source. Talk to David Rishell about an AC signal generator. Setup experiment in Mudd 216 with Prof. Magnes’ oscilloscope, DC power source, and multimeter.

Week 2 – April 27th-May 3rd. Derive equations to predict voltage drop across components to plot on top of collected data. Those equations being ΔV for LC, dampened LC (RLC), and AC driven RLC in series circuit. Collect data on voltage drops across LC and dampened LC circuit components. Plot data in mathematica.
Week 3 – May 4th-10th. Collect data on voltage drops over AC driven circuit. Predict resonance frequency. Define equations governing resonance frequency and find actual resonance frequency of circuit. Plot findings in mathematica. Consider sources of error or causes of deviation from predicted values on all three circuit configurations.

Week 4 – May 11th-17th. Finish data collection and additional exploration/inquiry. Create time dependent plots in mathematica to demonstrate projected vs experimental values.

Place/Logistics

Experimentation and data collection will occur in Professor Magnes’ lab in Mudd 216. Brian and Tewa generally work MWF and can be contacted for access to the lab.


Share

Project Proposal: Measuring and Modeling Physical RCL Circuits.

This project is based on an initial interest in the RLC circuit lab in 114 where students put together parts of a radio and demonstrated how inductance and capacitance was used to tune a radio. My end goal is to compare measurements across components of a real RLC circuit (radio) to the ideal values one might expect to find based on equations from our textbook that model these circuits. I would begin with a simple LC circuit, maybe constructed out of components that would later be found in the radio circuit (or whatever components are available to make the simplest LC circuit I can make measurements on). I would collect data such as potential across various components. An important part of the analysis would be proposing possible/probable causes of any discrepancy between expected values and experimental values. I would use an oscilloscope to make the measurements. Ideally I would use a computer oscilloscope and a laptop and set up in room 203A.

Share