by Steve Taylor
Basic Image Editing
![]() Over the years, many Vassar faculty members have asked how to get a copy of Adobe PhotoShop®, an expensive program used by professional graphic artists for creating and editing digital images. Typically they’re not looking for sophisticated, complicated functions, though— just some basic things like re-sizing, cropping, and adjusting the brightness or contrast. Though there are some free or cheap programs that can do these things, such programs are generally not easy to use. Now they— if they are Mac users, anyway— have a great alternative: Preview.
Over the years, many Vassar faculty members have asked how to get a copy of Adobe PhotoShop®, an expensive program used by professional graphic artists for creating and editing digital images. Typically they’re not looking for sophisticated, complicated functions, though— just some basic things like re-sizing, cropping, and adjusting the brightness or contrast. Though there are some free or cheap programs that can do these things, such programs are generally not easy to use. Now they— if they are Mac users, anyway— have a great alternative: Preview.
Preview is a program that has been included with the Macintosh operating system for many years. By default, it’s the program that launches if you double-click on a JPEG file or PDF file. And initially, that’s about all it could do: show you what a file looks like. But over the years, it’s accrued more functions and the current version— the one that comes bundled with Mac OS 10.6— is an elegant tool for basic image editing.
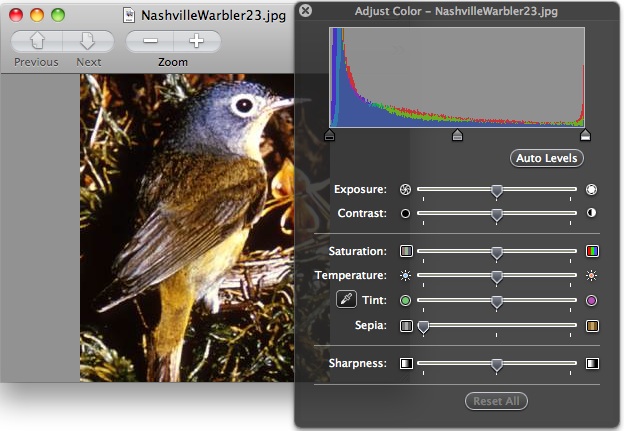
With the Color Adjustment tool, you can change the brightness, contrast, saturation, temperature, tint, sharpness, and even a sepia effect. The Size Adjustment tool is essentially the same as PhotoShop’s— you can adjust the height, width or resolution, choosing whether to resample the image when doing so or not. You can use your mouse to select a portion of the image and crop the rest out. You can rotate or flip the image. You can copy and paste pieces of the image. When you’re done, you can save the edited version in any of several file formats.
And while this is not new, it’s a nifty capability: you can drag a collection of image files onto the Preview icon to present a slide show.
PDF Annotation
![]() Preview can also display PDF files— in fact, it’s the default PDF viewer on a Macintosh. What’s new is that you can now use Preview to annotate a PDF in various ways.
Preview can also display PDF files— in fact, it’s the default PDF viewer on a Macintosh. What’s new is that you can now use Preview to annotate a PDF in various ways.
You can drag a circular or rectangular shape around something on your page or make an arrow pointing to it; you can choose the color and line thickness for this.
You can create a text box and type a comment wherever you like; you can choose the font, size and color of your text. For longer comments, or ones you don’t want to clutter up the page too much, you can embed a link to a note that will pop up in the margin— ideal for commenting on student papers submitted as PDFs.
If your PDF was created from a text file (i.e., not simply a scanned image of a text page), you can select a portion of the text and highlight it, underline it, “strikethrough” it, or embed a web link into it. You can also insert a bookmark into a specific spot and name it; all your bookmarks for that document will be listed in the Bookmark menu.
After being saved and shared, all these mark-ups will be viewable by people using PDF viewers other than Preview, such as Acrobat Reader®.
You can’t get a copy of Preview all by itself; it comes bundled with the operating system. If you don’t see all these functions in your Preview, you may not have the current version. For more details about these and other functions, click on the Help menu within Preview.


Good question, Traffic Mogul. We’ve now added social media sharing buttons to our posts.
Many thanks for providing really informative reviews on your blog. How can I share it on the social networks?