week 8

Last official update!

This week, along with taking more data, we also took a cursory look at all the videos so far and simply counted how many worms “turned around” or “hovered” during the data collection. This was just to take a step back and get a sense for what rough results we were getting as to whether the worms have a sensitivity to different wavelengths of light. The results of that:

Red and Blue Lasers

Live Videos:

04-04-01 red – 0:52  hovering

04-04-03 blue – 1:16  hovering

Dead Videos:

04-04-01 blue – 3:00  extreme deceleration (the worm is dead though, so probably due to currents)

Green and Blue Lasers

Live Videos:

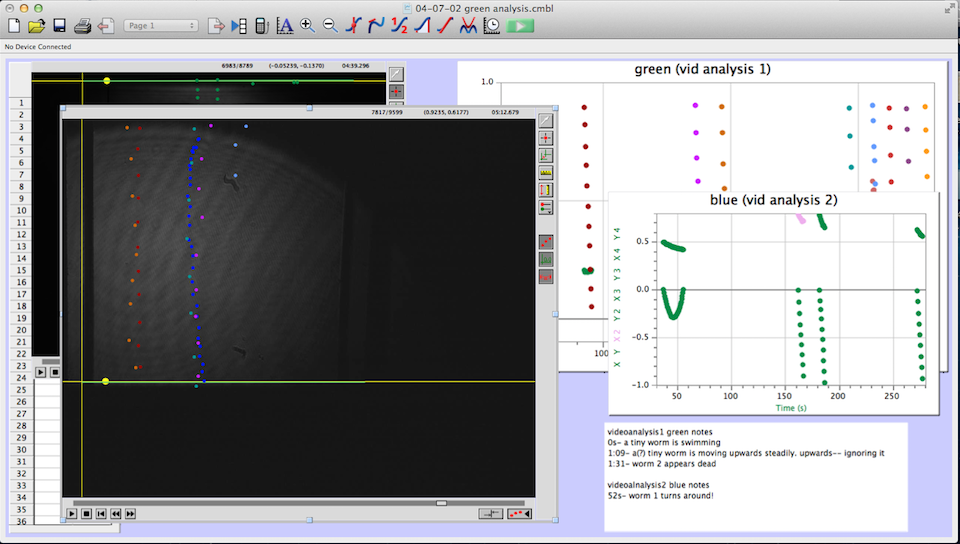
04-07-01 green – 3:45 (video 1)  slight turnaround (maybe due to a current)

04-07-02 green blue video – 0:52 (video 2) turnaround


This data is from 6 (or so) total videos. This data hints that the worms may have a sensitivity to the different wavelengths of light, but is inconclusive so far.

Again, this week we took data with the blue and red lasers.

IMG_3044

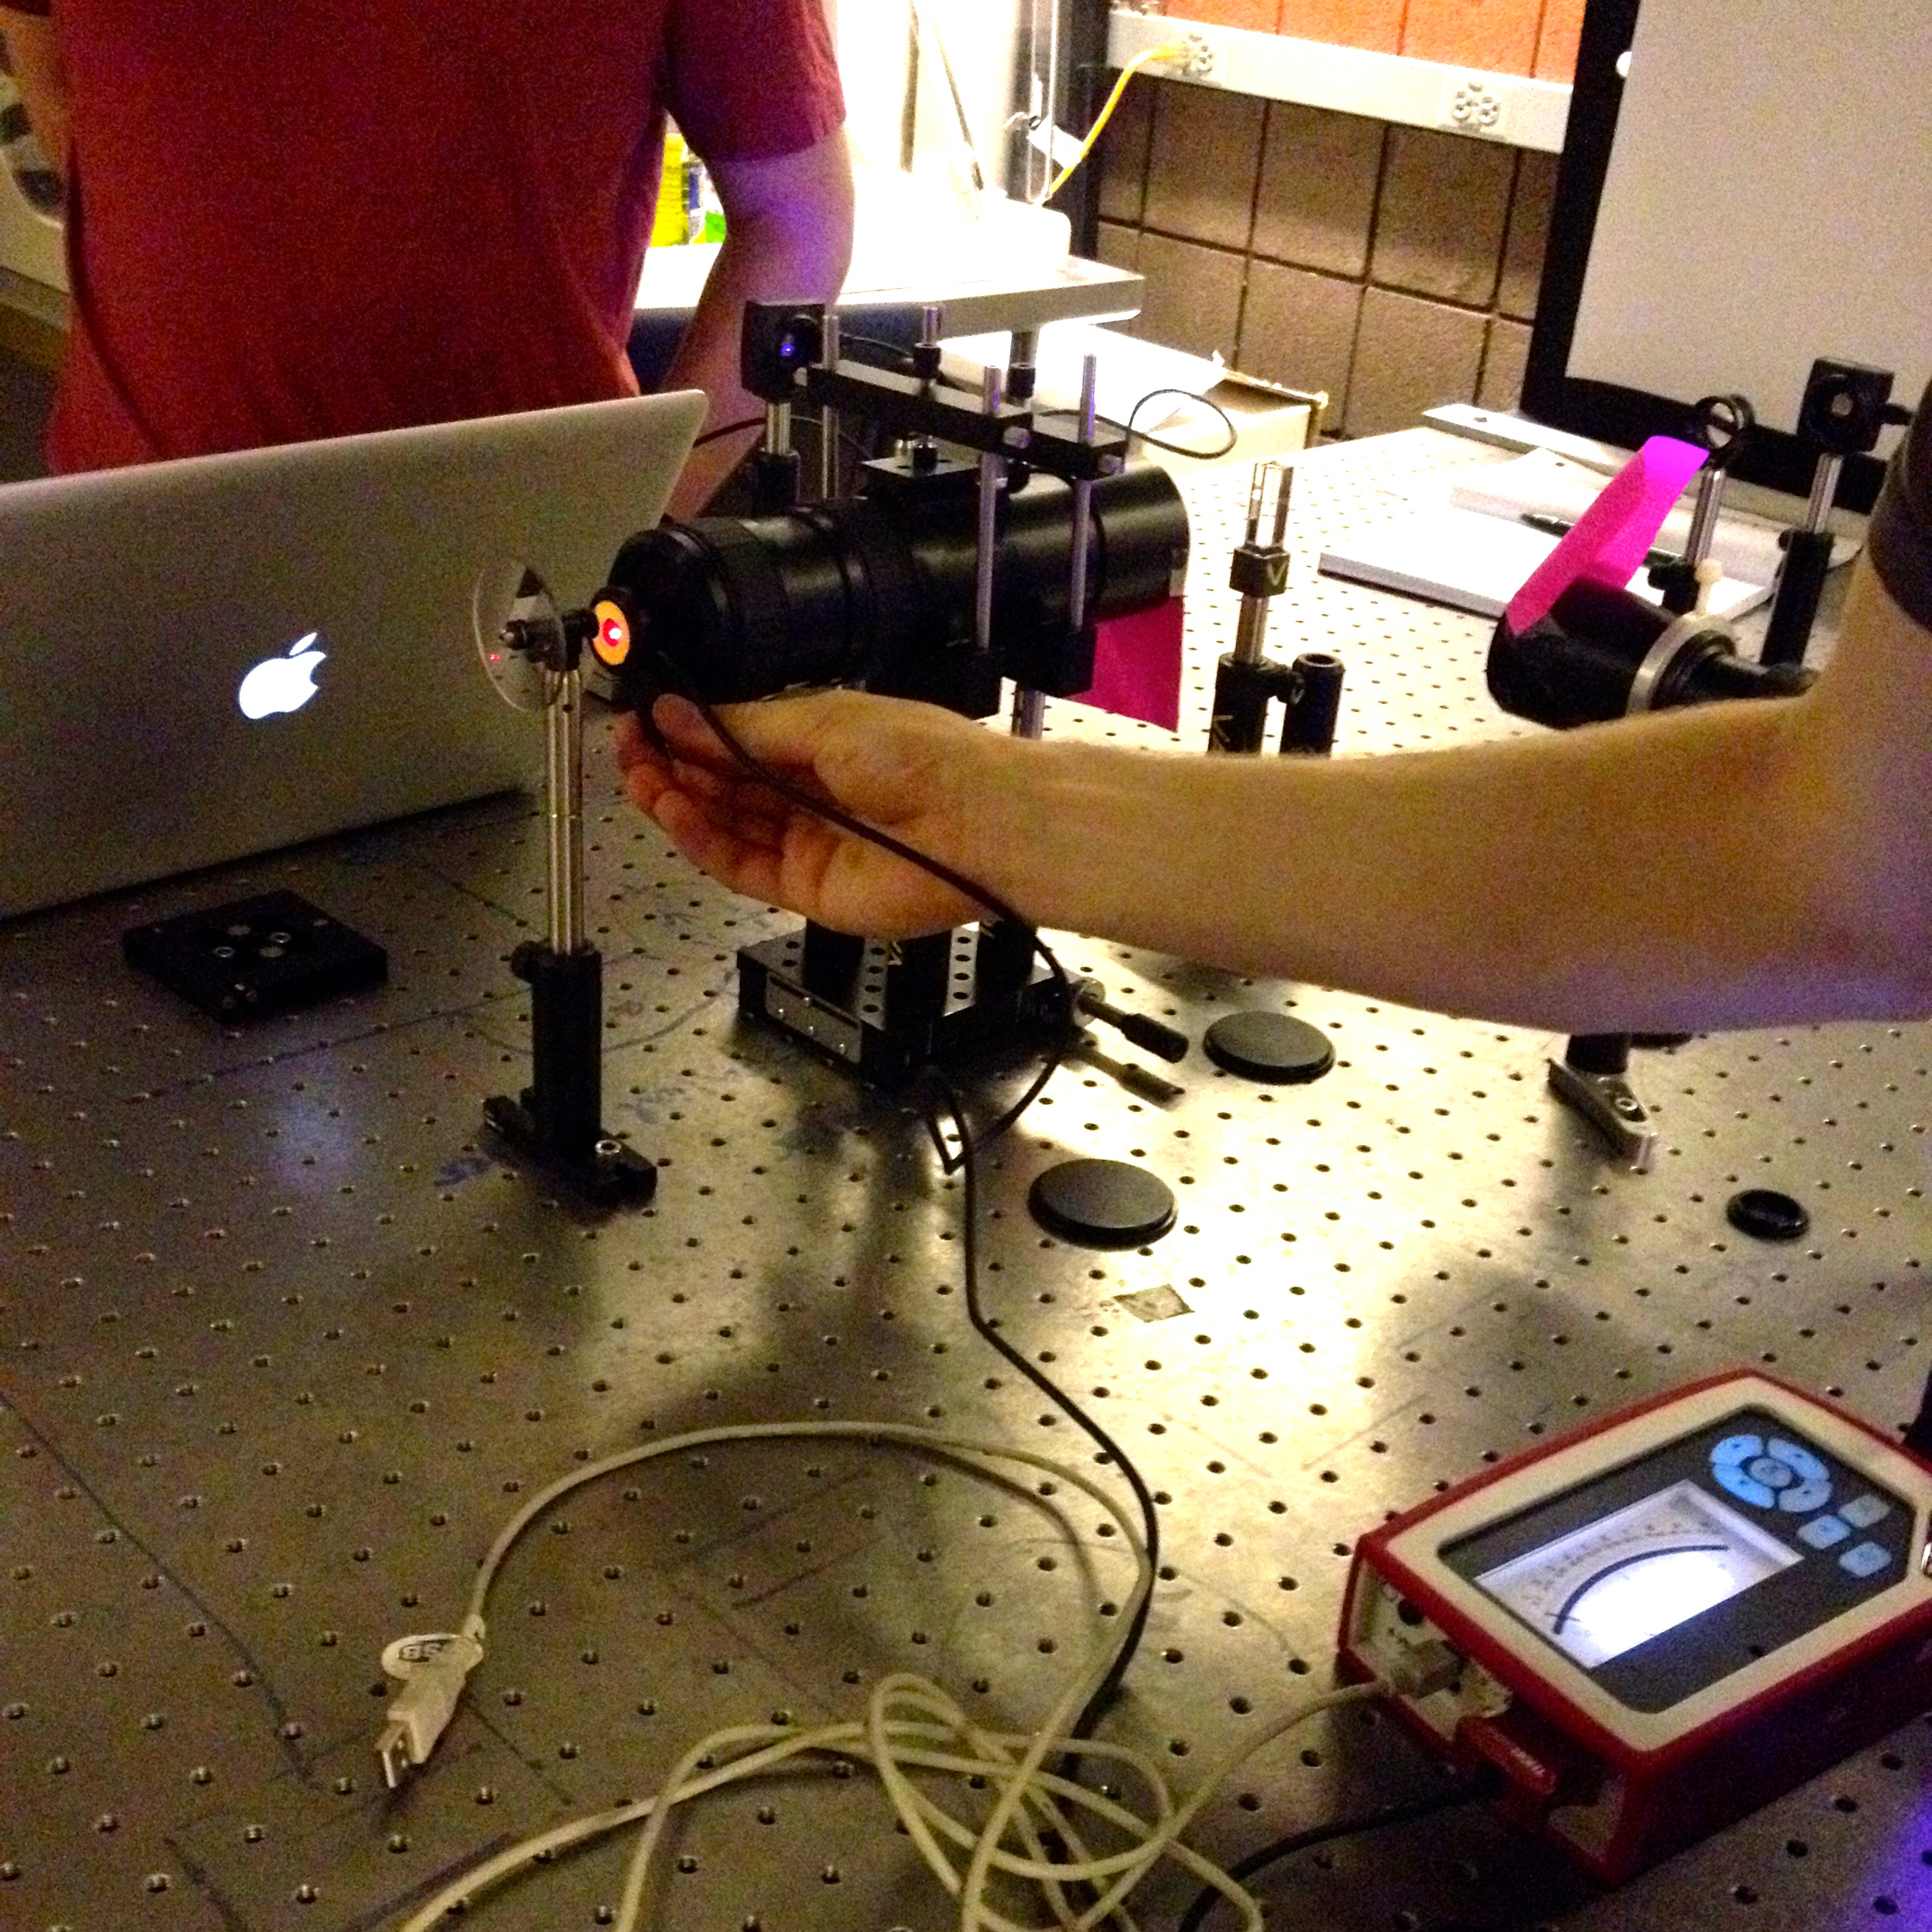
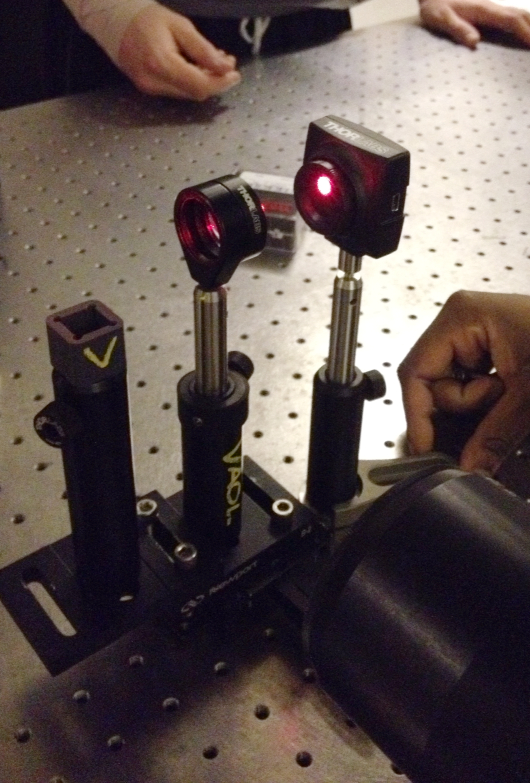
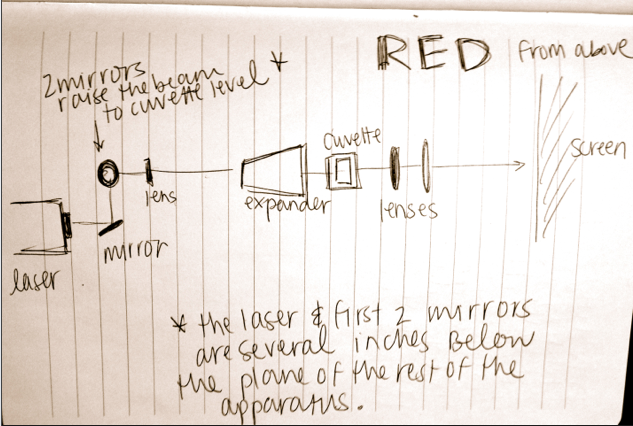
This image features the beam expander for the red laser, and Brian testing the power of the red laser. It is necessary for the two lasers to be producing the same power output for the experiment to be valid. (Note the setup: in view in order from left to right is the: neutral density expander, the power gauge held by Brian, the beam expander, the tiny cuvette, then the little black square of the CCD camera, and the white screen.)


This semester of research has been so eye-opening and informative to me personally and I feel that it is important to reflect briefly. I have learned through experience that experimental research is not smooth sailing: it requires ingenuity and patience facing the constant barrage of small problems in need of a solution. It is also quite rewarding and easy to invest in– keeping in mind the overall goal of the project, it is fun and easy to fall into the small details and celebrate every small victory. I have found this very rewarding, and am quite excited to continue in the field of research.

week 6 and 7

“Taking Data”

An expression used by experimenters and scientists regarding the collection and arrangement of data; the steps preceding the analysis of the data.

This week, we took data.

The CCD cameras have proven to be excellent. We drop the worm into the cuvette (through which a green and a blue laser are shining). One CCD camera is trained on the green, and one is trained on the blue.

  1. Upload the data to the computer, and open the movies in LoggerPro (Insert-> movie-> choose movie).
  2. Screen Shot 2014-04-17 at 1.27.25 PM“Set Scale” to 1cm by dragging the mouse from one wall of the shadow of the cuvette to the other.
  3. Set origin at the left end of the “set scale” linScreen Shot 2014-04-17 at 5.24.00 PM
  4. Choose options-> movie options-> override frame rate 25f/s and advance by 15f/s
  5. Screen Shot 2014-04-17 at 1.27.12 PM“add point” and click on the head/tail of the worm. The movie will progress at 15 f/s as you record the entire trajectory
  6. Screen Shot 2014-04-17 at 1.27.34 PM“add point series” for each new worm to separate data and make it easier to look at.

The whole process is not too difficult to understand, and LoggerPro is relatively easy to navigate. The most difficult part is keeping it organized. For each LoggerPro file, there are two movies (one for each of the colors of laser, one from each CCD camera), and two sets of data (two graphs).

Screen Shot 2014-04-17 at 5.18.45 PM

Here is a screenshot of the process. There are two videos open, and two sets of data. I keep note of unusual things that happen during the videos, and label the data sets clearly to minimize confusion. LoggerPro also helps differentiate between the data points by changing the color of each point series (each trajectory is color coded).

What’s next? For now, we have to continue collecting data. In order for a set of data to be at all conclusive or valid, it has to have enough raw data to generate a reasonable average.

week 5

Recall the problem of unfocused images when trying to observe the behavior of the worms when sent through two different wavelengths of light, side by side. The regular digital camera was producing such a tiny image that good data was hard to retrieve from the videos. We solved the problem by purchasing a second CCD camera! Now we are able to take two images (focusing the cameras on the two different colors respectively).

What’s next: We are looking into purchasing a UV laser in earnest. Comparing the price, whether it plugs in, the power, the beam divergence, and the wavelength to find the best option for us. We need it to plug in, for the divergence to be small, and for the wavelength to be mid- 300 nm, possibly adjustable.

In our search for the appropriate UV laser, we have found several inappropriate ones, and one especially scary one. A company called Wicked Lasers is selling handheld lasers that achieve up to 2 Watts of power, one of which has an attachment that makes it into a lightsaber. Although it does come with a disclaimer (“this is not a toy”), it is definitely a little scary that such a powerful laser can be bought for just a few hundred dollars, especially one that (even though it is described as NOT a toy) looks an awful lot like a toy.

week 4

[latexpage]

The CCD camera is not producing images. Up until now, it was possible to set up an effective laser setup just with “eyeballing it” (no math). Unfortunately, the CCD camera needs to be placed a specific distance from the closest lens, and because we have little experience with the camera, some math needs to happen in order for us to develop a “feel” for the instrument.

f=focus, h_o=hight of object, h_i=hight of image, o=distance from lens to object, i=distance from lens to image
f=focus, o=distance from lens to object, i=distance from lens to image, arrows indicate respective heights (object, image)

\begin{equation M=\frac{-i}{o}=\frac{h_i}{h_o} \end{equation}

where M=magnification

The use of this equation, along with the methods that we have been using in our setups, should produce the desired result: great images that are easy to see and easy to work with.

week 3

In the lab, things do not go smoothly line to line like in classroom physics problems. Experiments take endurance and patience: you will fail before you succeed.

Current project: Analyzing the C. elegans’ reaction to different light wavelengths (blue and red).

Problem: The videocamera cannot effectively record the nematode’s path through both the red and blue– it is very hard to track its path when analyzing the data.

Proposed Solution: CCD Camera.

CCD camera as it will be placed for data collection (lens cap on)

A “charge-coupled device” camera, although much pricier than a digital camera, converts the light it senses into electrons (just like a solar cell). They then interpret the assembled charge, and transfer the analog data into digital pixels. These cameras produce extremely high-quality images due to the charge moving across the chip with very little distortion.

This particular camera (pictured) is great for the setup because it can  1: be placed directly in the beam to collect images, and  2: plugs into the computer to easily record the images.


What’s next? First we have to confirm that this CCD camera will solve the above problem. Then onto data collection: it is unknown whether the worms react more to green or blue light. It is known that they swim away from UV light. First, collect data for blue and green. Then, on to a UV laser?

week 2

Learned:

  1. to measure/ record an optical setup
  2. what to do when the setup does not actually function
  3. to clean optics
  4. to pick worms.

This week was the first real week in the lab where I could help instead of being lost.

1) Measuring a setup: Hold a piece of string taught between your fingers. Making sure it is parallel to the table, hold one end directly above the center of the laser lens, and pinch the string directly above the first obstacle (pinhole, lens, etc). Mark the distance with a marker, and measure against a ruler. Record and repeat. Below is an image from my notebook, drawn on 2/13/14, of the Helium-Neon laser setup (from above).

Screen Shot 2014-02-15 at 10.16.06 PM

2) What to do when the setup is not aligned: The laser work table is sturdy and covered in a grid of holes, into which instruments can be secured. If the instruments are not in alignment, the laser will not reach through all of the lenses, etc, to reach the screen. To adjust, simply line up the instruments against one of the straight lines of drill holes. Most instruments will either be in a straight line or at right angles to each other.

3) Cleaning optics: Cleaning the mirrors and lenses is essential to get a clear image projected on the screen. To clean: place the mirror on a paper towel (that material does not really matter). Take a piece of lens paper, being careful to touch it as little as possible. Fold it, using the small forcep clamps, until a clean edge can be secured with the forceps. Wet the paper with a drop or two of methanol, and wipe slowly across the mirror, making sure not to touch the mirror with the same section of paper more than once.

4) Picking worms: First, retrieve a 4-day old (mature) dish of C.elegans worms, and a new dish with food (E.coli). Pick a Pick (a glass rod with a tiny wire of on the end). Using the dissecting microscope and a bunsen burner (to sanitize the pick between each contact), move four or five worms from the old plate to the new one. This is difficult at first because depth perception through a microscope takes practice and patience. Try not to kill any worms. Then wrap the dishes, mark them “VAOL” and the date, and place back in the refrigerator for four more days.


In conclusion: Some big strides were taken in the lab for me this week. I am looking forward for the data collection process, which is scheduled to begin on Monday (2/17).

week 1

As one of the new grunts of VAOL, this first week has progressed appropriately awkwardly, full of disorientation and demonstrations. I think it is appropriate to keep this first post simple, and avoid technicalities.

As I’ve been introduced to the lab, several themes have been repeated to me:

  1.  Experiments usually fail several times before any actual progress is made. One step back before two steps can be made forward.
  2.  There is a lot of waiting involved. In order for science to be done, there is a lot of shuffling around and communicating to be done first, then purchasing of equipment/setting it up, then figuring out what experimental procedure will answer the proposed question, etc. In this case, working with C. elegans, an additional step is figuring out how to coordinate the work with a living creature, and how to best make due with the supplies at hand.
  3.  A good understanding of the equipment is essential. As an example, in the current Shadow Imaging experiment, a Helium-Neon laser is the most useful laser because the beam is safe (easy to work with), it is relatively affordable, has good beam quality (stays focused for an extended time), and it has an adjustable wavelength, and as a result, can efficiently produce any wavelength of visible light (unlike many other types of laser). In general, it is extremely important in experimental setup to do thorough research on what type of equipment would be best for the experiment long before the actual experiment can be conducted.
  4.  There are often simple solutions to complex problems. For example, also in the Shadow Imaging experiment, one problem that arises is: how to keep track of the beam’s magnification on the screen? Simple solution: set a clear ruler at the measuring distance between the laser and the screen , an mark on the screen the magnification. In a word, good experiments require some Cleverness.

What’s next? –> I will soon be learning how to grow worms! The almost-microscopic C. elegans has a reproductive life cycle of about 4 days, and to keep the population constant, they must be transferred from dish to dish to give them food and a fertile location to reproduce. Apparently, it takes practice to learn to do it without killing them…

Social Widgets powered by AB-WebLog.com.