Assignment:
For today you are going to create a five minute podcast where you interview each other about a topic.
First develop a set of questions (3-5 questions).
Record your conversation around the questions.
Edit your conversation down to five minutes.
Time permitting, add music, an intro, any non-distracting sound effects, and an outtro.
Export as an .mp3.
Please upload to our WordPress site with the category “Podcasting with Audacity”.
Audacity Resources:
Workshop Outline – tinyurl.com/VCMakers-Audacity
Audacity Overview / Zooms / Headsets/ Spaces to Record Sound
- Zoom H1s can be signed out at Media Resources
- USB headsets with mics at circ deck and Media Resources
- 1-2 Rhode Lav mics
- Basement of Chicago Hall has a space to record high quality audio, email babailey@vassar.edu or acs@vassar.edu to arrange a recording session (9-5, M-F)
- Film has a whisper booth / Foley Booth (may be Film students only)
Downloading Audacity – http://www.audacityteam.org/ (Don’t use SourceForge).
Workshop Outline
Microphone setup – apple menu->Input/Output BEFORE launching Audacity
Launching Audacity
Security Settings
Tools Overview
Selection Tool – you’ll use this a lot
Envelope Tool – use this to adjust the volume, fade in, fade out
Zoom Tool – use this to view the wave form close up, control click to zoom back out
Draw Tool – for editing wave forms
Timeshift Tool – for sliding tracks left or right
Make a quick recording
Checking your input source
Tracks
Stereo/mono
Basic Edits
Selecting – use the selection tool to select pieces of the wave form
Deleting – edit menu, cut, or backspace key
Pasting – edit menu and paste, or apple – V
Shortcuts for repeating an insert – use the arrow key, then paste
Saving Files
.wav, .aiff – lossless, high quality
.mp3 , .aac – compressed file, “low” quality, export format, not good for editing
.aup – Audacity project Files
Effects
Amplification
Fade in/ fade out
Manual fade (Envelope Tool)
Noise Removal
Compressor
Importing Sound Files and Music
Practice Files
https://drive.google.com/driv e/folders/0BwJsmGvMifkLa0gwck5kM0F0NkE?usp=sharing
Exporting
Saving Files
Reopening Files
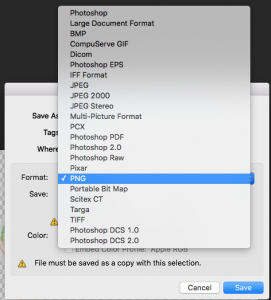
Exporting mp3s
Bonus Stuff – Trust your ears!
Resources:
Audacity Video Tutorials by Baynard
Audacity Tutorials in Lynda
Audacity Team Help http://www.audacityteam.org/help/
Audacity Tutorials http://wiki.audacityteam.org/wiki/Category:Tutorial
Download the LAME mp3 encoder from within that site
Google for help, lots of stuff on YouTube.
Open Source Sound – https://www.freesound.org/
Blog Post on 20 top free sources
Getting two USB headsets to work:
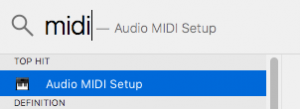
This is built-in functionality for Mac OSX. Plug in both headphones, then open Audio Midi setup from /Applications/Utilities.
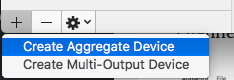
Click the plus in the lower left corner and choose “Create Multi-Output Device.”

Check the checkboxes beside both headphones in the new panel on the right.
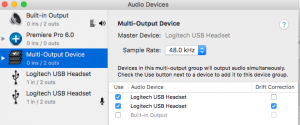
If you want to rename it, you can double click the new entry in the list on the left and give it a name like “Both headphones.”
Now you can choose the Multi-Output Device as the audio output in System Preferences → Sound. (You can also easily change the output by holding the Option key and clicking the volume menu.)
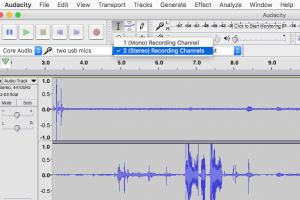
Setting up Two USB Headphones mics
A similar arrangement will work to create two usb inputs. Create an aggregate device for the usb headsets.
Check the appropriate boxes.
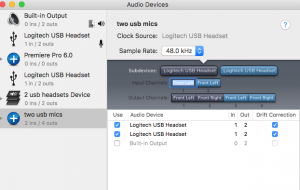
To record in Audacity onto two separate channels, choose stereo recording channel as your input: