week 2

Learned:

  1. to measure/ record an optical setup
  2. what to do when the setup does not actually function
  3. to clean optics
  4. to pick worms.

This week was the first real week in the lab where I could help instead of being lost.

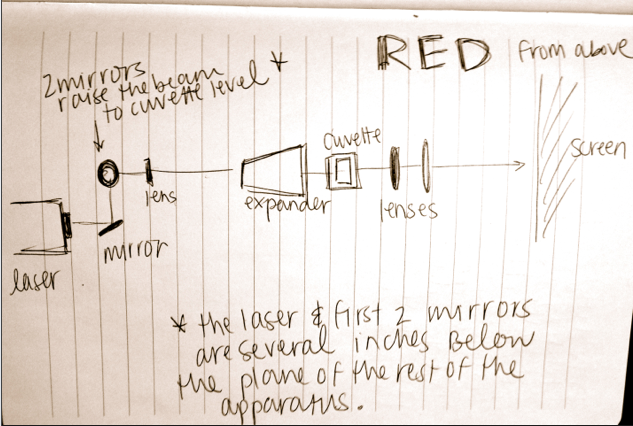
1) Measuring a setup: Hold a piece of string taught between your fingers. Making sure it is parallel to the table, hold one end directly above the center of the laser lens, and pinch the string directly above the first obstacle (pinhole, lens, etc). Mark the distance with a marker, and measure against a ruler. Record and repeat. Below is an image from my notebook, drawn on 2/13/14, of the Helium-Neon laser setup (from above).

Screen Shot 2014-02-15 at 10.16.06 PM

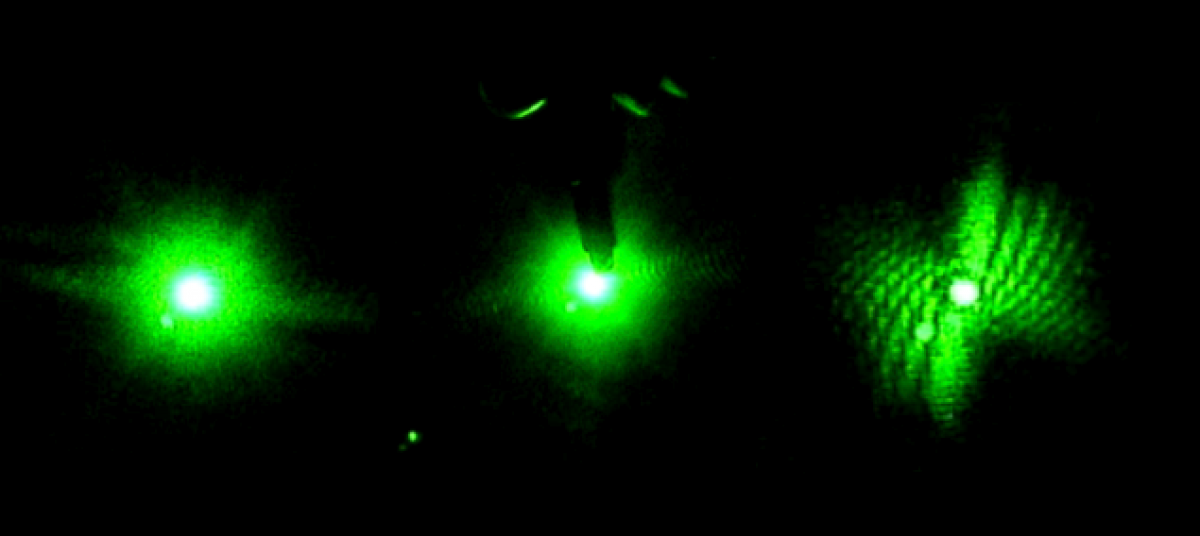
2) What to do when the setup is not aligned: The laser work table is sturdy and covered in a grid of holes, into which instruments can be secured. If the instruments are not in alignment, the laser will not reach through all of the lenses, etc, to reach the screen. To adjust, simply line up the instruments against one of the straight lines of drill holes. Most instruments will either be in a straight line or at right angles to each other.

3) Cleaning optics: Cleaning the mirrors and lenses is essential to get a clear image projected on the screen. To clean: place the mirror on a paper towel (that material does not really matter). Take a piece of lens paper, being careful to touch it as little as possible. Fold it, using the small forcep clamps, until a clean edge can be secured with the forceps. Wet the paper with a drop or two of methanol, and wipe slowly across the mirror, making sure not to touch the mirror with the same section of paper more than once.

4) Picking worms: First, retrieve a 4-day old (mature) dish of C.elegans worms, and a new dish with food (E.coli). Pick a Pick (a glass rod with a tiny wire of on the end). Using the dissecting microscope and a bunsen burner (to sanitize the pick between each contact), move four or five worms from the old plate to the new one. This is difficult at first because depth perception through a microscope takes practice and patience. Try not to kill any worms. Then wrap the dishes, mark them “VAOL” and the date, and place back in the refrigerator for four more days.


In conclusion: Some big strides were taken in the lab for me this week. I am looking forward for the data collection process, which is scheduled to begin on Monday (2/17).

Week 1

As the other new grunt of the VAOL, this first week was spent learning the ropes around the lab. I started out my week watching a laser safety video so I would be allowed to go into the actual lab where the lasers are kept and where all of the testing will take place.

Brian also showed me the worms (C. elegans) that we will be growing and did his best to explain the process of moving the worms onto a new petri dish with a fresh supply of food so that they can lay eggs and make more worms to work with. It takes 4-5 days for the worms to mature into adults, which is when testing occurs and the optimum time to move them onto a new dish.

Another good part of the week was spent assisting our professor with some tasks she needed to get done, including testing multiple pieces of data recording equipment. Spending time to make sure everything is getting done in the physics building is a necessary part of the research assistant position I am in.

Next week Brian and Tewa will teach me how to move worms into new dishes without hurting the worms or the gel that they are placed on. I am looking forward to it!

week 1

As one of the new grunts of VAOL, this first week has progressed appropriately awkwardly, full of disorientation and demonstrations. I think it is appropriate to keep this first post simple, and avoid technicalities.

As I’ve been introduced to the lab, several themes have been repeated to me:

  1.  Experiments usually fail several times before any actual progress is made. One step back before two steps can be made forward.
  2.  There is a lot of waiting involved. In order for science to be done, there is a lot of shuffling around and communicating to be done first, then purchasing of equipment/setting it up, then figuring out what experimental procedure will answer the proposed question, etc. In this case, working with C. elegans, an additional step is figuring out how to coordinate the work with a living creature, and how to best make due with the supplies at hand.
  3.  A good understanding of the equipment is essential. As an example, in the current Shadow Imaging experiment, a Helium-Neon laser is the most useful laser because the beam is safe (easy to work with), it is relatively affordable, has good beam quality (stays focused for an extended time), and it has an adjustable wavelength, and as a result, can efficiently produce any wavelength of visible light (unlike many other types of laser). In general, it is extremely important in experimental setup to do thorough research on what type of equipment would be best for the experiment long before the actual experiment can be conducted.
  4.  There are often simple solutions to complex problems. For example, also in the Shadow Imaging experiment, one problem that arises is: how to keep track of the beam’s magnification on the screen? Simple solution: set a clear ruler at the measuring distance between the laser and the screen , an mark on the screen the magnification. In a word, good experiments require some Cleverness.

What’s next? –> I will soon be learning how to grow worms! The almost-microscopic C. elegans has a reproductive life cycle of about 4 days, and to keep the population constant, they must be transferred from dish to dish to give them food and a fertile location to reproduce. Apparently, it takes practice to learn to do it without killing them…

Social Widgets powered by AB-WebLog.com.